Discover the Insider Secrets of Million-Dollar Crowdfunding Campaigns
Some clients pay us over $1,000,000 to run their
multi-million-dollar crowdfunding campaigns. For the first time ever, we’re pulling back the
curtains and showing you how we do it.
How to develop a product everybody wants
How to get 100,000 visitors to your page
How to increase sales by over 37%
What services to use... and which ones you shouldn’t waste time on
Email marketing remains the principal lead-generation channel for most marketers around the world. Beyond its whopping return of 4,400% on average, emails are a great way to approach your leads with a personalized and engaging message and cultivate meaningful relationships that extend far past just the transactions.
But to achieve it, there should be at least some interaction involved. Instead, what we see time and time again is marketers sending meticulously crafted emails with almost no responses back.
And think about it…
With our eyes skewed toward interactive social media content, how can lousy walls of text even spark interaction?
Besides learning how to design AMP-powered dynamic emails, how to set up a custom auto-reply in Gmail and how to use many other tools.
Check out these email marketing best practices to level up your marketing game. Hence, to adopt the best email marketing strategies, it is advisable to follow the best practices.
Any.do Extension
Sometimes it can be overwhelming to deal with many tasks and responsibilities.
It’s a cloud-based task management solution, which at first, compared to alternatives (for example, Todoist), can be intimidating — but I assure you it works extremely well.
It is very simple yet feature-rich.
The extension has a timeline where you can add, mark as done, or delete tasks and notes.
When you open the traditional Gmail inbox interface, some Any.do bonus sprinkles in, such as the Remind me button?
Set a reminder with the day and time, and the tool will notify you to follow up on that email or contact a specific person.
The mobile app is where the focus advantage is!
There is a focus button, which takes you to the Kanban timer.
You work on your task for minutes and then take a minute break. Then start again.
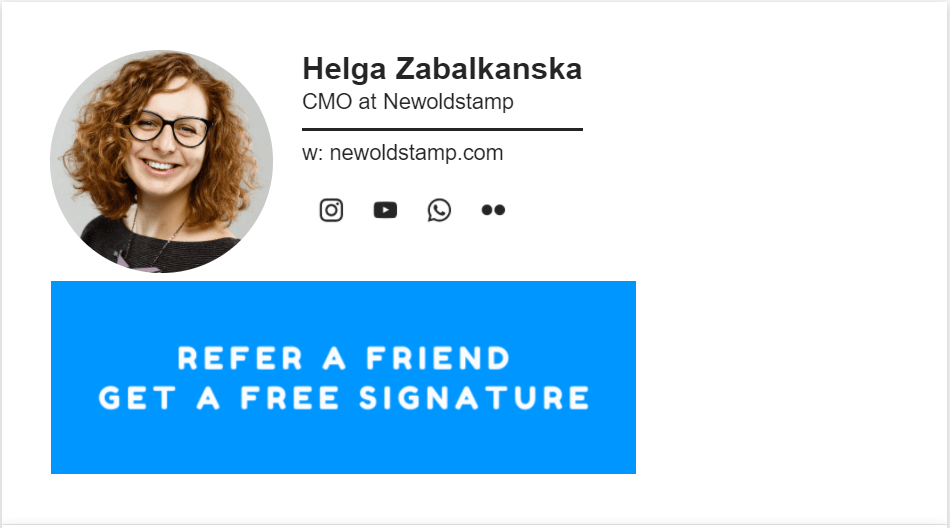
Newoldstamp
Newoldstamp is an email signature marketing platform that makes it possible to easily create branded sign-offs for all of your team members and turn your regular business emails into an additional marketing channel.
Newoldstamp allows adding clickable elements such as social icons, CTA buttons, and interactive banners to drive additional traffic, boost your brand visibility, and improve your email response rate.
Regarding automation, the email signature generator facilitates the management of multiple email signatures and helps to create automated banner campaigns. Customize your promotional banner from the central management dashboard once, and all your teammates’ email signatures will update automatically.
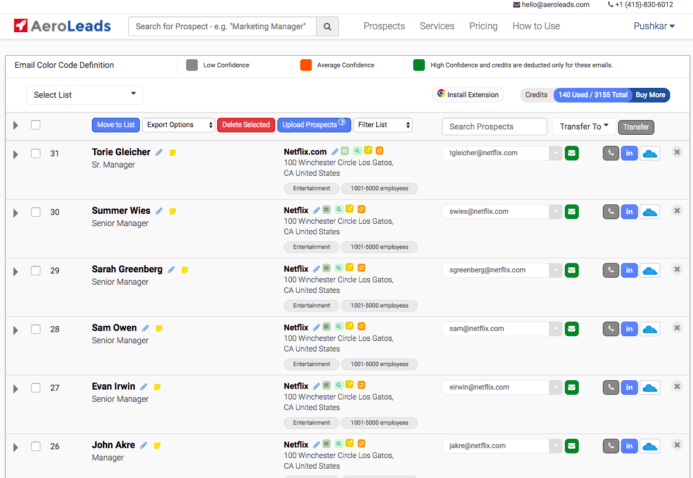
Aeroleads.com
One of the most sought-after email finder and verifier tools in the market. It does not just aid in getting emails but also super speeds the lead generation process by many folds. One can get verified email addresses of various companies’ decision-makers from their sites and LinkedIn.
The tool provides up to 15 different data points, such as address, contact number, full name, job title, email address, etc.
AeroLeads can be integrated with Mailchimp, Zapier, Zoho, and other email marketing tools for effective communication.
To begin with, even the Free Trial is available along with the Chrome Extension for new users.
Mailgun.com
Mailgun.com is a powerful email automation tool trusted by 10k web and application developers to conduct thorough email campaign analysis and send, receive, and track emails effortlessly.
The power of Mailgun comes in its wide array of use cases.
With its powerful email API, PHP, Ruby, Python, C#, and Java, developers can spend more time building awesome webs rather than fighting email servers.
It provides you with a way to send an email when the server you are on does not support SMTP or where outbound SMTP is restricted since the plug-in uses the Mailgun HTTP API for sending email by default.
Meaning it is integrated with a local postfix service and sends email through an SMTP server while integrated programmatically with your existing cloud application.
Mailgun, when properly configured, can deliver emails from a blogging software content management system (CMS) such as WordPress, integrate with bug tracking software, or any open-source software needed to send emails. Mailgun can also be used to handle incoming emails.
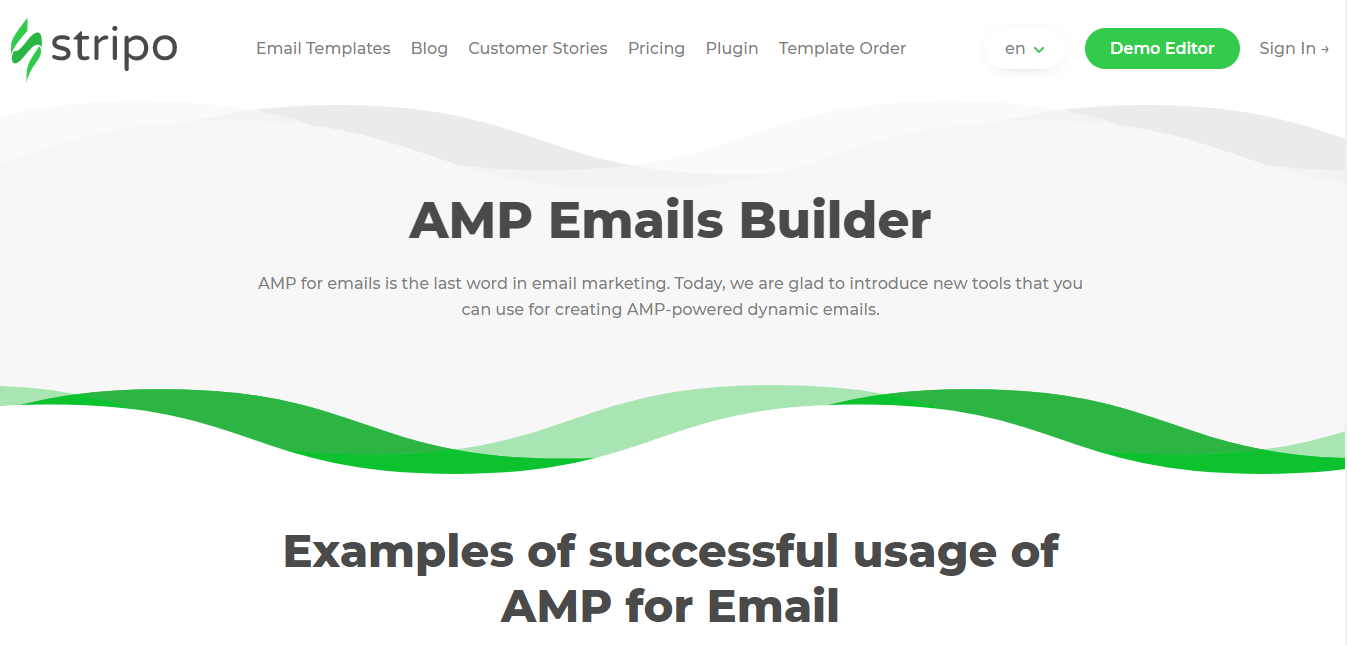
AMP-Powered Emails About To Shake Up Email Marketing
So far, email has been primarily static. People couldn’t do much other than read, watch, and click through. But AMP for email now opens up so much space for dynamic and personalized content to enrich your customers’ email experiences.
Google introduced AMP (Accelerated Mobile Pages) back in 2015 to cut the load time on mobile and deliver lightning-fast pages to all its users. Ever since, AMP has been picking up steam at an incredible speed.
Recently, a series of diverse elements was unfolded to enliven the monotonous email overlay with some eye-popping and interactive features. One is the AMP-form element, allowing you to embed forms that can be completed right from within the email. Another is the amp-accordion element which facilitates the showing or hiding of different sections in the email. And there are dozens more!
Pinterest, Booking.com, and Doodle have been among the early adopters of AMP-powered emails. In the words of Antony Melone, the Senior Product Owner of Direct Marketing at Booking.com: “It’s the biggest thing happening to email since the creation of email.”
And it really seems like one.
But tapping into AMP’s game-changing potential can be challenging.
One obstacle you’d likely encounter is the non-versatility – not every email client supports AMP yet. But most of the popular ones, including Outlook, Mailbird, and Gmail (no surprise!), already do.
To create the most dynamic AMP-powered emails with little effort, you can use Stripo.email. This AMP email builder is home to some stunningly-designed email templates with all the diverse AMP formats and integrations with multiple email marketing platforms.
Now is the time. Jump onto the wave of this disruptive email marketing funnel trend before it becomes the new norm.
Turn Trade Show Participants Into Partners With Phantom Buster
We usually walk out so inspired by the boldest innovations at trade shows that the only idea buzzing in our mind is to build partnerships with the most promising creators – in no time.
But then we watch that “no time” swiftly grow into days, then weeks – all because of the infuriating manual routine it takes to scrape participants’ contacts from exhibitors’ lists.
And it would have still been the case should this handy automation from Phantom Buster hadn’t found its way to my inbox.
This time they developed a new set of automations to scrape the email addresses, phone numbers, and other contact data of all the companies listed in the trade show’s directories.
The challenge is that this information can be displayed in a number of ways – sometimes simple and often convoluted. And each respective arrangement will determine the set of automations you need to use to access the data. Let’s look into the 3 most likely cases.
Case 1: The directory displays an index of all exhibitors on one single page.
This is the ideal scenario where we have the list of all the exhibitors gathered on a single page. Upon a mere click on the company name, you’ll see a full page displaying the phone and email of each company.
Strategy:
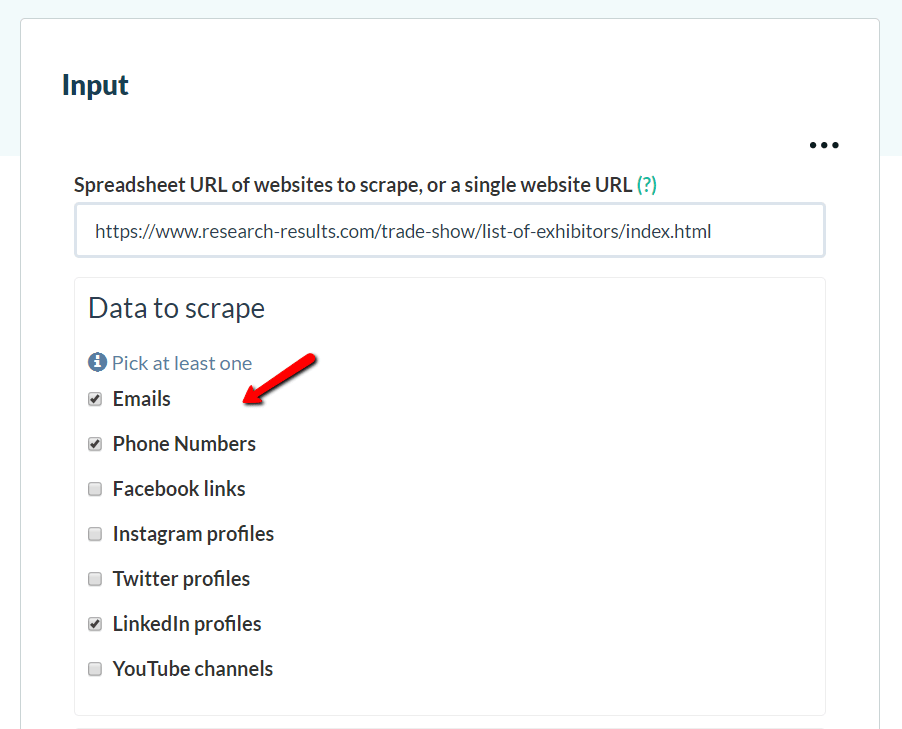
Open a Data Scraping Crawler on the index page (on the left side) to extract every link there.
Choose the data you want to scrape (i.e., Emails, Phone numbers, LinkedIn profiles).
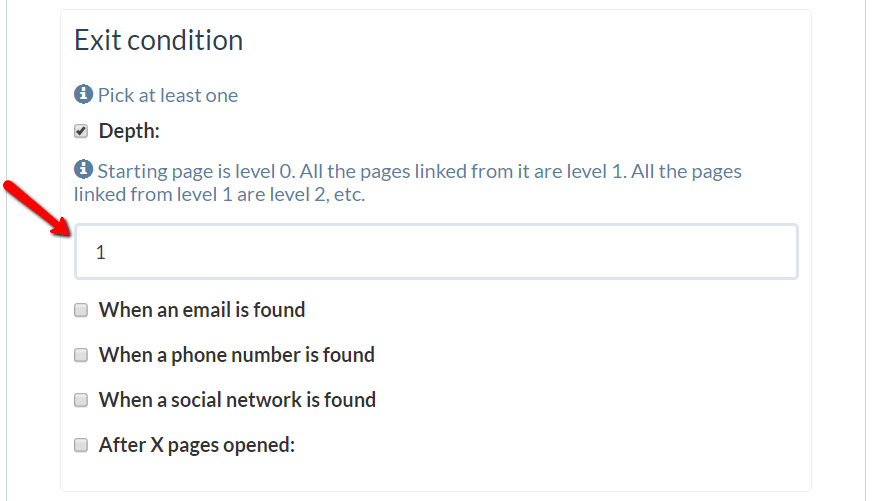
3. Set the depth to “1” so that it visits all the pages and elicits the requested info. Phantombuster denotes the starting page as level 0. All the pages linked from it are level 1. All the pages linked from level 1 are level 2, etc.
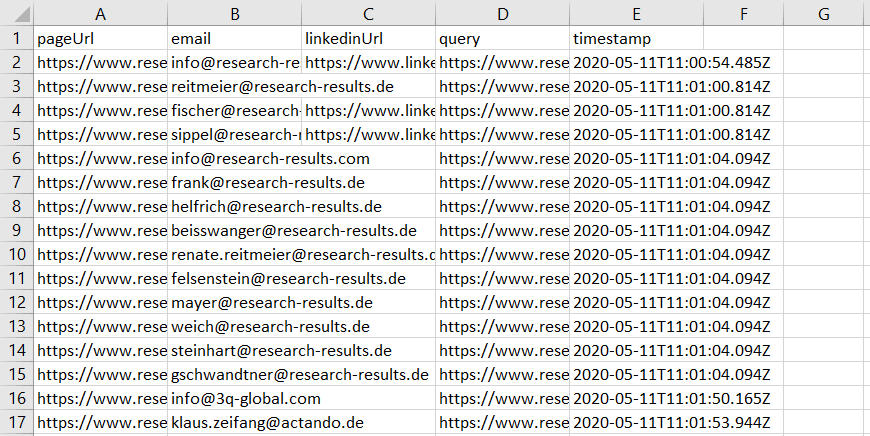
In just a matter of seconds, it will migrate all the extracted data and neatly lay it out in a spreadsheet with a timestamp next to each result.
Case 2: The trade show website displays all results over multiple pages
Lots of exhibitions have 1000s of participants. And the common way to show this large volume of results is to divide them up over multiple pages.
Strategy: Forge URLs, precisely dubbed the scary-but-for-real-it’s-not-that-scary mechanism by Phantom Buster itself.
Copy the URL of one page. It can be by page:exhibition.com/exhibitors/page-1 or any variation of this.
Paste that URL in a Google Spreadsheet.
And generate all the pages’ URLs just as follows.
Easy as 1, 2, 3!
Case 3: The results are displayed on a page with an infinite scroll
In this case, as you’ve guessed, you can hardly see more than just a few results before you must scroll down again. And again. And more.
Strategy:
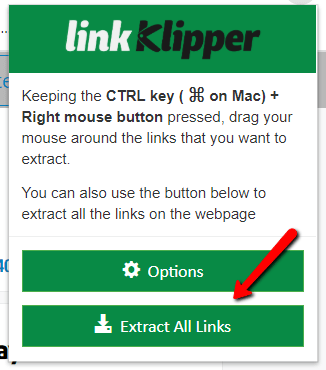
In this case, we’ll first scroll down to the bottom of the page to capture all the links on the page. This might take a while, but keep in mind you have to do it just once.
We’ll then use the Link Klipper browser extension, which will extract all the links to a spreadsheet.
You’ll then need to clean the spreadsheet and give it as input to the Data Scraping Crawler, following the remainder of the steps described in Case.
There are a few more cases and strategies to hack around them, detailed in Phantom Buster’s blog post. But these 3 are the most likely cases you’ll encounter in your search.
Use these seamless automation sequences and build ties with trade show participants in no time.
This time in all seriousness.
Respona.com
Respona is an all-in-one link-building and blogger outreach platform. Since outreach is an important part of any marketing strategy, it is important to streamline the process.
The platform centralizes the entire outreach process from start to finish. Find opportunities, create automated email sequences, find contact information, and personalize campaigns all under one roof.
Combining all the process steps into one platform, Respona replaces the need to have multiple paid tools when you just need one. With an automated content scraper and database of over 400 million contacts, endless opportunities are waiting to be found!
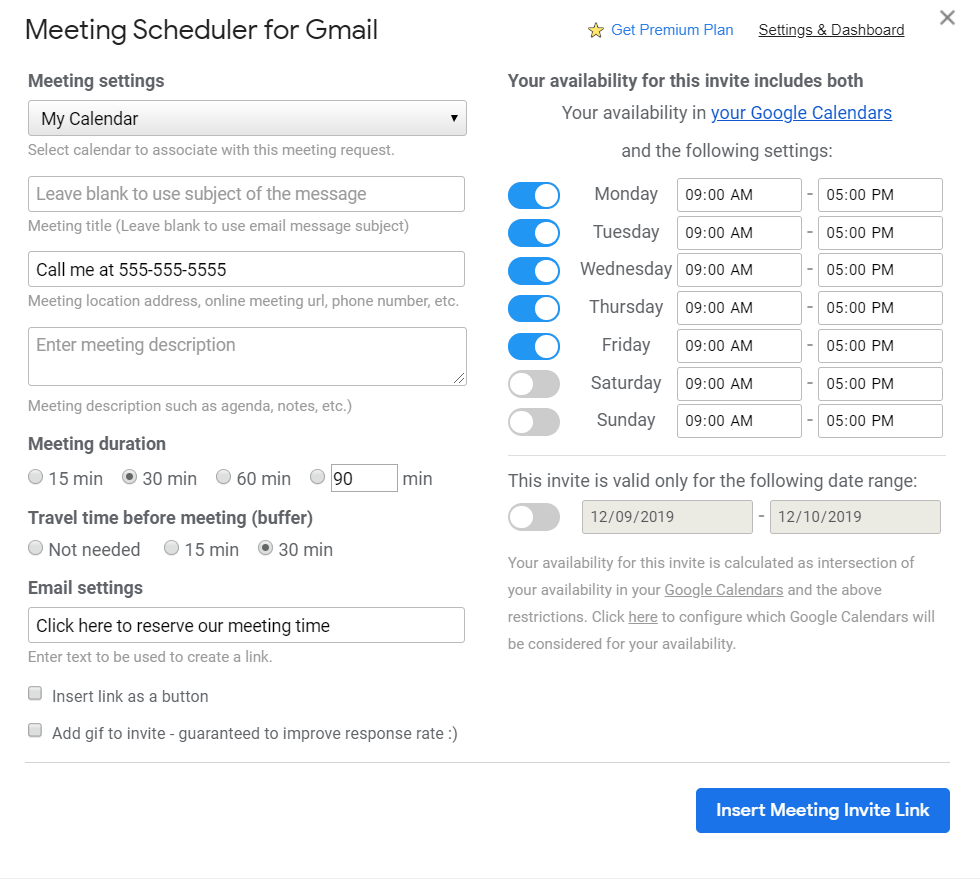
Cloud HQ’s Meeting Scheduler
Scheduling calls with clients, partners, and potential leads is imperative for any sales and partnership specialist.
Of course, the all-around Calendly and its handy extension come to the rescue more often than not, but recently I’ve caught myself needing something… more.
More personalization, more fun, more warmth, more user-friendliness.
That’s where Cloud HQ’s new Meeting Scheduler for Gmail came into the game. The extension takes seconds literally to install and get running. After downloading it from the Chrome web store, you don’t need to go anywhere other than your inbox.
The extension automatically connects with your Google calendar, so all you have to do from then on is click the tiny calendar button when you compose a new message.
A mini window will pop up showing you a range of dates and times to fill out according to your schedule, where you can also integrate a different calendar. This will also automatically create a Google Hangouts link, or you can add your Zoom or Skype in the description box below.
Whatever suits your fancy.
Many other tools are capable of doing the same, you may say. So why go with this one over the rest?
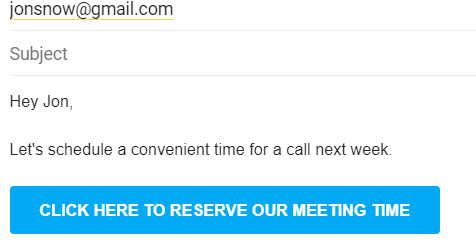
Because the meeting scheduler lets you insert the meeting invitation link as a button in your email text. Don’t tell me you’re not tempted to click any button you see in your messages. It’s way more than a simple hyperlink!
You can also add a personalized CTA if you feel like it.
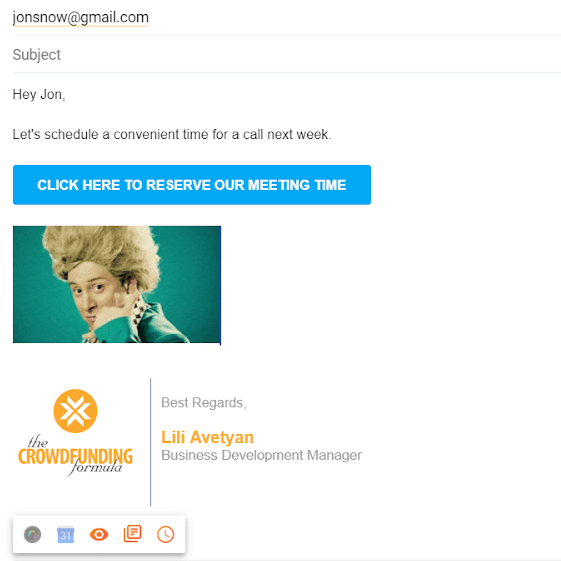
And to add sauce to the mix lets you throw in a funny, nice thematic gif, which may even crack a smile in your recipient before they push the button.
There are only a few seconds between installing the tool and starting to use it, but those few seconds have been game-changing in organizing my workflow.
Woodpecker.co – Cold emailing & automation
Woodpecker.co is a cold email and outreach tool which allows follow-up automation the best there is.
You can use this tool to schedule both pitches and follow-ups with the optimal follow-up email frequency.
Once there is a reply from the recipient, the follow-ups are automatically stopped.
The features are the followings:
Reply detection: the tool also detects replies from different address, forwards, and autoresponders.
Cold e-mail personalization allows contact with an unlimited number of subscribers with a customized cold email
Open and clicks tracking feature shows who and when opened the email
Teamwork security, due to the shared database, prevents both you and your team from sending the same email to the very same subscriber
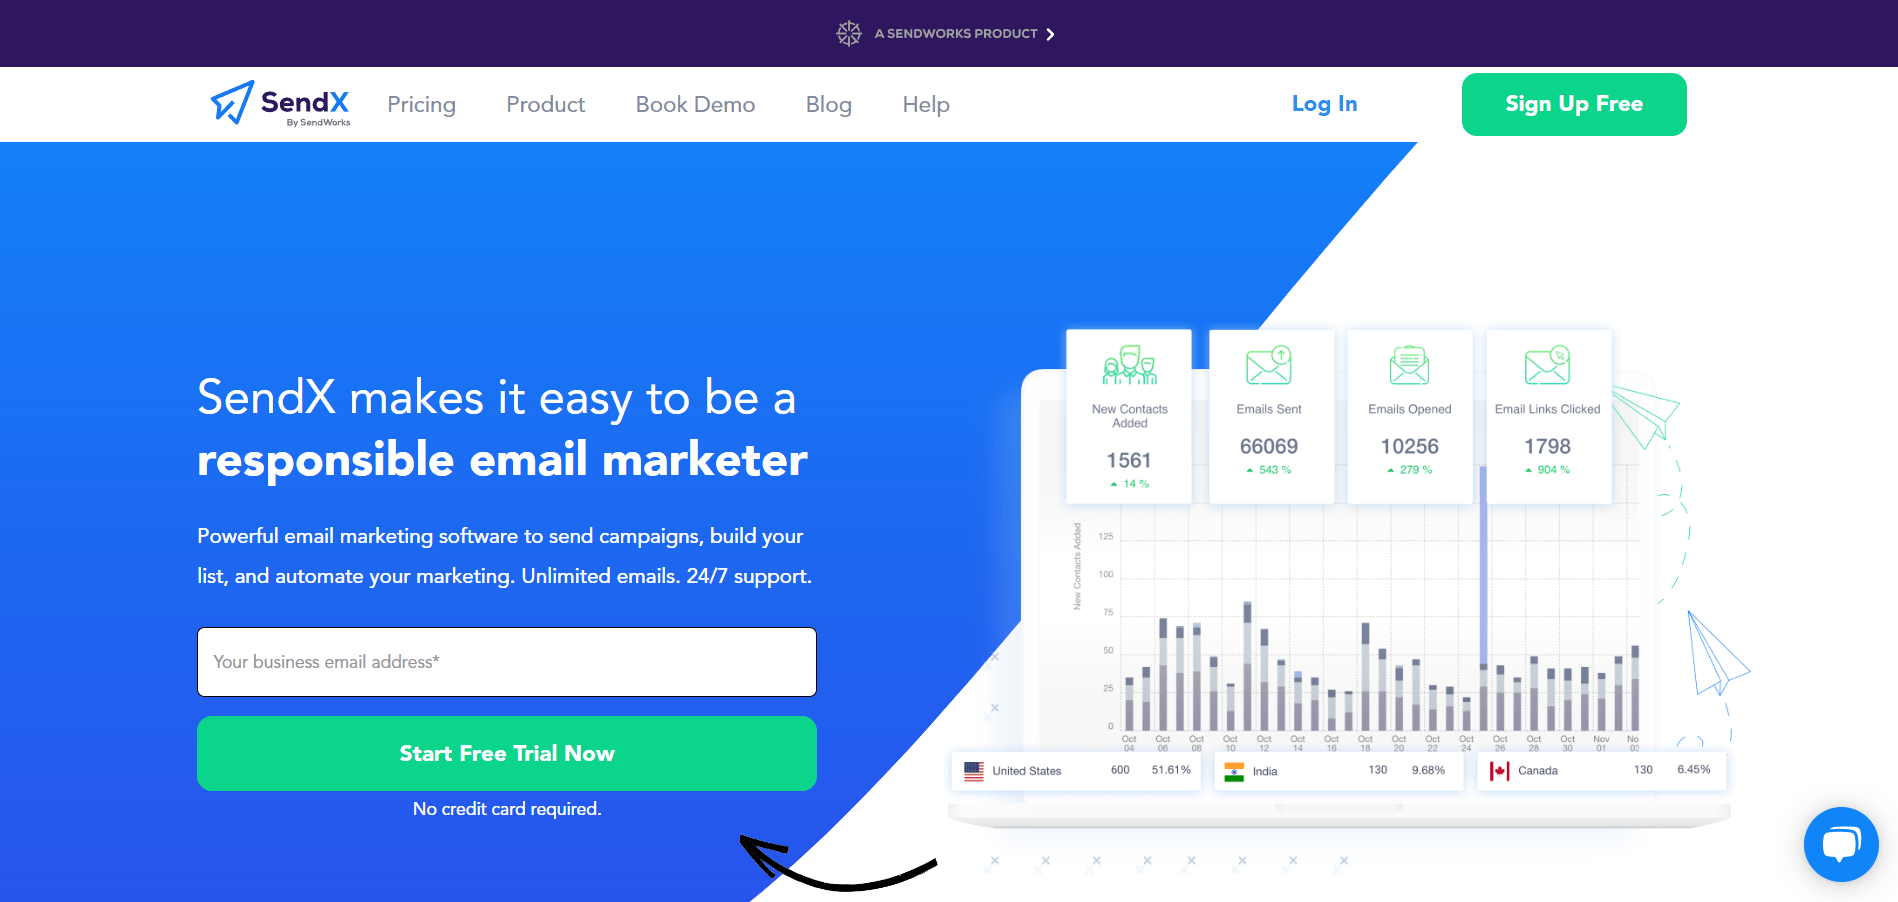
SendX
SendX prides itself on enabling marketers with one of the simplest UIs in the industry. SendX provides unlimited email sends with every plan, powerful automation capabilities, and best-of-breed email deliverability.3000+ companies worldwide trust SendX for their Email Marketing.
You can send unlimited emails using SendX per day. Unlike a few other ESPs, SendX does not restrict the emails you can send per day in any way.
The WYSIWYG email editor in SendX is a simple draft & drop email editor, and you do not need any HTML coding skills to use it.
You can use our JS API to add contacts and trigger emails or initiate drip sequences to them. JS API can also add tags based on user actions and update custom fields. The API has only two functions and is super easy to get up and running. You can use SendX’s JS API to add or edit contacts. We also have an API playground where you can play with our REST API endpoints in SendX.
In SendX, you can use the Track API Method to track a contact. You can add or remove tags from a contact using this API. At SendX, a dedicated IP ensures you are not sharing the email delivery infrastructure with anyone else. A dedicated IP works best if you send over 200k emails monthly.
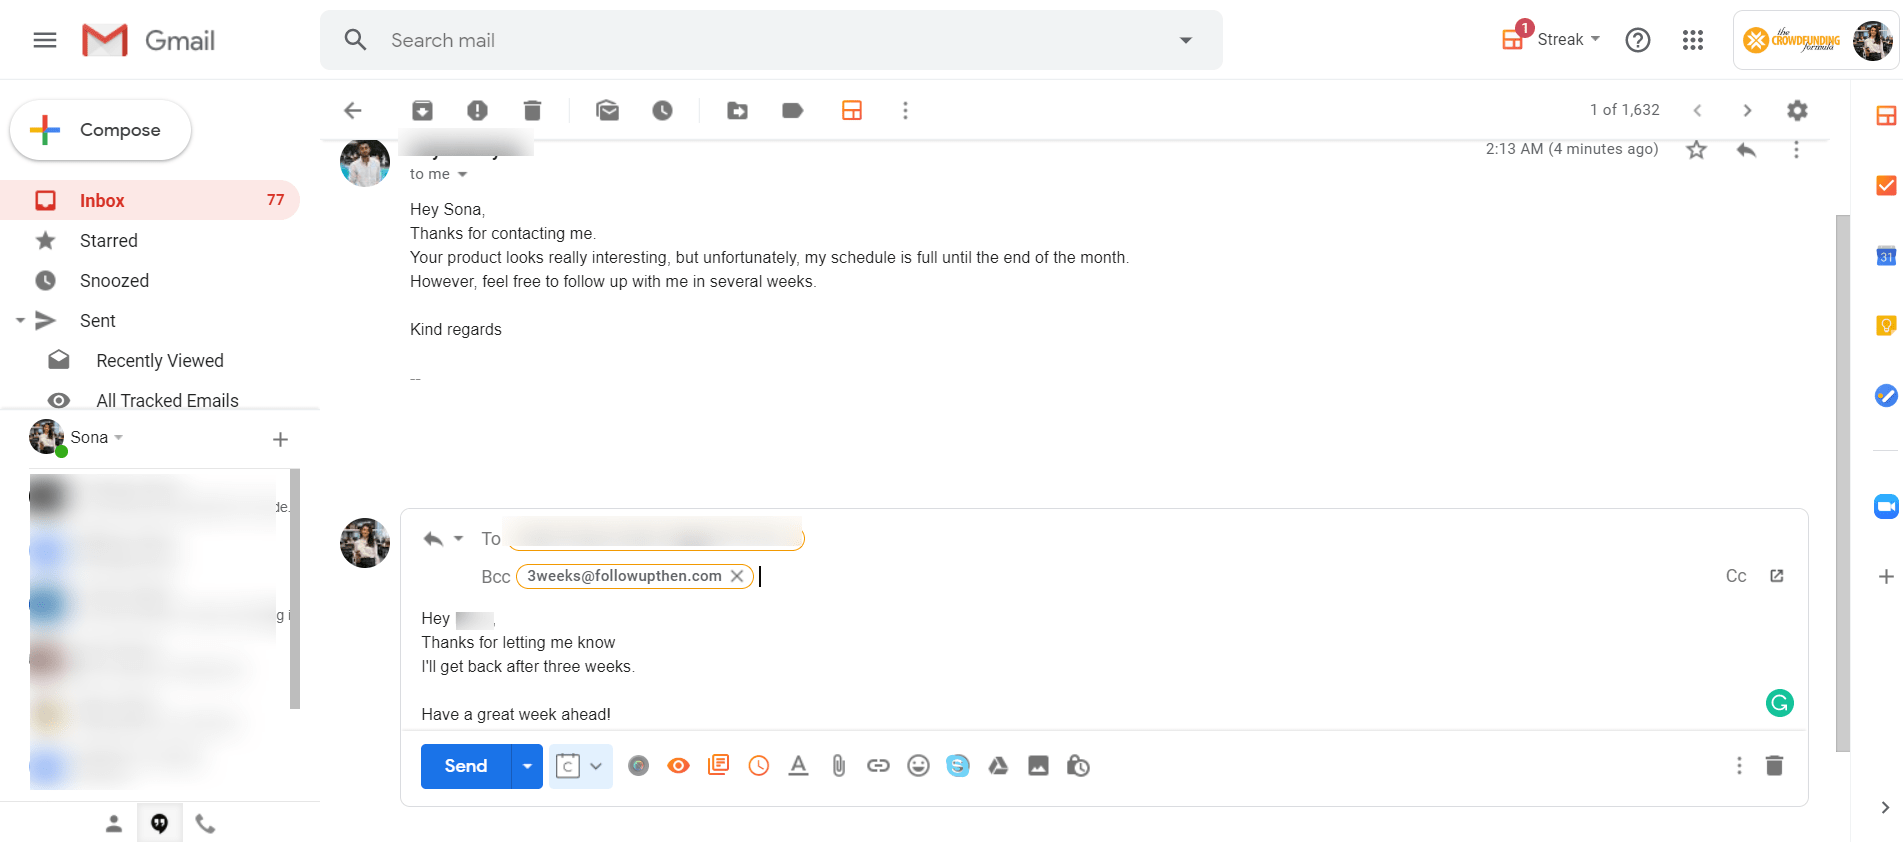
Followupthen: A Simple Way to Remember Important Follow-Ups
I am confident that almost everyone in digital marketing is familiar with this situation. When a partner, journalist, or influencer asks to follow up with them after a certain period because of being busy, overloaded, or overscheduled.
But you end up forgetting.
Followupthen is a simple yet genius tool to remind you of important follow-ups. And the magic thing is that you put a reminder right from your reply window.
Once the time mentioned in your email has elapsed, you’ll receive a reply email from Followupthen saying it’s time to follow up with the person in the email.
Wait, but you don’t have to remember all these emails.
There’s a little trick you can do to have about 20 drafts in your email contacts. Send a test message to [email protected], and you’ll get a reply with about 20 emails in CC. Click “Reply all,” and as you send the next test reply, all the emails will automatically appear in your contact list.
It may sound like a lot of steps. But it ensures timely follow-ups and precious partnerships with 0 stress.
Saleshandy
SalesHandy is an engagement platform for sales that allows sales teams to seamlessly expand their outreach activities via email. Campaigns hosted on SalesHandy are the simplest method to schedule and send thousands (or hundreds or thousands) of automated, multi-stage follow-up emails to prospects simultaneously. You can personalize your email campaigns by using merge tags and sending automated follow-ups according to your leads’ engagement (opens and clicks) in the previous email. You can also schedule these emails to be sent out according to the recipient’s time zone to ensure that your emails do not get lost within their email inbox. With add-ons such as verification of email and real-time alerts for clicks and opens, and custom tracking links, it’s the most reliable system for sending mass sales emails. Two-key template shortcuts and team-wide template sharing and analytics help increase productivity and monitor the results.
Change The Subject Line of Your Follow-up Email To Bolster Response Rate
“Every day I’m hustlin’” may sound cliche to many, but it captures the nature of any partnership efforts.
The truth is not everyone—indeed very few—is going to reply to your email. More often than not, it will take you the third, the fourth, and sometimes even the fifth follow-up before you hear back from your prospects—which in many cases is a disappointing no.
But you can’t just leave the success of your outreach campaign to chance. What you can do instead is to understand how your prospects react to your emails, analyze the reasons behind and make changes to harness better results.
Every time I send a partnership offer via email, I always track it to see what fraction of my prospects opened my email.
If the number is small, it can usually be explained by two reasons—either the email landed in their Spam folders or your prospects weren’t appealed to open your email. Once you make sure all the spam-triggering words or elements (i.e., excessive hyperlinks and images) are eliminated, it’s time to think about how to pique your prospect’s interest and boost your likelihood of getting a reply.
How about you change the subject of your follow-up?
This way, your email will come as unfamiliar to your prospects, and if your new subject line, indeed, sounds more compelling, inspire them to click Open.
Since Gmail doesn’t have a native feature to edit the subject in reply messages, the extension Rename Email Subject by CloudHQ comes in handy.
Besides allowing you to edit the subject lines of the emails you send out, you can also change the subject lines of the emails you receive—a handy feature to include a note or a reminder to organize your inbox.
Test this new subject line tactic and see how it goes. If you see a spike in the open rate with almost no responses back, maybe consider revisiting the content of your email to make sure it resonates with your prospects and offers them value.
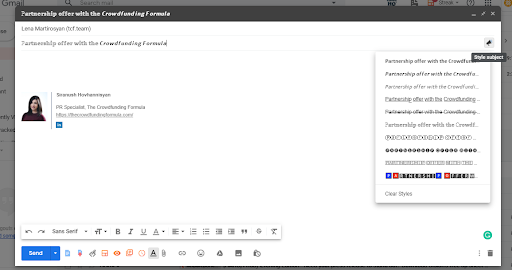
Improve Your Email Subjects with this Formatted Subject Lines Extension
Are you looking for a way to make your emails stand out in someone’s inbox and bolster your response rate?
Much like its name entails, formatted Subject Lines by Cloud HQ lets you repackage your monotonous subject lines into an appealing style that catches the eye.
Once installed, you’ll see this magic paintbrush icon on the subject bar’s right-hand side.
With a mere tap, the paintbrush rolls out a list of different styles to make your subject lines an artsy feat that will permeate people’s minds and engage them to open them.
Bold, bold italics, underline, strikethrough… the choice is yours!
Want to get more creative? The interchange between different styles in one subject line. Just highlight any part of your subject line and format only that part. Then do it for other parts you’d like to change. Here is what your end result may look like.
With this little eye-popping tactic in action, you can be sure your emails won’t be gone unnoticed.
Now sit back and let the wave of responses come in.
Write A Compelling Preview Text to Boost Open Rates
Email communication is an important part of our everyday job.
As a recipient, I sometimes wish I could know more of what’s awaiting me in that email other than the subject line. And as a sender, I wish I could catch the attention of my recipient with something more meaningful.
In almost every email inbox (be it Gmail, Yahoo, or others), you always have the sender’s name, the subject line, and the preheader text that comes in a light grey-ish color right after the subject line.
The preheader text is automatically generated from the opening lines of your email, which is, according to the email etiquette, most likely a boring introduction, i.e. “Hey [sender’s name], I’m [recipient’s name] from the Crowdfunding Formula.
To me, it’s a space used wrong.
The recipients already see your name as the sender. And they’ll see your introduction, too, if you get them to open your email. So there is no point in wasting that precious preheader text space on a lousy email opening. Spend it on ensuring they actually open it.
But in Gmail, there is no option to select a compelling snippet of your email to go as your preheader text. So you may think you can’t really change it. What you can do, however, is write your desired text at the beginning of your email and hide it. Here’s how.
Step 1.
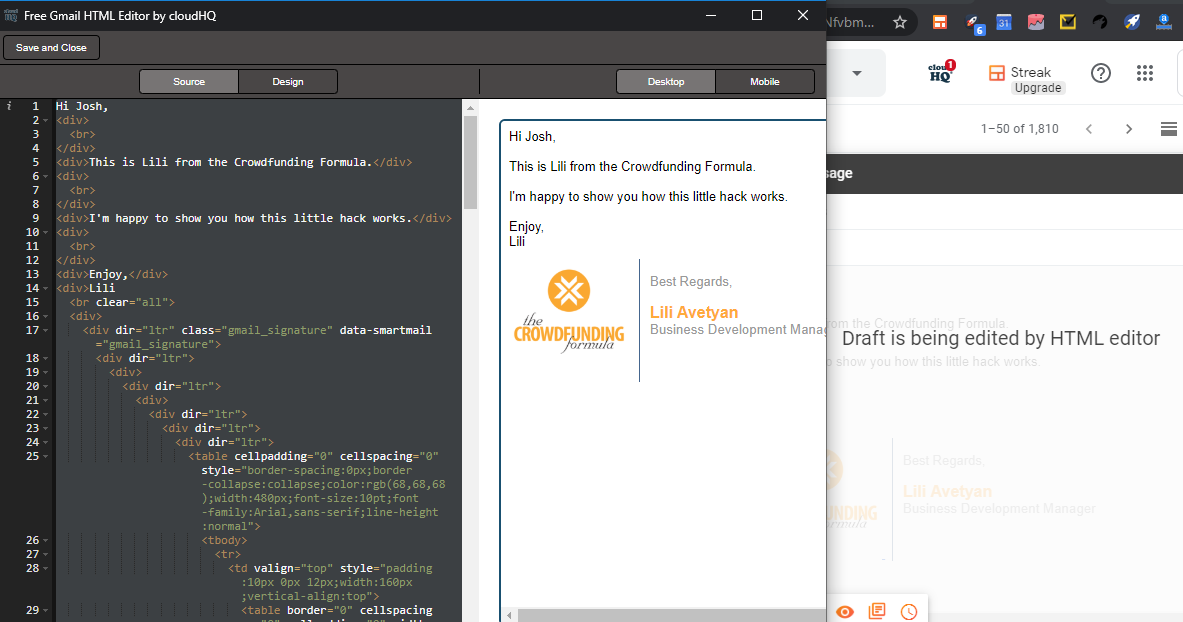
First, you’ll need to install this HTML editor for the Gmail Chrome extension. It takes literally under 1 minute to get it running.
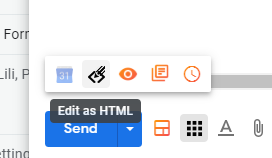
Step 2.
Hit the “Compose” button and start writing your email as you would normally do. After you’re done, click the “Edit as HTML” icon, and a window will pop up displaying your email’s HTML code.
Don’t worry if it looks complicated. You don’t need to be a programmer to get this working!
Step 3.
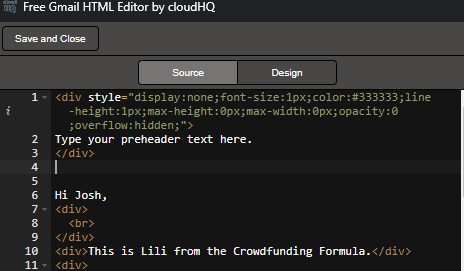
In the HTML editor, go to the first line and copy and paste this piece of code below before your first line.
Change the placeholder “Type your preferred preheader text here.” for your own text.
This code will hide your text from the main body of your email but still keep it there for Gmail to generate it as your preheader.
Step 4.
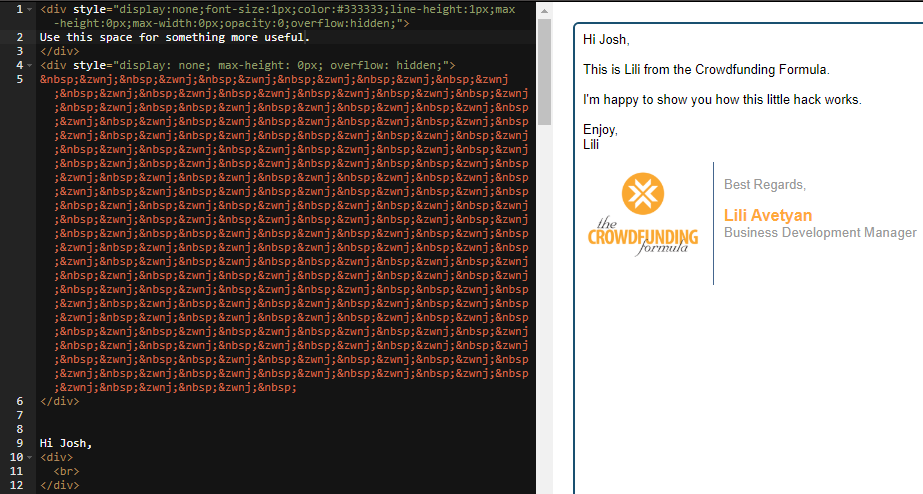
The preheader character count can vary based on the mail inbox, device, etc. But on the off chance your secret preheader is shorter than 90 characters, you’ll need to add something else to this mix.
We’ll add some invisible characters to prevent your actual email body from sneaking into the preheader space after your hidden one.
Copy and paste this code into the HTML editor after the hidden preheader and before your actual email body.
Now that you have everything set, just hit the “save and close” button on the HTML editor and send your email as if you hadn’t just used this genius hack.
Here’s how it will appear in the recipient’s inbox.
Think of the preheader text as a chance to improve your open rate. Use it as a second subject line, a CTA, or include eye-catching information that will speak to your recipient’s needs.
Share Mail with Streak’s New Feature
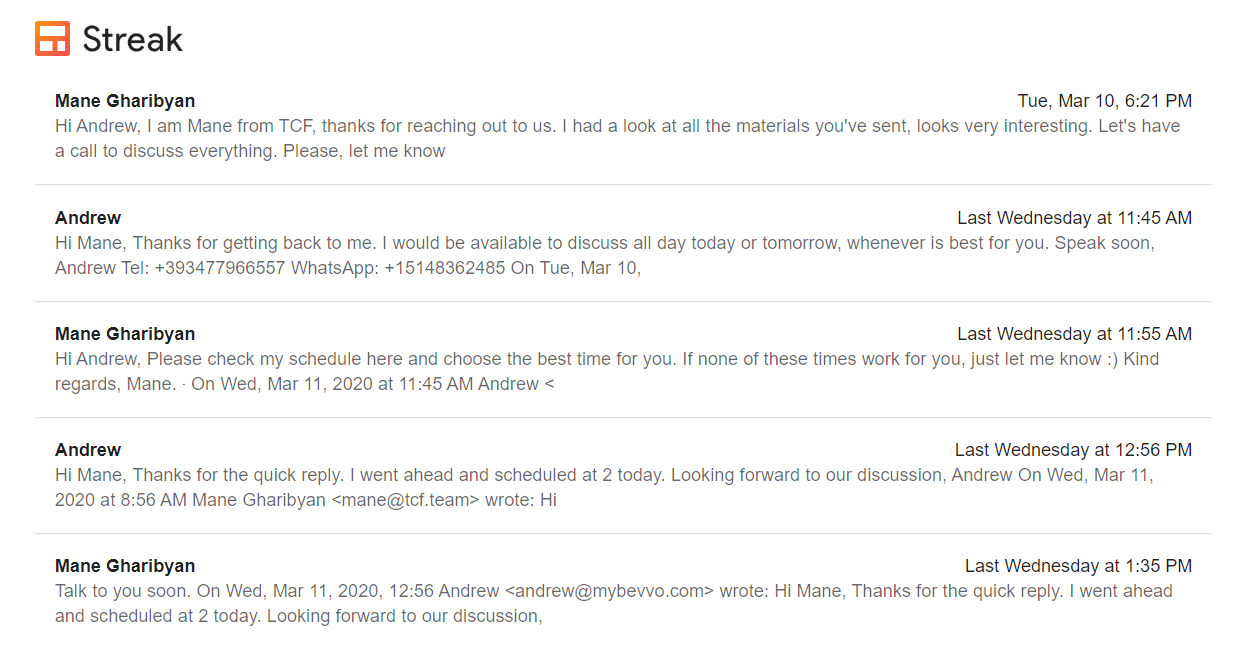
With email acting as everybody’s main communication platform, you know the struggle of taking screenshots and sending them to your teammates to keep them in the loop. Or worse, forwarding the email makes your thread look like a total mess.
Chances are you use the Chrome extension Streak to bulk email and track your results.
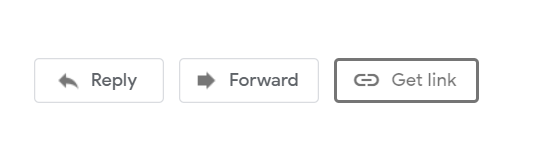
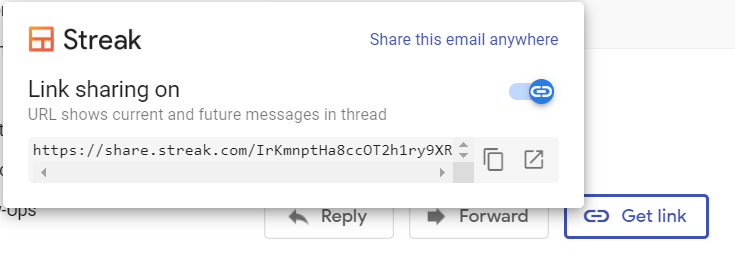
It has recently rolled out a new feature called Streak Share, which makes keeping your teammates in the loop a simple 2-step process. Once you open the email you want to show your teammate, next to the Reply and Forward buttons, you’ll see the Get Link button.
When you click on it, Streak generates a link that you can use to send the email conversation to whoever you want.
What I absolutely love about this feature is that it updates the email thread in real-time, so you don’t have to generate a new link every time you get a new email.
And if you want to stop sharing, go back to the email, tap on the Get Link button and turn off the sharing feature. Simple as that.
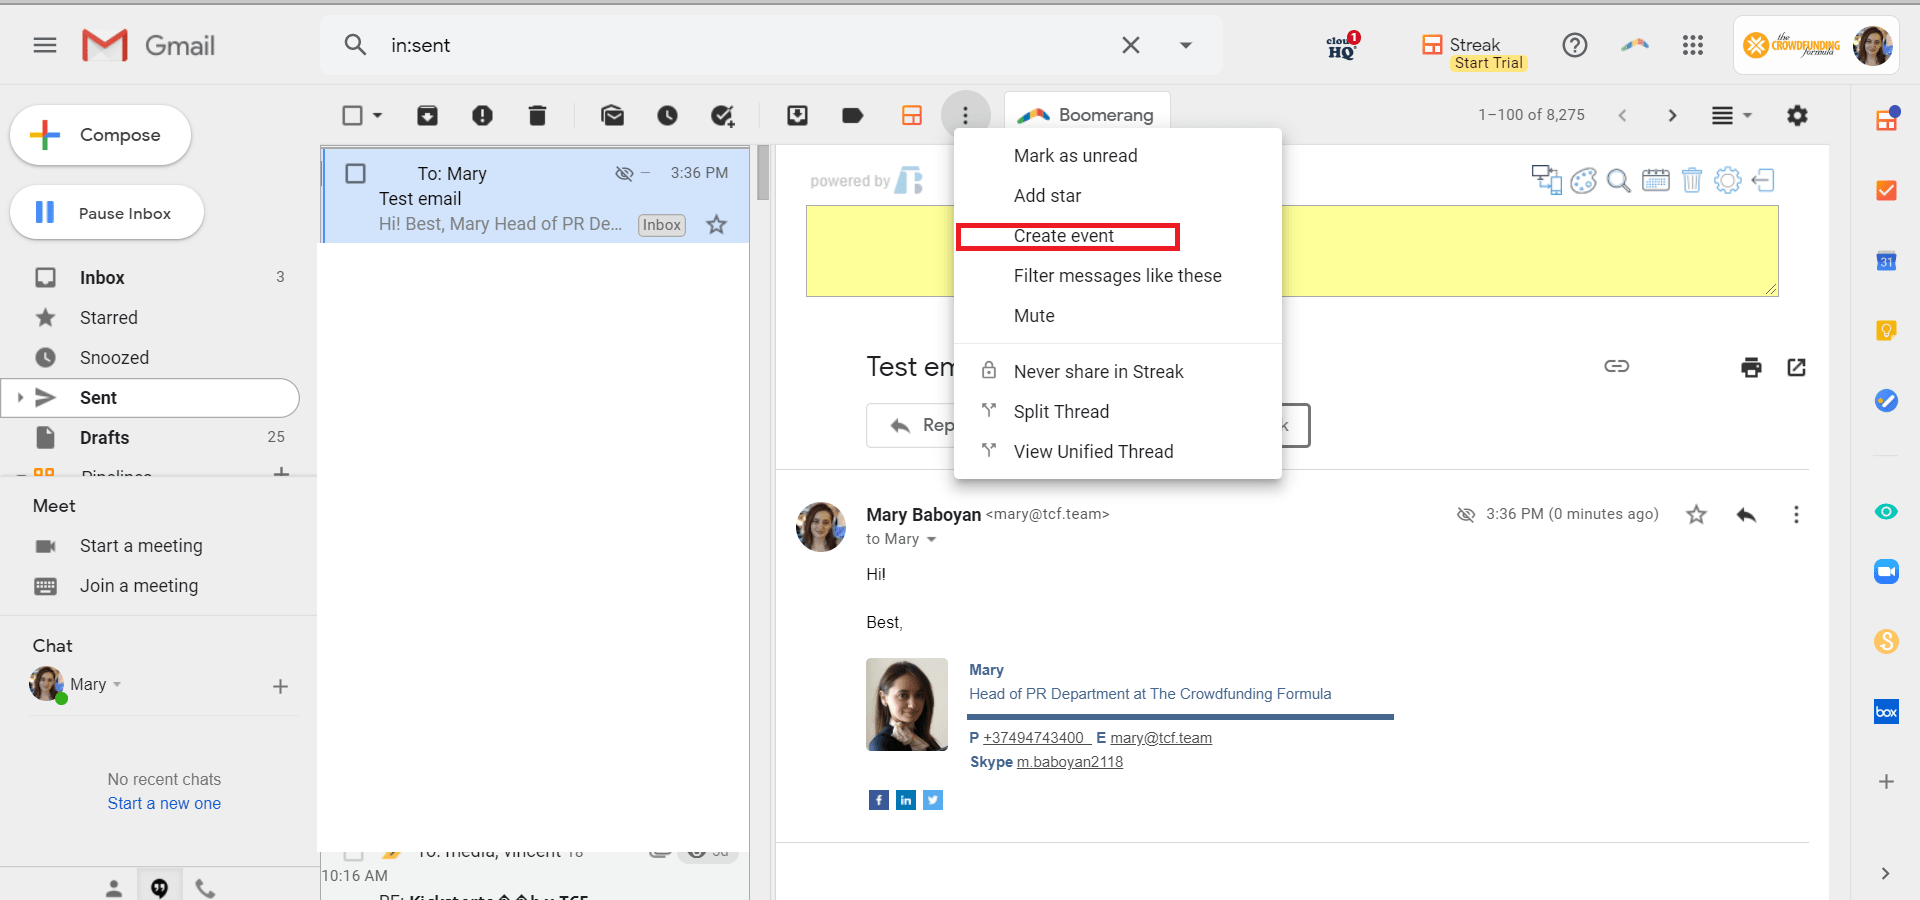
Create A Meeting Invite Right From Within Your Gmail
When setting up a call with journalists or organizing an event, Google Calendar always comes in handy. Not only does it help you stay afloat with your scheduled meetings, but it also serves as a timely reminder for your interlocutors. And trust me, they do appreciate it!
Navigating through the seamless steps on Google Calendar has probably long been a no-brainer for you. But I suspect you knew about this smart little hack to immediately cut to the chase.
Open an important email you need to arrange a call and head to the three-dots menu in the top overlay. From the drop-down menu, choose “Create event.”
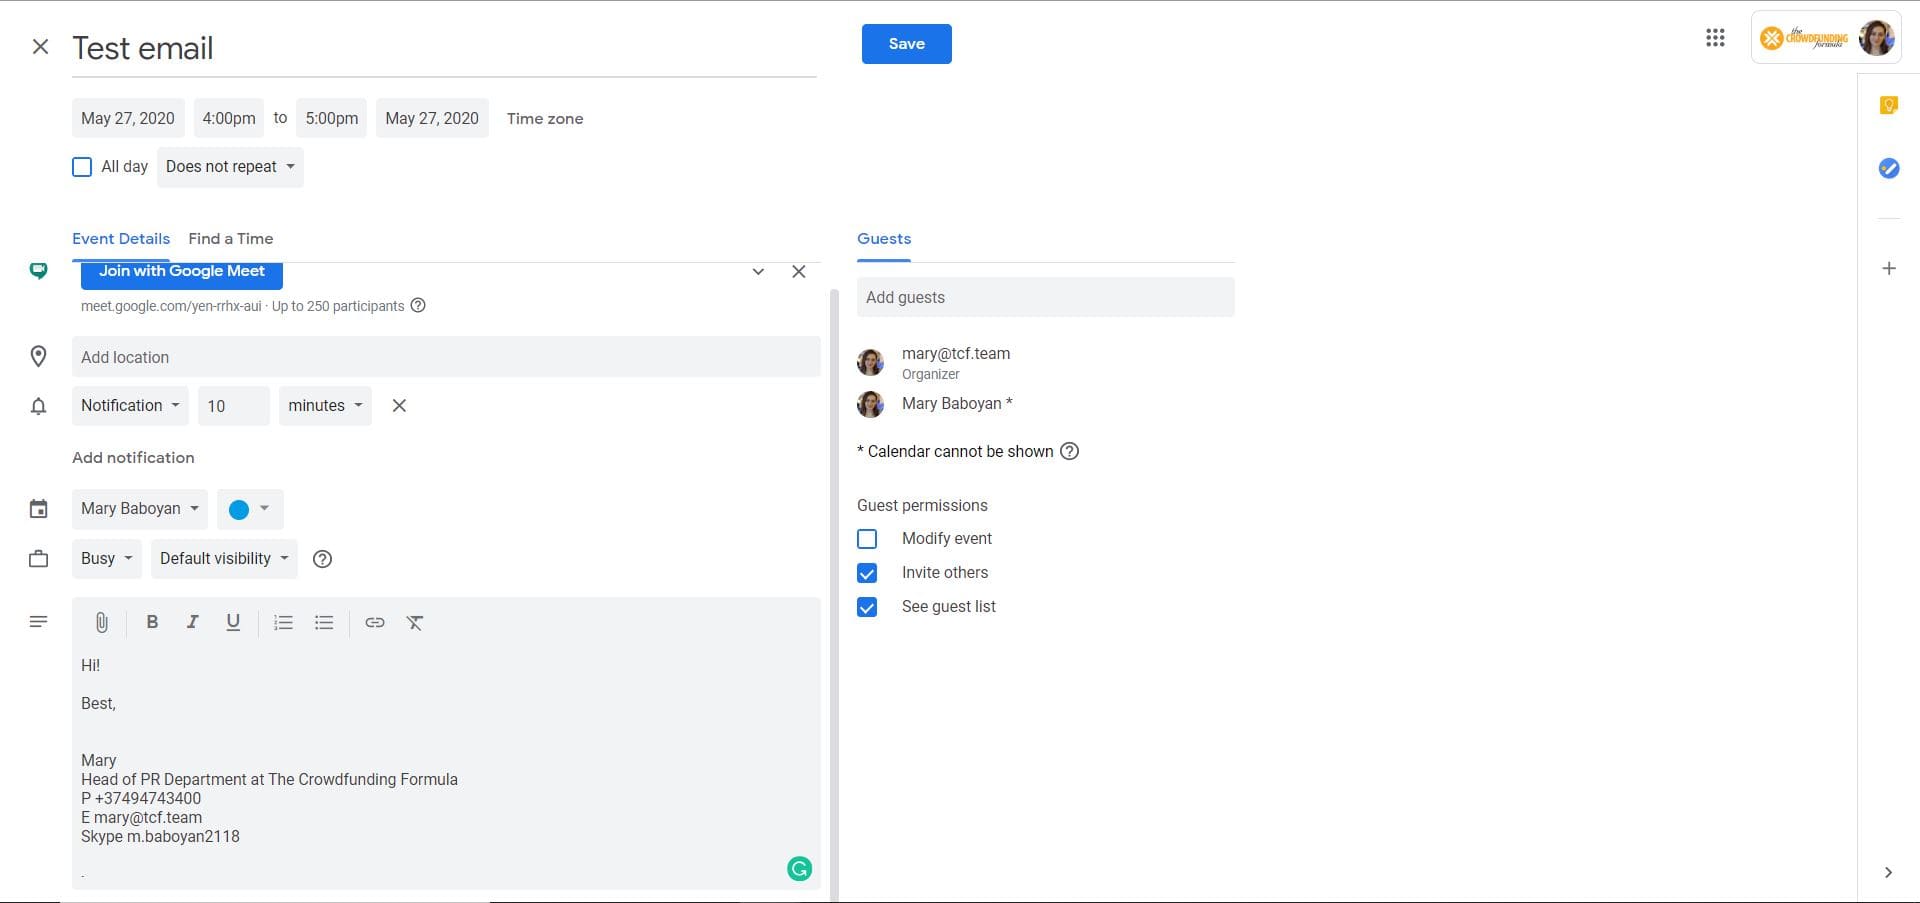
This will redirect you to your Google Calendar, and the automation will take care of nearly everything for you!
The subject of your email thread has been set as your Meeting topic, and everyone involved in the correspondence has been invited by default. Needless to say, you are still free to tweak any of these.
One of the coolest things about this setup is that the last email in the thread will also be embedded in the invitation to make sure everyone is on the same page.
Pretty useful, don’t you think?
And you’re done!
Apply this clever reboot to your workflow and create a punchy meeting invite in just a minute.
Season Your Email Campaigns With 4 Juicy Tactics
Let’s kick off this week’s Know-How with a quick debut of 4 forward-thinking tactics to cultivate a highly-invested subscriber base and encourage email campaign results that shoot through the roof.
Tip #1: Personalization is critical
“Dear customer” is not the same as “Dear Jack.” Not by a long shot. For the sake of illustration, replace “Jack” with your name. Did you feel how this little twist hooked and reeled you in immediately?
Every person in your subscriber list is an individual, and your email should sound like it’s talking to each one personally. And what better way to accentuate your prospects’ individuality than address them with their names in the subject line or in the body text?
While subscribers’ names are mostly used in greetings, personalization shouldn’t be reserved only for this purpose. You can ask questions in your emails to trigger feedback loops or occasionally check back in with your prospects to regain their attention.
“What do you think of our new product, {{name}}?”. Or “You know what I mean, {{name}}.”
Ensure these little additions naturally weave into the email narrative and don’t sound like awkward interruptions detouring readers from the context.
Despite being one of the last steps in email marketing, personalization should never be an afterthought.
In fact, you should consider it right from the onset of your lead generation activities, and while collecting subscribers’ email addresses, designate another box to add in their names too.
Surprisingly, many marketers avoid asking for subscribers’ names, thinking that this extra task will add unnecessary friction to the onboarding and lower subscription rates.
Yes, multi-step processes do repel. But adding a first name hardly classifies as a huge commitment?
What follows afterward involves just a few twists in the email software to automate the laborious personalization and enjoy a six-fold surge in conversion rates.
Tip #2: Send out birthday emails
Studies show that businesses that send personalized offers on their prospects’ birthdays reap 324% higher revenue from this single email than from the rest of their email campaigns.
So if birthday emails are still not part of your email marketing, time to jump on its bandwagon!
Don’t think too hard if you are worried about how to coerce your prospects into giving their birth dates! Just send a short, sweet email to your subscribers and ask them to fill in their birthday dates with a promise of a lovely surprise on their special day.
Beyond just the whopping sales, birthday emails go a long way in strengthening customer loyalty toward your brand and inspiring word-of-mouth. Because… who wouldn’t feel flattered after such a thoughtful gesture and likely share their riveting experience with friends and family?
Tip #3: Design with a dark mode in mind
With top email service providers like Gmail, Outlook, and Apple rolling out dark modes, inboxes worldwide are going dark. This means marketers should now keep their eyes peeled for some micro-optimizations to ensure every campaign email is equally accessible in light and dark modes.
This involves using images with a transparent background (i.e., png) and adding a white stroke around dark-colored texts to make them visible over the dark overlay.
Besides dark mode, dark-themed emails are trending too. They appear with a dark background despite a user enabling dark mode. Oculus and Apple are just two top-notch companies that have opted for dark-themed, sleek email designs to promote their offers.
If you are inspired by this new vertical, just take a moment to contemplate whether it aligns with your brand, as this minimalist approach may not be relevant to every business.
Tip #4: Engage your Indiegogo backers with a referral campaign
Whoever backs your campaign on Indiegogo receives a generic Indiegogo email confirming their order. Following this, campaigners are hardly in direct touch with their backers besides the occasional updates.
One of the motifs, why many startuppers choose crowdfunding is the tight-knit community of dedicated backers who offer authentic feedback and support to campaigners and become ambassadors to promote their product in their circle of friends.
Word-of-mouth marketing is the best way to promote your crowdfunding campaign, harness sales waves, and keep your backers engaged.
And the tracking is sinfully easy.
The first option you can suggest is a bonus they can get while sharing their personal referral link from Indiegogo. This can be a discount or bonus they can redeem later to purchase your other products (if you plan to offer some, of course).
As a second option, you can share your Kickbooster link. And they will earn a commission from every purchase logged via the link.
Just note that this referral strategy does not apply to Kickstarter, as you will be granted access to your backers’ emails only after the end of your campaign.
Choose the best option aligned with your preferences, or develop your own ideas!
And if you’d feel like you need some validation or expert opinion before you proceed, don’t hesitate to drop them in the comments section below. I’ll make sure to check them out and reply to you with my thoughts.
Combined Email Marketing
If you have already built an audience inside Facebook Messenger and want to transfer your subscribers over to email, you can ask them to provide their relevant contact information. But nothing comes for free.
Offer these passionate subscribers an extra perk or discount that is fair and equal to the value of trust and support they give you implicitly when sharing their contact information.
Start by integrating your email marketing software with ManyChat (currently, ManyChat supports native integration with MailChimp, ActiveCampaign, and ConvertKit). You can also integrate your mailing software via Zapier or Make (formerly Integromat.)
When your automation is set up, send a broadcast with your plans and shared benefits to your chatbot subscribers. They’ll provide you with their emails automatically exported into your mailing software.
And if you’ve set it upright, they’ll instantly receive their discount!
Gmail calendar sync
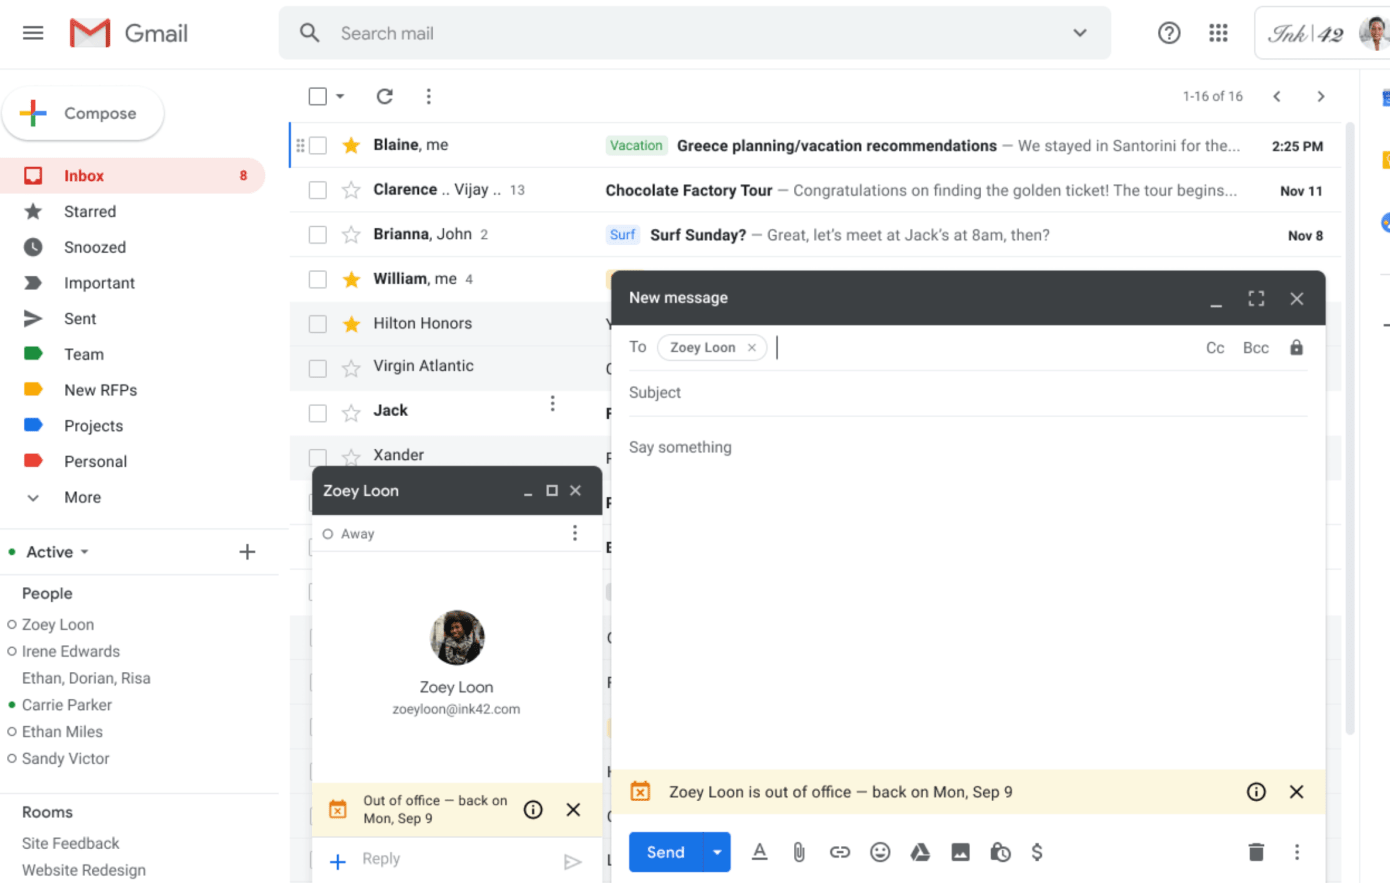
Now Gmail allows you to see whether the email owner is available to answer your emails for that specific period or is out of the office at the moment. A great opportunity to save time instead of emailing someone and getting an auto-reply.
Mark yourself as on leave on Google calendar, and your colleagues will get a heads up before they click “the send the email” button.
A yellow banner will pop above the send button to notify that the addressee is currently out of the office.
Available for G Suite users.
Notify Your Leads about Your Campaign Launch with Google Calendar Invites
As a middleman between startups and subscribers, email marketing is immensely powerful in getting your leads to love your product. With a pinch of creativity, witty text, and appealing visuals, each email in a series becomes a little insight into your product.
And, more importantly, a constant reminder that you’re out there. Perfect brand awareness.
If you’ve coined your formula for crafting compelling emails with a clear CTA—then a good fraction of your subscribers will now be on the lookout for the launch email to enjoy early-bird discounts before they are snatched up.
But here is the problem.
Sometimes your subscribers may never receive your emails for a handful of reasons—especially if they get marked as Spam or Promotions. This can leave hundreds, if not thousands, of your subscribers unnotified of the campaign launch. And many of these could be real potential backers.
So how do you ensure your subscribers know your campaign is live and increase your chances of conversions?
With this great tactic, I came up with.
Send out calendar invites to subscribers with succinct information about the launch and a link to your campaign. Take it one step further and create an event in your subscribers’ calendars without them even receiving an invite!
How? Here we go!
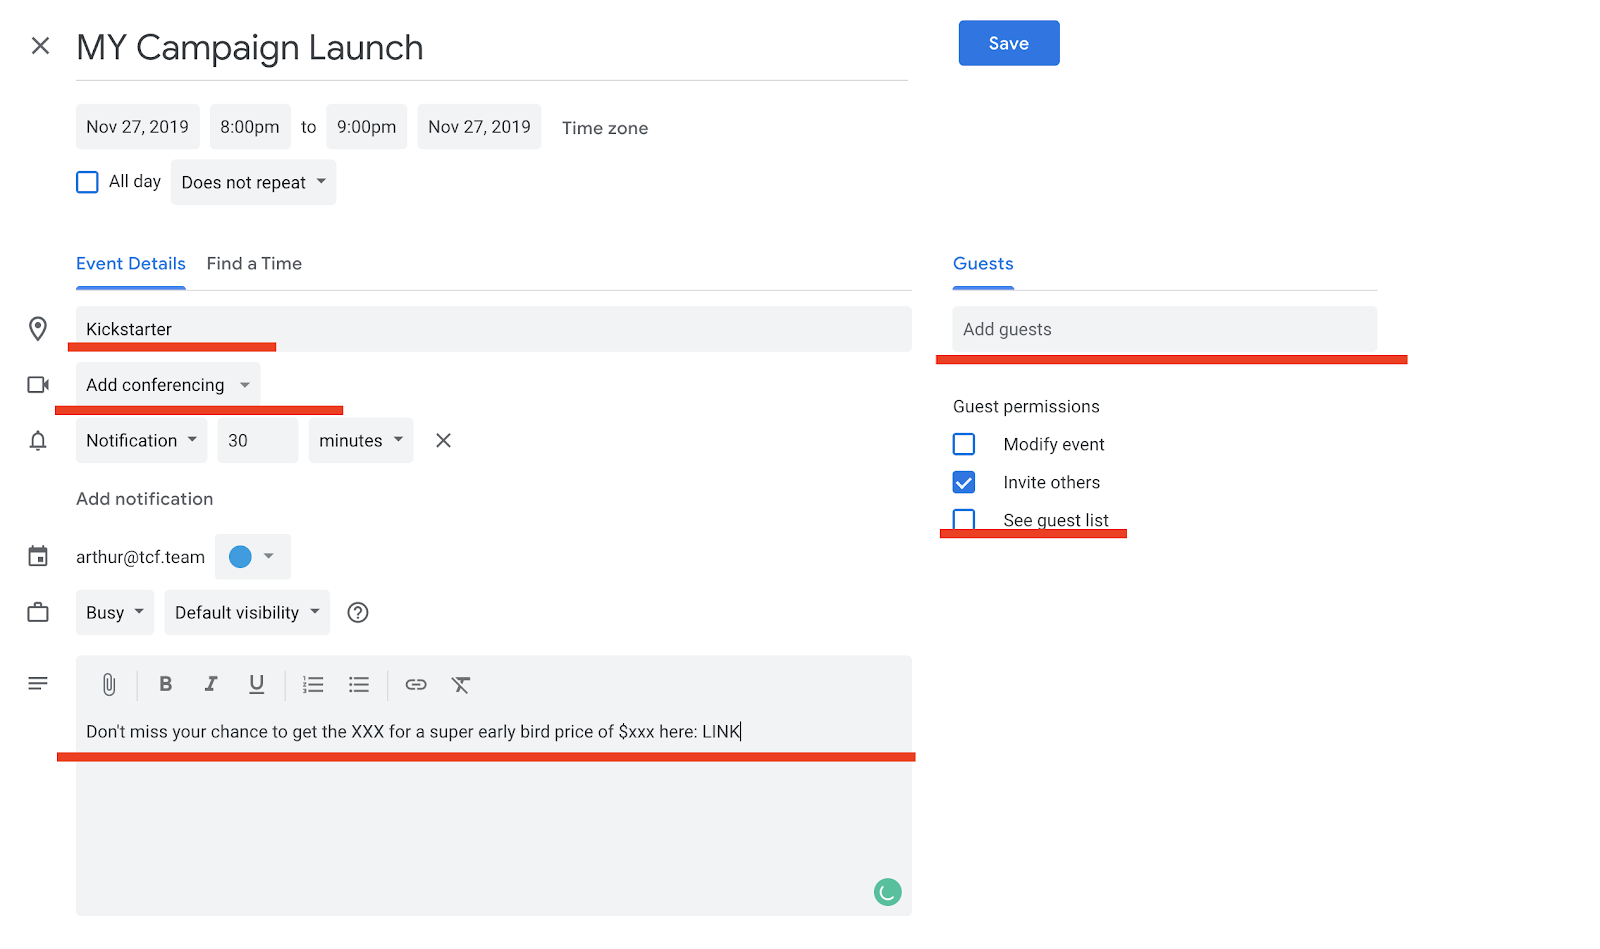
In the info box of your Google Calendar event, put the necessary information about the launch (i.e., date and time of the launch, early-bird discount, clear call to action) and put the link to your campaign page.
Simply call the event “{name of campaign} Indiegogo/Kickstarter Launch.”
Set the event start time at least 2 hours after the real campaign launch.
Uncheck the box “People can see the list of invitees.”
Save the event.
Now go to your subscribers’ list and filter out all the emails within the G-Suite domain.
Copy 199 emails at a time (Google Calendar allows 200 participants per event, so 199 and you give 200)
Go to Google Calendar and duplicate your existing event. In the duplicated event, paste the copied 199 emails to the invitees’ list.
If Google Calendar automatically adds video conferencing to the event—turn it off.
Now click “Save.”
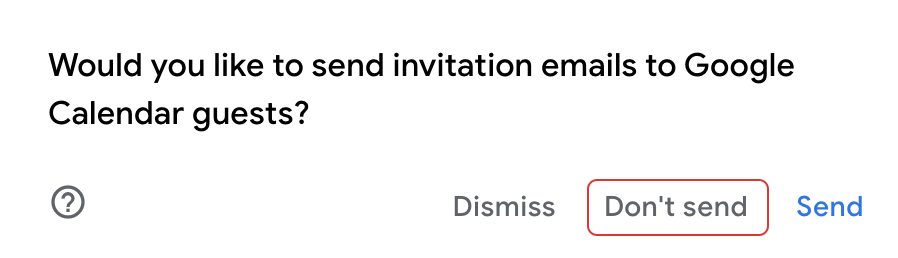
After clicking “Save,” you will be asked to send out invites. Click “Don’t send.” You want to send invites only when the campaign is already live.
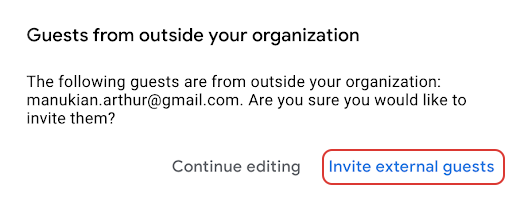
Now you will be asked if you want to send an invitation to external guests, just click “Yes”.
Repeat steps 6-12 again until you are out of subscribers
DONE!
Depending on your subscribers’ notification settings, they will receive a reminder 1 hour, 30 minutes, or 15 minutes before and one right when the event starts, i.e. campaign launch.
They’ll surely get surprised to receive an unexpected invitation in their inbox and will be tempted to click to see what it is about! Even better, when they check their calendars, they’ll see an important event they need to attend—your campaign launch!
Good luck in boosting your subscribers’ conversion rates!
Inserting GIFs in pitch emails to accomplish two things
Journalists are bombarded with a striking number of pitches each day. In this fierce competition for coverage, you need to get creative to stand out in the crowd and be among the lucky ones to first earn the journalist’s attention.
This time we tried a new tactic—inserting a GIF in the pitch email. But this wasn’t meant to jazz up what may seem like a boring text wall at first glance (I’ll talk about writing compelling pitches some other time).
First, it was meant to show the product in real life—in this example, it’s the Christmas card. Another purpose the GIF strove to accomplish was to introduce the person sending the email and develop some personal touch with the recipient, i.e., the journalist.
While in this case, only our PR guru Serine’s face is visible in the GIF, there may also be cases when you want to fully appear in the GIF. Don’t get lazy and shoot a profile picture for the email with the same outfit you’ve shot the GIF, so the recipient will immediately figure out that it’s you. You can also create QR codes to provide product information seamlessly in your email. Try Canva’s QR code generator as another tool for creating QR Codes for free.
You may be thinking we are getting too caught up in details. But remember, small details like this one can make all the difference.
Customized Auto Replies on Gmail To Streamline Follow-ups
We all have received or set up a vacation auto-reply where Gmail sends the same generic reply to every email in your inbox. But what if you want to send an auto-reply to a defined set of people with customized text tailored to them? Or auto-reply only to emails that contain certain phrases?
For such cases, Gmail has a built-in feature —Templates — which, if fast-tuned with the Search Filter, can encourage the desired outcome.
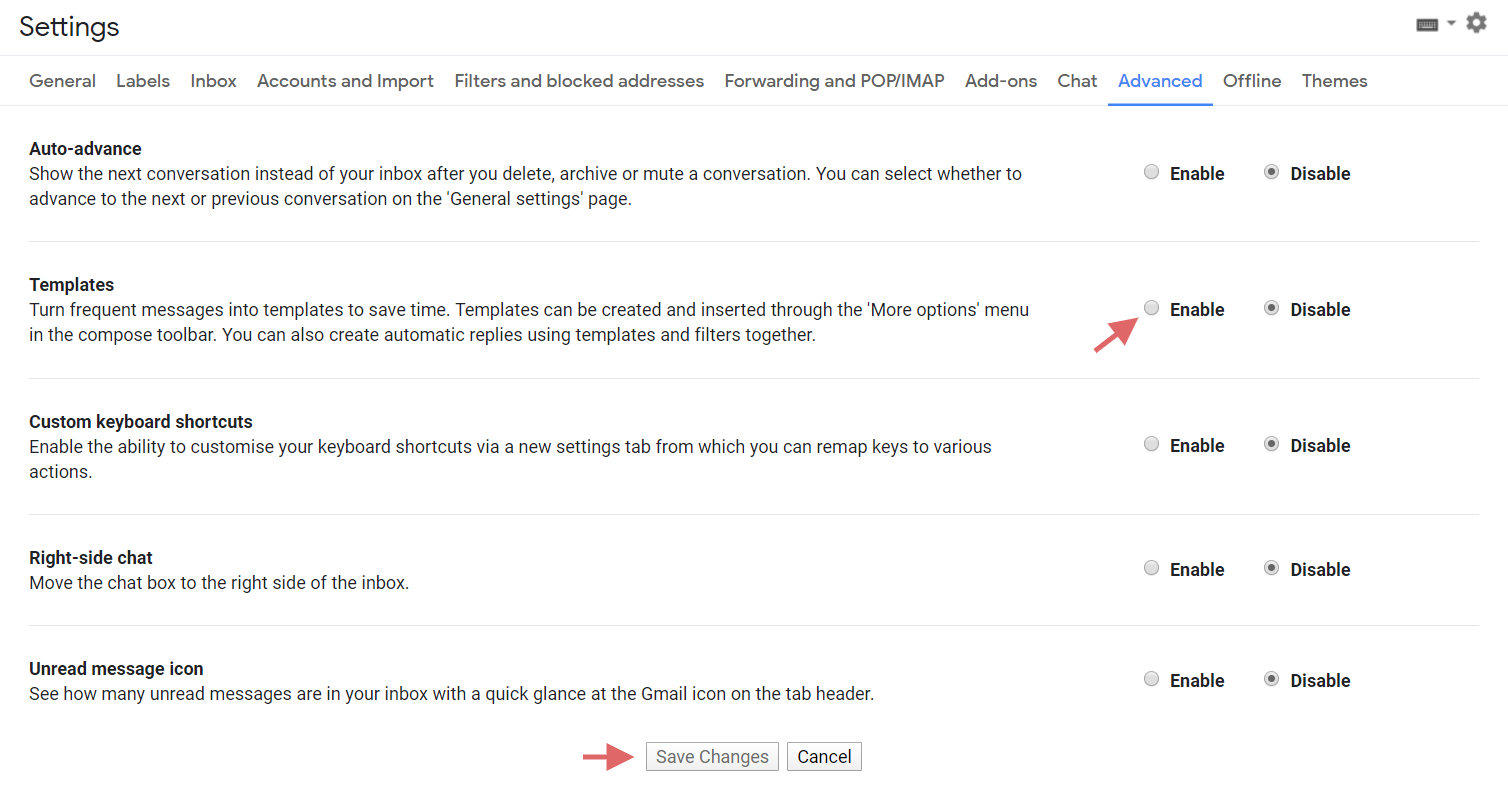
Step 1.
First, go to your Gmail’s advanced settings and enable the “Templates” features.
Once enabled, don’t forget to click “Save Changes”.
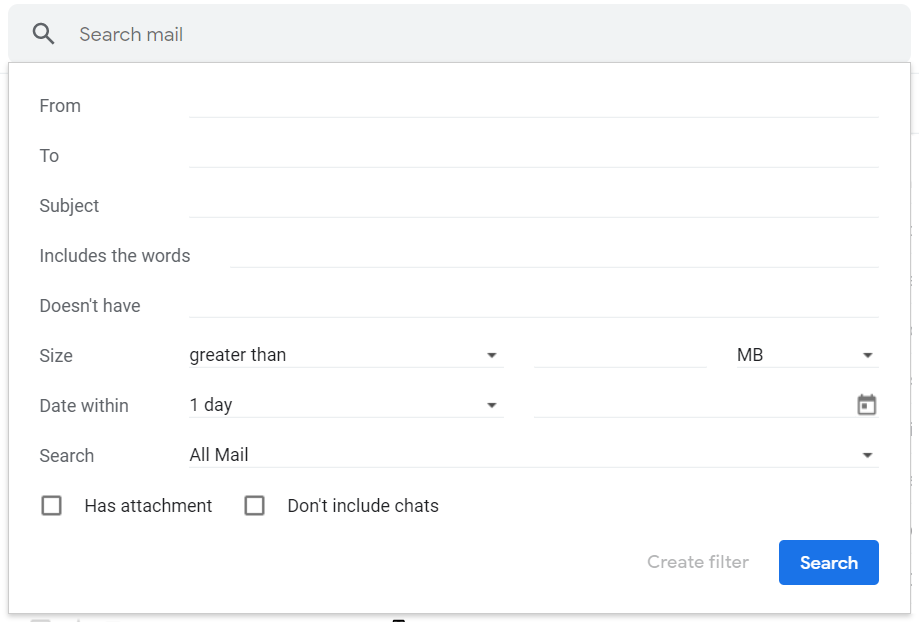
Step 2.
Then head back to your inbox and hit the small, down-facing arrow on the right side of the search bar.
You need to create a filter to sort out the ones you’re interested in from the incoming stream of emails. The more detailed, the better.
In the window that pops up, mention a sender’s domain and subject, name keywords that will most likely be included in their emails, define a timeline, specify whether messages have attachments, and a few other filters.
Imagine you want to reply to all the employees from Company A to inform them you’ve received their email and ask if they are available to make a call next week.
Just fill in the “From” field with the company domain name and hit “Search” to test if it works. If so, proceed with the “Create Filter” next to the “Search” button.
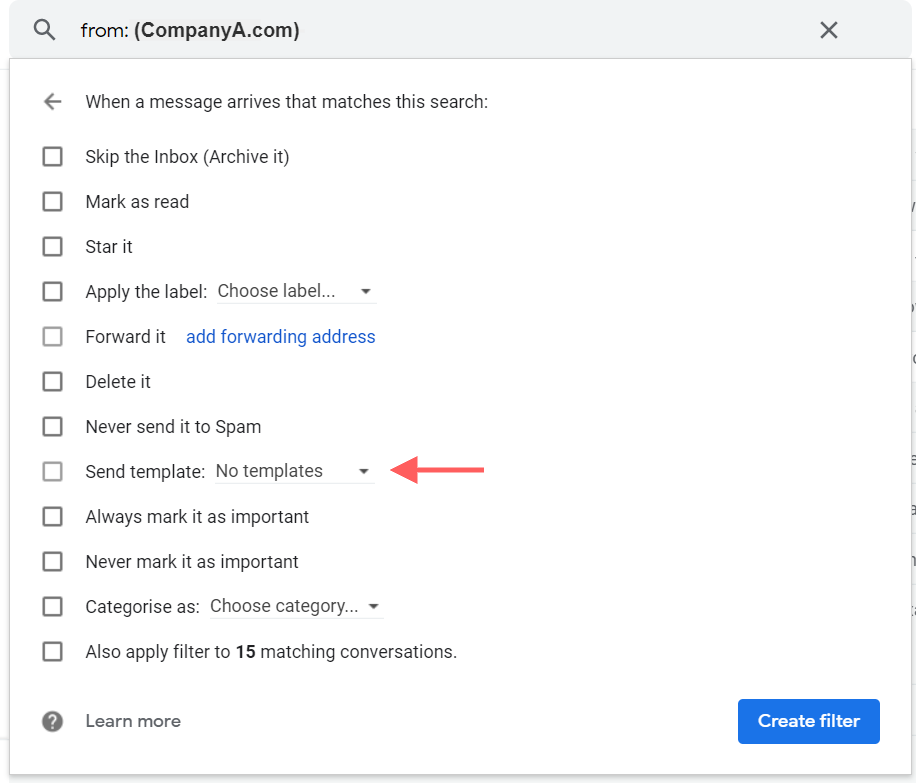
Step 3.
Since you want to send a custom auto-reply to all the emails identified with your filter elements, tick “Send Template” to choose the corresponding template reply from the drop-down menu.
All Company A employees will receive your customized auto-reply the minute their email lands in your inbox.
Oh, wait! But we haven’t created the template yet.
It’s easy.
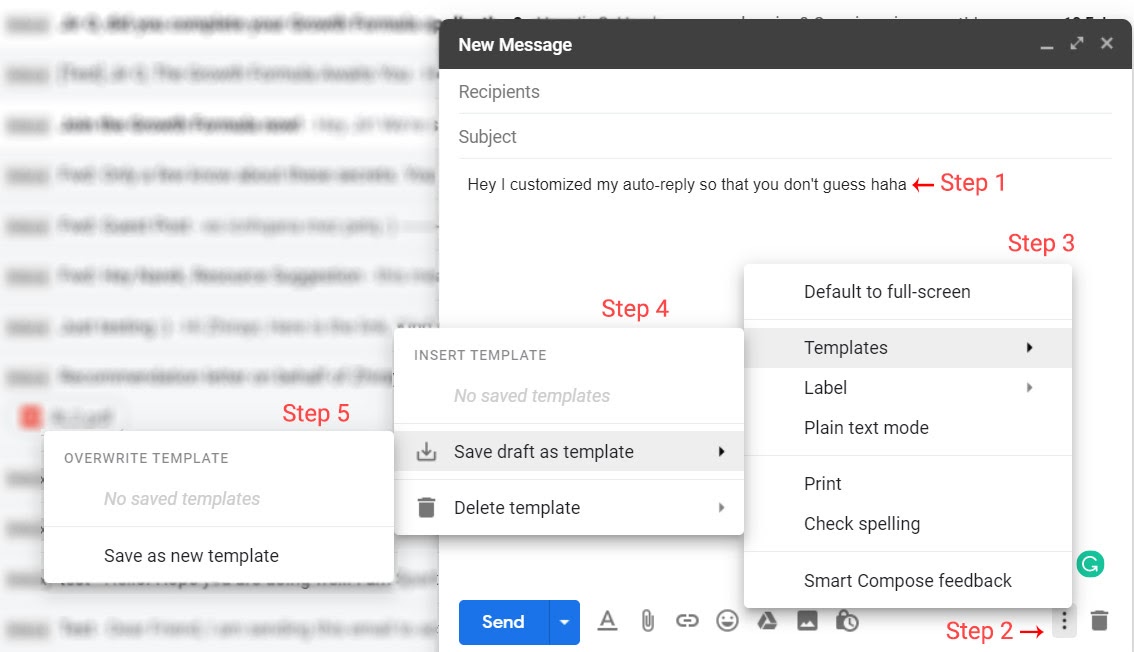
After the “Templates” is enabled, hit the “Compose” button to write the reply message and follow the next few steps illustrated in the image.
Once you click “Save as new template,” a window will open with a space to enter the template’s name. I advise picking an intuitive name that also captures the key information about your template. Something like “Scheduling a call with Company A employees” seems to fulfill the two criteria.
Now you have the template too.
Go ahead and set this simple flow to action to save yourself a great deal of time you’d otherwise have wasted doing all the follow-ups manually.
Tasks Moved Into Gmail To Organize Things More Easily
Google doesn’t want you to miss even a single email follow-up anymore. And it is committed to reminding you as often as needed before you get it done.
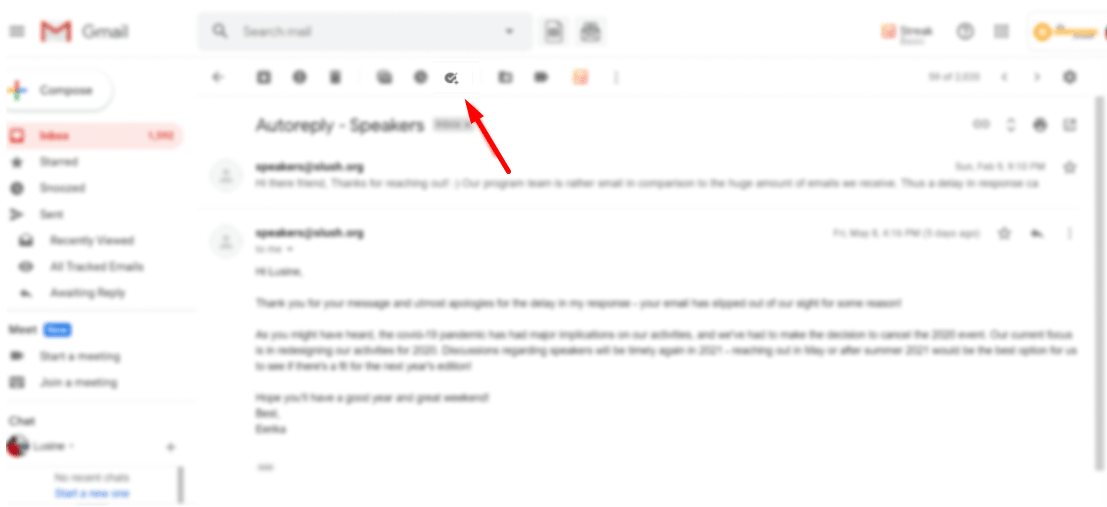
It has even migrated Tasks into Gmail’s top bar.
Look up. It’s right there.
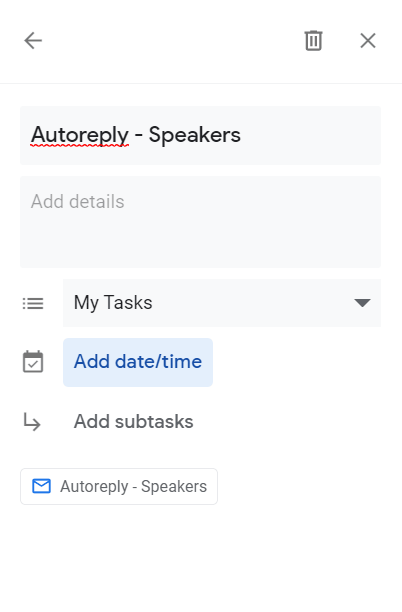
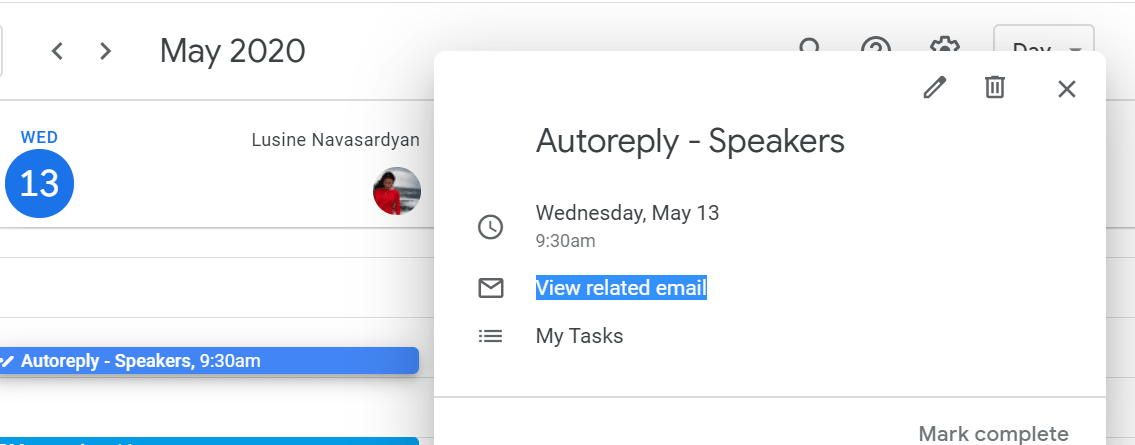
Open an important email you need to follow up on or take any other action and click on the “Add to tasks” button in the top overlay. It will instantly pop up a window in the right-hand sidebar to set the expected date and time of the completion and add notes to your task.
The task will also appear in your Google Calendar.
And Gmail will send you a reminder 10 minutes before the deadline.
When you are done with your task, check it off in your Gmail sidebar, and it will be automatically marked as done in your calendar.
And you are good to go, my geek organizer!
Integrate Tasks in your daily workflow, and you’ll save yourself a great deal of legwork to pursue your other goals.
_____
Have you created your first custom auto-reply with Gmail Templates? Those simple steps will take you a minute now and save you heaps of time later on.
And as you go about reading more on how AMP ushers the next paradigm in email marketing, don’t forget to also bookmark our article on SEO tools to improve your marketing campaign.


Comments