Discover the Insider Secrets of Million-Dollar Crowdfunding Campaigns
Some clients pay us over $1,000,000 to run their
multi-million-dollar crowdfunding campaigns. For the first time ever, we’re pulling back the
curtains and showing you how we do it.
How to develop a product everybody wants
How to get 100,000 visitors to your page
How to increase sales by over 37%
What services to use... and which ones you shouldn’t waste time on
Digital Marketing Tools And Strategies You Should Know
12.01.2023
Did you know that March 22nd is Mother’s Day in the UK? And March 23rd is Puppy Day on international calendars?
While people are looking for ways to cherish the bonds with their loved ones in life, marketers are cooking up special offers on the theme of festive occasions to tap into people’s emotions….and generate sales.
But how can you even possibly know all the holidays around the world? Don’t despair. There’s a smarter way.
Besides the annual marketing calendar, discover digital marketing tools to reveal the tech power behind your competitors’ websites, learn about a hack to rank on Google with emerging keywords, study a retargeting tactic to convert cold audiences on top of recent ManyChat updates, and easily create branded marketing collateral and some more.
Let’s dive right in.
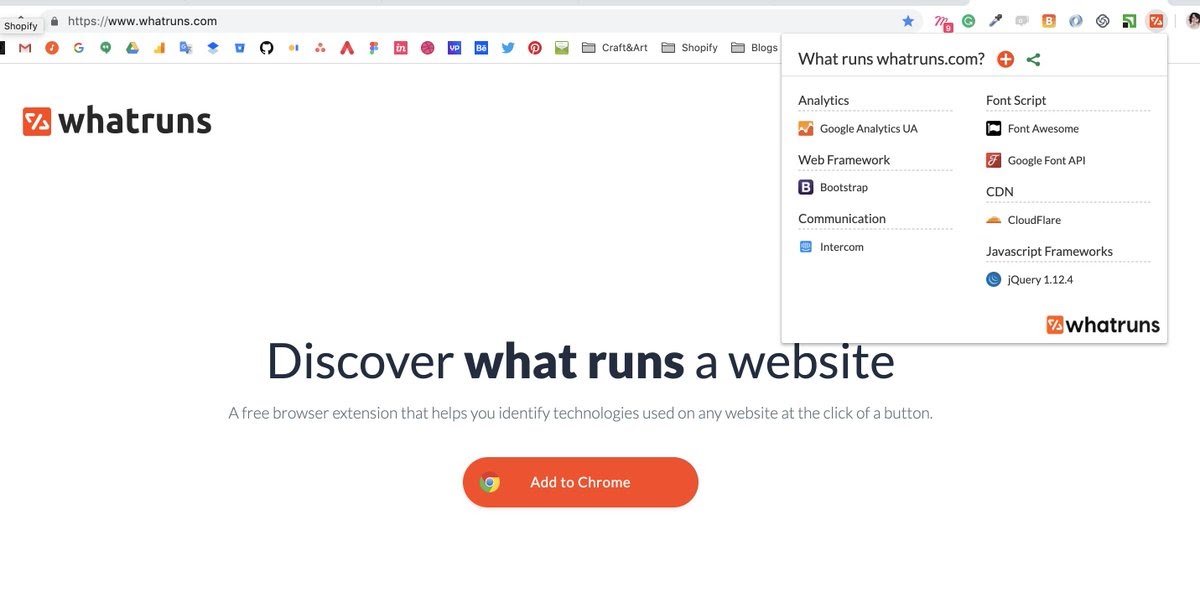
Spy on Your Competitors’ Websites’ Technologies with WhatRuns
Your competitors undoubtedly use various digital marketing tools, plugins, and technologies to help boost user experience and reinforce their online presence.
Don’t you think it would be cool to know what Content Distributed Network (CDN) or Communication software they use exactly so you, too, can leverage them in your favor? Or know each pitfall, predict the areas your competitors are failing in, and not make the same mistake?
WhatRuns is a browser extension that lets you almost instantly find the technologies used on any website you visit.
With a mere click on the extension icon, the tool displays all the technologies that power the website, classified by their relevant category, including CMS, Widgets, Analytics, Web Server, Programming Language, Cache, and more.
Not only does WhatRuns deliver valuable insights on your competitors’ websites, it also notifies you anytime they deploy a new technology or abandon an existing one.
While WhatRuns is definitely not one of its kind, unlike most of its alternatives, the extension is light on your browser and presents highly accurate information, identifying even the newest technologies and plugins and, most importantly, notifying you in a matter of minutes once a change is detected.
Add WhatRuns to your Chrome or Firefox browser, and… happy stalking!
Easily create branded marketing collaterals with Xtensio
With this helpful document creation tool, you can quickly and easily create and design marketing material that confidently represents your brand.
For people who are unsure where to start, Xtensio offers an extensive collection of templates that give you a starting point that you can tweak according to the needs of your business.
The built-in samples range from reports, business models, proposals, fact sheets, landing pages, plans, press releases, calendars, one-pagers, media kits, and many others.
However, if you want the freedom to express your creativity, you can start with a blank slate and utilize the drag-and-drop elements for your documents.
Aside from these features, Xtensio offers something that will make your work much easier: real-time collaboration. You can work with your teams, squeeze in edits, and see these changes applied in real-time and synced across all devices with access.
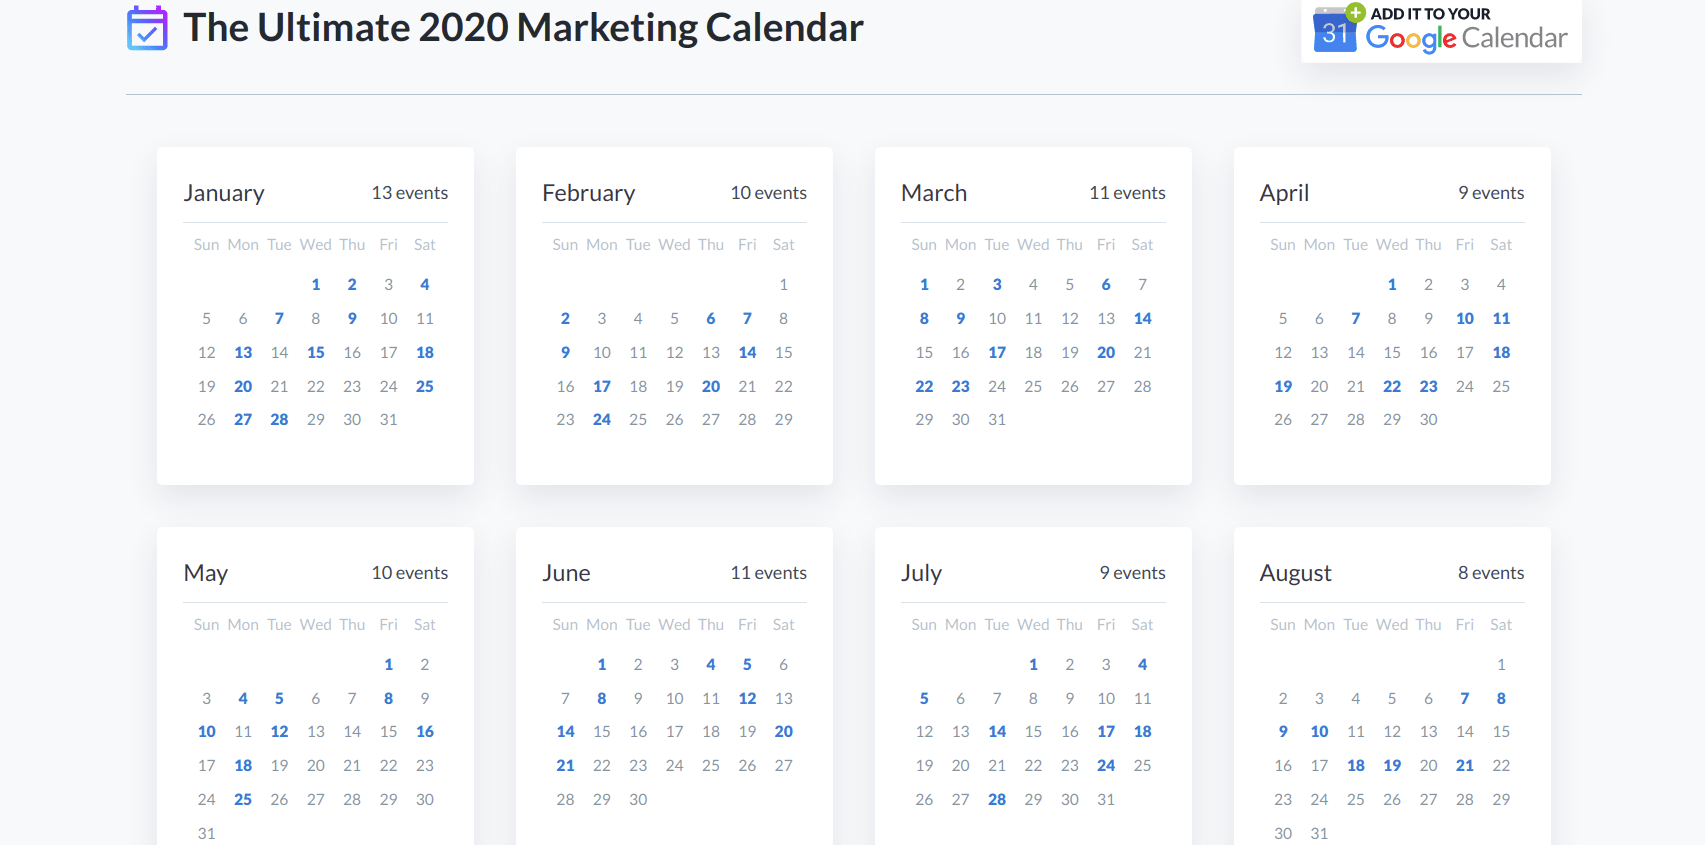
Drive Sales on Holidays with Calendify Marketing Calendar
Working in digital marketing and targeting the entire world, you need to stay on top of many holidays celebrated in different parts of the world.
Why?
Because during the festive season, people are happy. And happy people are more prone to shopping, especially if it’s done to rejoice with their close ones.
And because you can’t possibly remember all the major, minor, national, and international holidays in the world, this tool is your holy grail.
Calendify is a marketing calendar that contains holidays from all over the world. It shows you the dates of celebrations and gives you a background for each holiday, so you don’t even have to do additional research.
Use Calendify now to look up the holidays that are coming up soon and start creating super-tailored marketing campaigns to excite your prospects on their festive days.
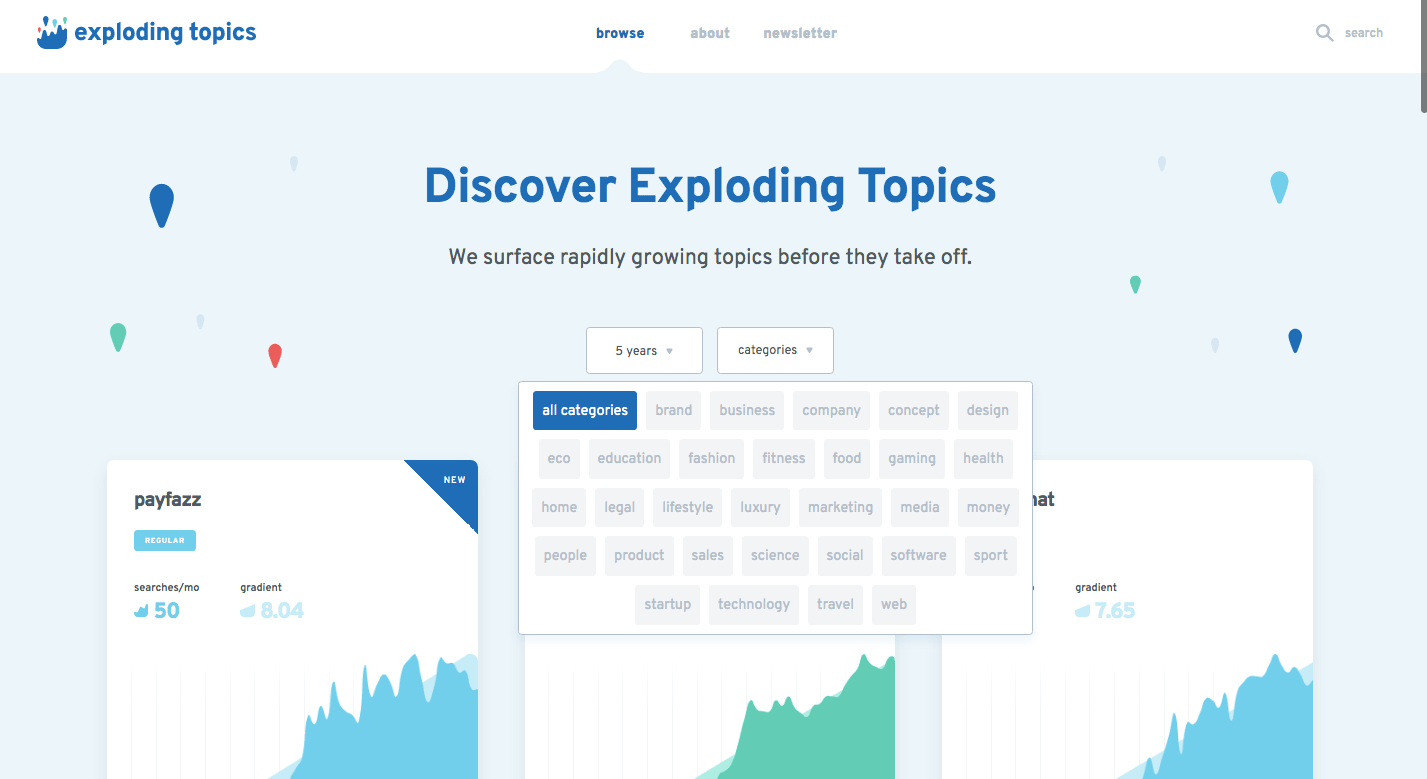
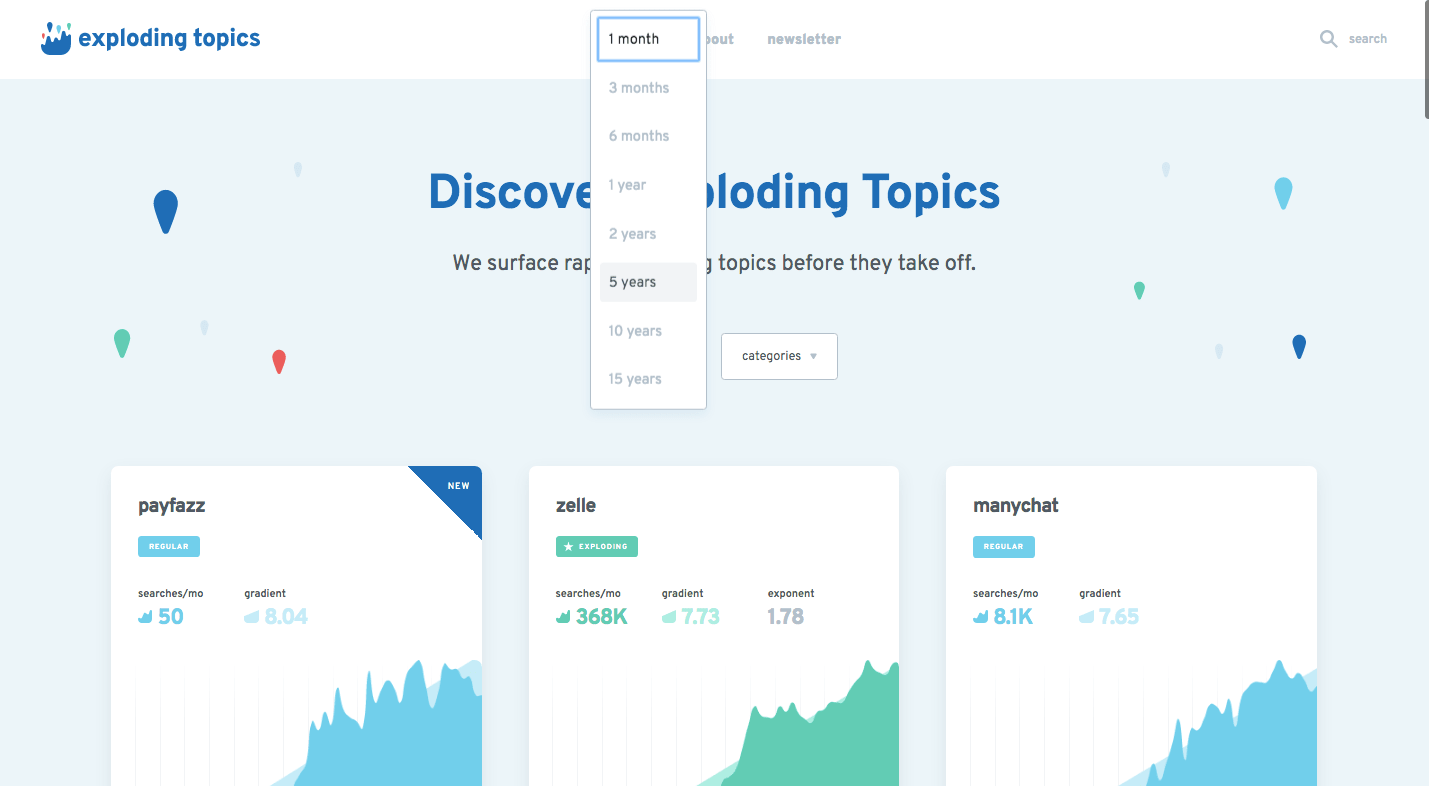
Rank on Google with Emerging Keywords with Exploding Topics
When doing SEO for SaaS companies, choosing the right keyword to optimize your content around is a manifold process with a bit of guesswork as to whether the keyword you just picked will still be sought-after in the future. Once you’ve distilled a set of keywords relevant to search intent, there are two major factors that guide keyword selection – search volume and difficulty.
The common tactic many early-stage businesses apply is optimizing content around low competition, i.e., less difficult keywords with a relatively bigger search volume, to bypass the fierce competition and stand a chance of ranking on Google.
And while this strategy was proven to work well, it greatly restricts your ability to write quality content.
(Don’t assume that your mind-blowingly amazing content alone will slowly pave its way to Google’s first result page, do you?)
But what if I tell you there is a way to jump on the top emerging topics in your field and be among the first to publish substantive content with significantly improved chances to rank?
Behind this forward-driven strategy stands Exploding Topics. Developed by Backlinko’s Founder Brian Dean, the site surfaces topics classified in different categories that are now hiking up massively in their search volumes but haven’t hit the ceiling yet.
Its robust underlying algorithms wade through millions of searches, conversations, and mentions online to discover top emerging trends with projections of their search volumes over the course of the next 15 years.
Now tune in!
Many of these emerging topics are unique, untapped keywords predicted to become overly competitive in no time. This means you’ll be among the first to write about the topic and rank before the competition gets too crowded. Always make sure to check your content for plagiarism to avoid duplicate content penalties.
You can also use this buffer time wisely to gain some backlinks from authoritative sources and garner your spot among the first ten results when somebody searches your target keyword.
But even if we neglect its tremendous impact on SEO for a moment, Exploding Topics is just a goldmine of insights revealing the various spiking trends in the world that may open new avenues of pursuit for your business.
Facebook Events as a Retargeting Means to Convert Cold Audiences
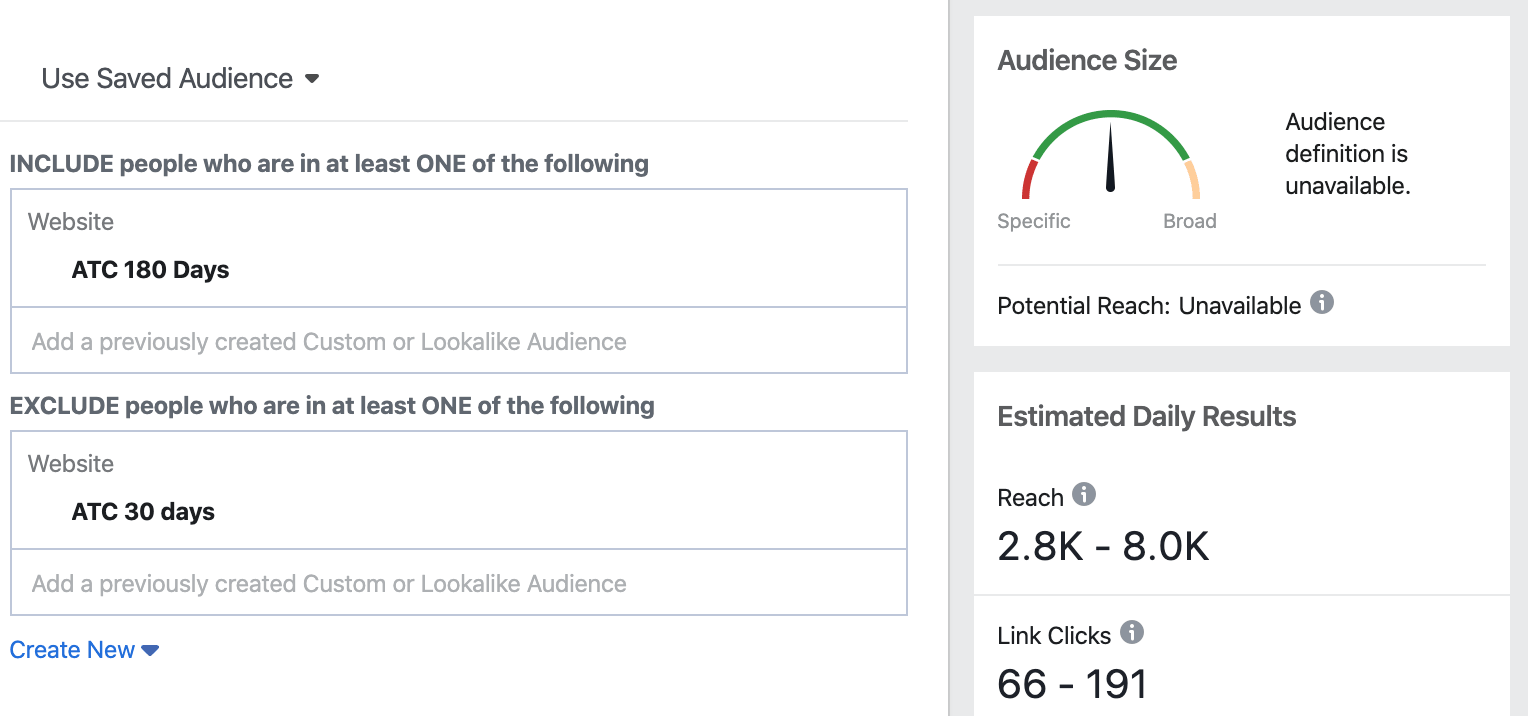
Suppose you plan to run retargeting ads on people who’ve visited your page over the past 180 days. In that case, you probably realize that the odds of conversion won’t be equally distributed amongst everybody.
Depending on the time they last visited your site, and their position along the sales funnel, your audience can be divided into three segments – cold, medium, and warm.
As the names suggest, medium and warm audiences are still interested in your product, with a significant fraction of them converted through a simple retargeting ad.
The matters get complicated regarding the cold audience, though – it’s been a while since this segment has engaged with your product.
Have you already guessed how to boost your conversion rates?
You got it!
Nothing can work better than a financial motif. And this is when the limited-time discount offer comes in handy.
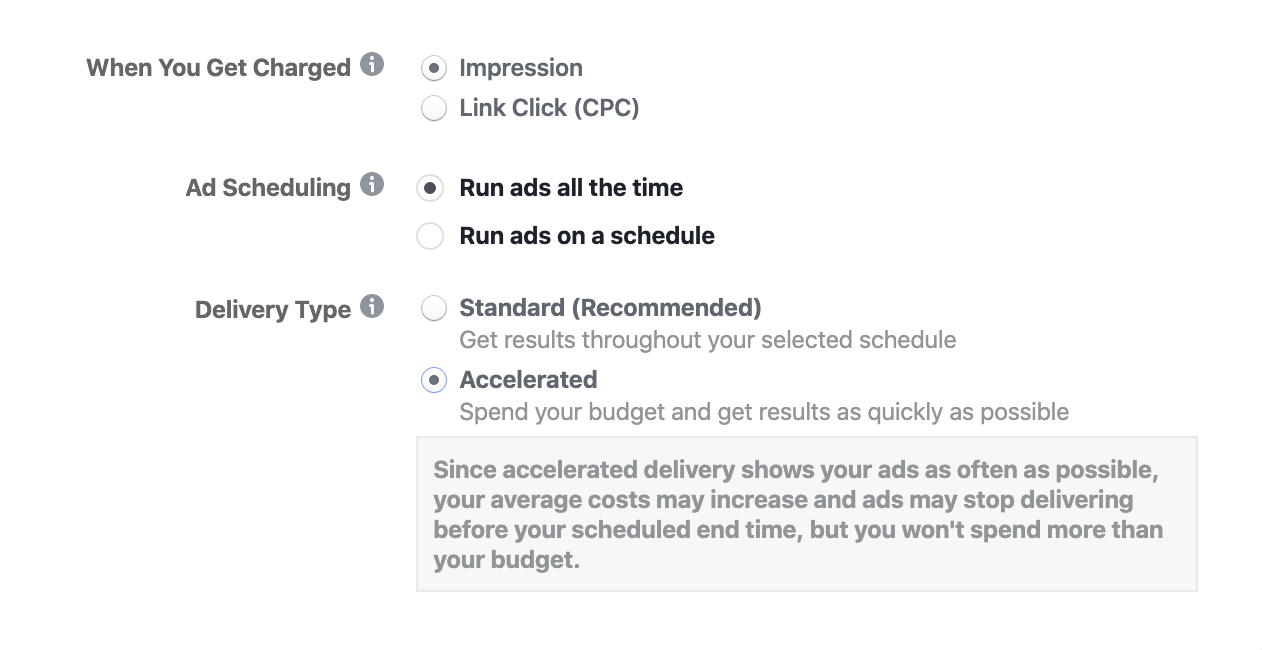
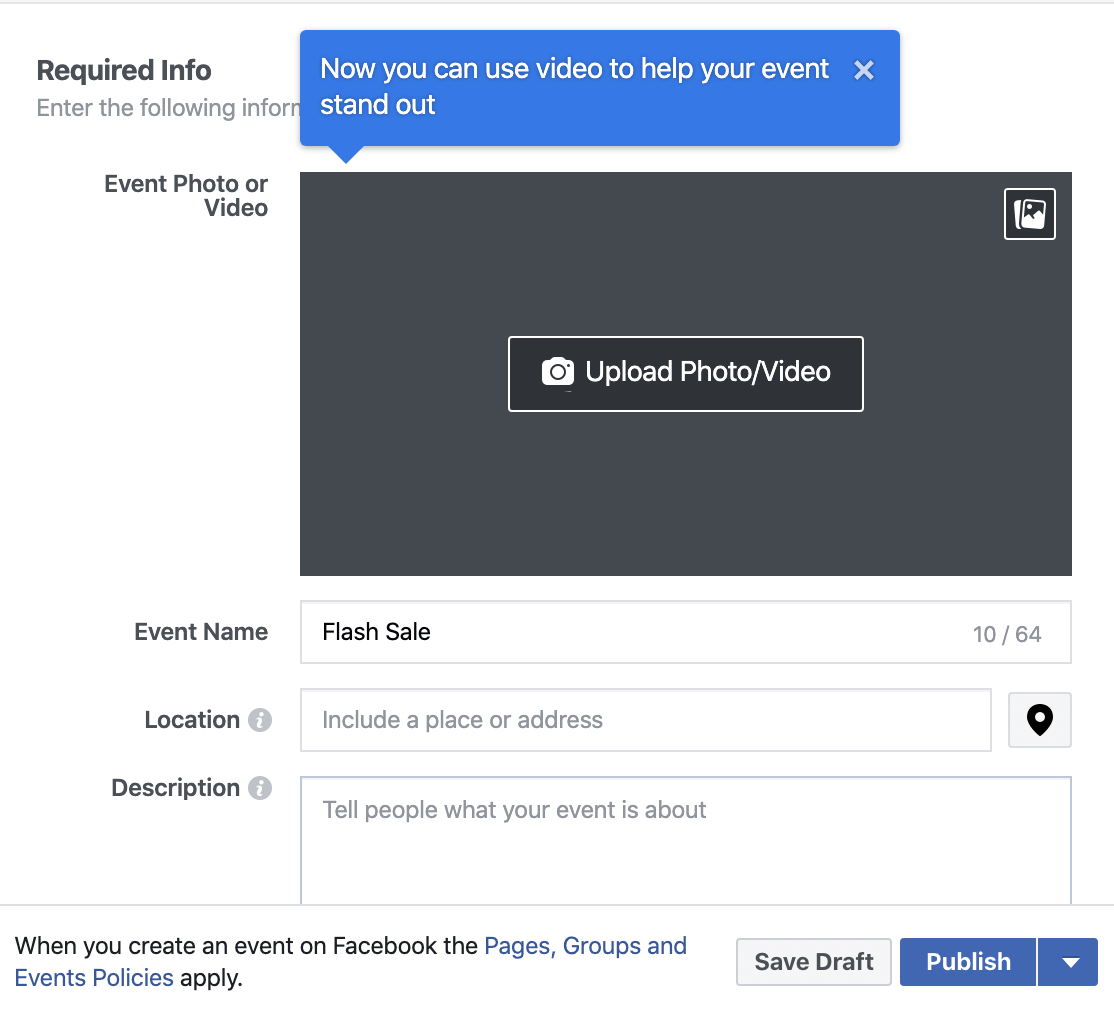
To frame it in a more catchy and original way, I came up with the idea of creating a 24-hour flash sale event on Facebook with a limited-time discount offer. I can then run pre-launch traffic ads with a custom audience of ATC 180 days (if your Add to Cart audience is small, you can target all your visitors).
I use accelerated delivery to promote the ad, which heavily spends my ad budget but brings in results fairly quickly.
An important thing to remember is to exclude all the visitors from the past 30-40 days, which can still be deemed warm and converted without any extra sale or discount offer.
Or not… but it’s a meaningless expense!
An added benefit of this strategy is that Facebook’s algorithm will show this event to a large cold audience, a non-paid promotion of your event that can send some more leads your way.
On the flash sale day, Facebook will notify everyone about the limited discount offer, channeling a pipeline of hot leads to purchase your product.
Gifyu.com
We usually use Giphy to upload Gifs on the Indiegogo or Kickstarter pages. But the problem with Giphy is it gives a trackable pixel, which we need to remove first. And also, in case you click on the Gif, it redirects you to Giphy.com.
This is not suitable for our campaigns cause we want to keep the potential customer on the page.
It’s a Gif sending & uploading tool. Fast. No trackable Pixel. Full-sized Gif as an added bonus.
You can use GifyU to host files from your own computer or ones from a URL. This digital marketing tool supports multiple image uploads and accepts PNG, JPG, GIF, and BMP image files no larger than 100MB.
Hexomatic
If you need data for making better and more productive decisions for your digital marketing campaigns, Hexomatic is the perfect solution. It’s your no-code friend for growth hacking and automating time-consuming tasks such as data gathering. You can scrape and use the information on products, listings, and pricing, which will help market and position your business in a smarter way.
Moreover, with Hexomatic, you can schedule the process of gathering and storing fresh data which you can use in the automation sequence you’d like. Whether you need any specific documents, get SEO data, or perform various queries you need in your business marketing processes. Finally, you can customize all these automation processes according to your requirements and needs.
Taskeo’s Project Management Solution
Whether you’re running one project at a time or juggling several of them, a good project management tool should be next on your software shopping list. With this kind of app, you can organize your team’s tasks, manage your workload, and control deadlines.
If you’re looking for an easy start, Taskeo’s project management solution is right for any business size. With its extensive and feature-rich toolkit, you can control everything from daily to-dos to project milestones, budgeting, workload, and more.
And let’s not forget about visualization of your processes, workflows, and projects. It’s a simple but effective way to help your team understand project dependencies and sequences that tasks need to follow from beginning to end. Most project management tools, Taskeo included, offer visualization features to help you see clearly where things stand.
Content Studio
If you’re looking for an all-in-one solution for your marketing needs, ContentStudio is your go-to platform. Contentstudio helps small businesses and agencies market their business correctly by providing full insights so they can get their desired results.
Besides bulk social media scheduling and publishing, it allows you to discover trending content, curate it and plan it in your editorial and social calendar.
You can create an evergreen campaign for your favorite blog posts of all time to never lose any traffic to your blog from social media. Its features like a media library, Canva post design from the app, trending hashtags suggestions, and social inbox make management easier than ever.
Above all, it has powerful competitors’ analytics that allow you to create a better social media strategy for your brand.
It supports social platforms like Medium, WordPress, Youtube, Dailymotion, GMB, Facebook, Twitter, Linked In, Pinterest, Tumblr, and Instagram.
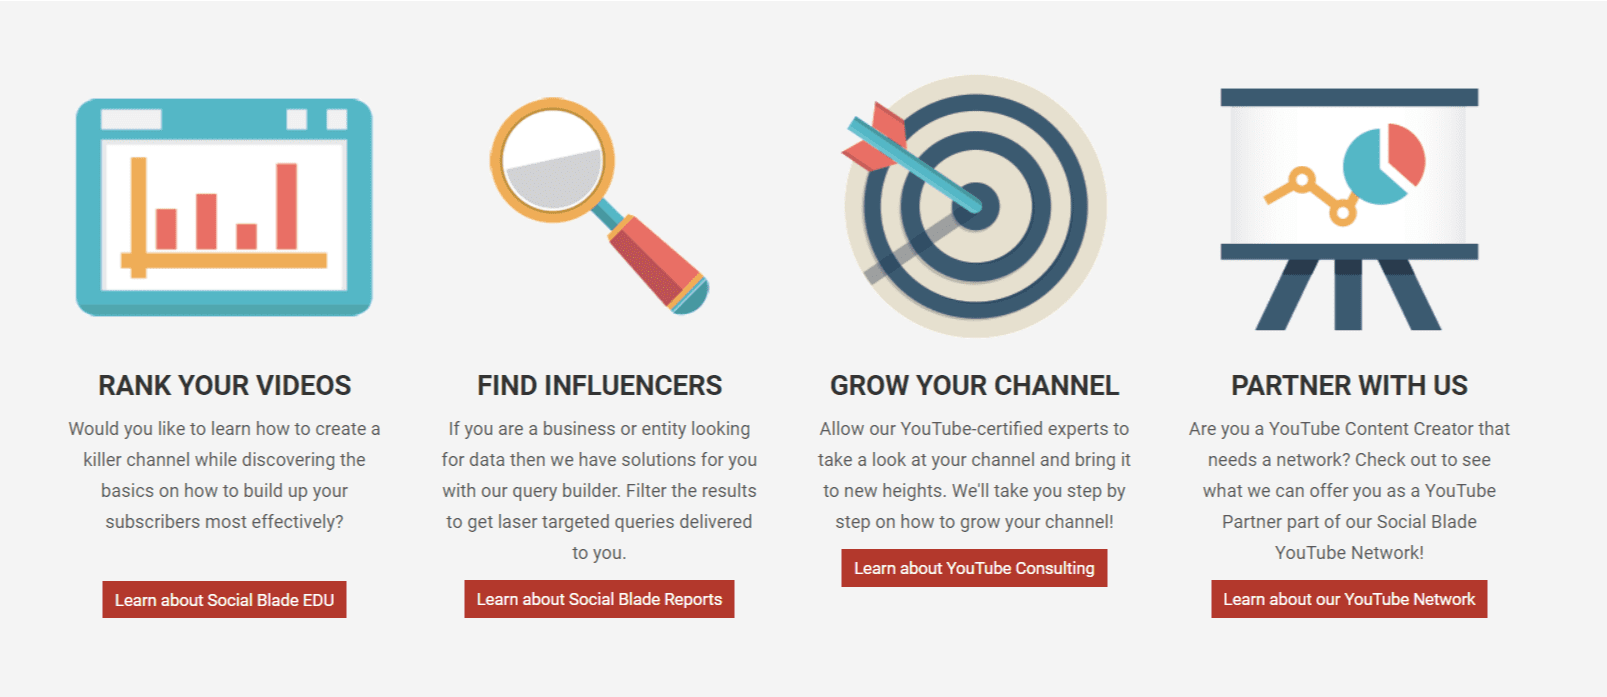
Social Blade
Want a deeper understanding of user growth and trends?
Utilize Social Blade – clear leader and #1 authority for digital media news – to track user statistics on YouTube, Twitch, Instagram, and Twitter!
Segment is another great extension to analytics, providing you with additional data and off-the-website data per user.
So you can track the attribution and behavioral performance like scrolling down and going from one page to another, search intent, and user page visits individually – not as an aggregate.
This tool can track the path before the final conversion and analyze it.
It is open-sourced and free!
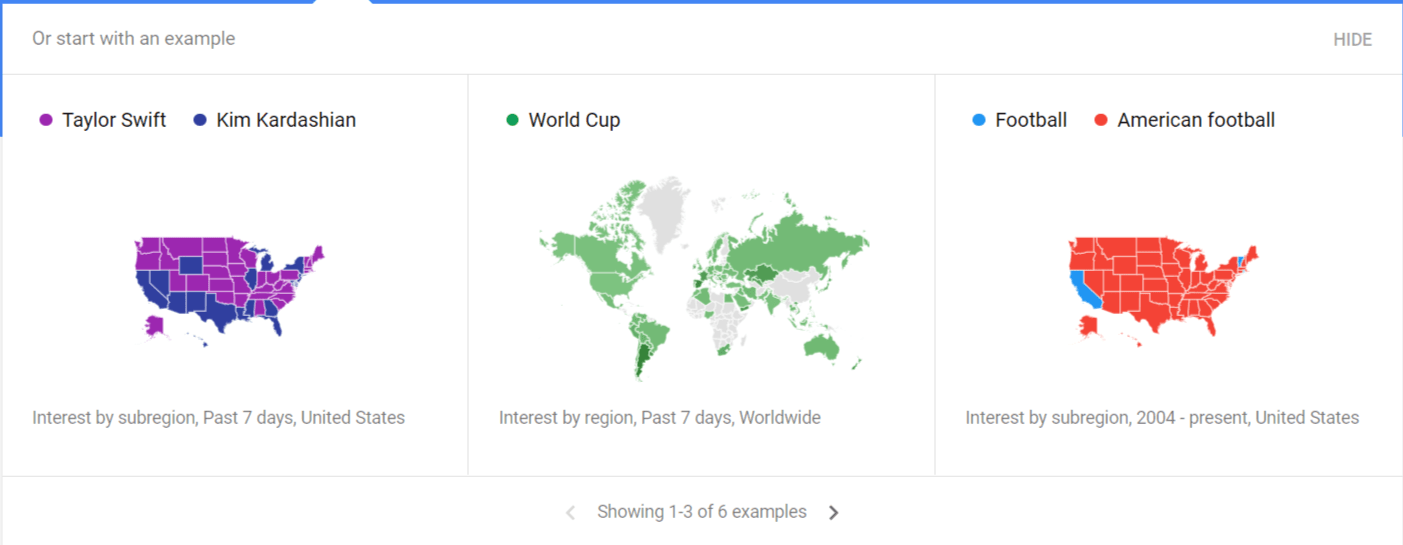
Google Trends – Explore what the world is searching
Can you guess the most searched topic in the USA for the last 7 days… apart from… Kim Kardashian?
Those who use Google Trends know that it’s a keyword search engine that analyzes the most searched topics and volume to give real-time search data.
Google Trends is the no-brainer tool to personalize marketing campaigns for a specific region.
Our research department uses Google Trends to help identify certain trendy topics and where in the world they are searched.
SocialBee.io
If you’re looking for a solution to post on all your social media profiles from one place, SocialBee’s here to help.
SocialBee is an easy-to-use social media management tool that helps businesses make the most of their social profiles.
Are you looking to post fresh content regularly? With SocialBee you will save plenty of time while doing it because you can easily just automate the process.
You’ll not only enjoy a user-friendly interface, but also you’ll get the possibility to categorize your content, just like top social media specialists do.
This way, your audience will enjoy the best mix of content.SocialBee’s main benefits:
SocialBee allows you to recycle your evergreen content.
You can easily import content from various sources and edit it in different formats.
You can post and customize content for the following platforms: Facebook, Twitter, LinkedIn, Instagram, Pinterest, and Google My Business.
You can generate your own posting schedule based on best practices for each platform.
SocialBee’s Collaboration Features help you and your team collaborate better and work together efficiently.
Siftery.com – Take full advantage of best-in-class tech stack data
This tool is a goldmine!
Siftery is an online platform that allows businesses to discover, buy and manage their software tech stack and track their competitors.
Atop the high-quality software products and companies database – Siftery automatically tracks its software spending and optimizes costs. And by comparing this with companies with similar stacks, it makes recommendations!
Venngage
Don’t know much about design but want to create killer infographics for your content? Don’t look further!
Venngage Infographics is the most user-friendly online infographic maker. The tool allows you to create infographics from thousands of professionally designed templates. You can customize your design as much as you’d like with hundreds of icons, charts, maps, fonts, and colors accessible from their library.
Venngage top 5 cool features:
Brand kit – save and apply your own styles
Free access to thousands of icons, charts, and maps
Team collaboration – add and manage team members to your account to make communication and editing flow seamlessly.
Upload up to 500 of your own images
Advanced photo editor
Photo library with access to thousands of stock photos
Napoleoncat.com
NapoleonCat is an awesome gem for managing sales force, customer care, and social media marketing platforms. Based in Warsaw, Poland – this digital marketing tool was founded back in 2011 to offer a plethora of valuable data and insights!
NapoleonCat – integrated with Facebook, Messenger, Twitter, Instagram, LinkedIn, YouTube, and Pinterest – allows to:
manage multiple social media channels
automate customer service
analyze marketing results
monitor and benchmark against competitors
collaborate within teams
automate reporting process
Benefits: NapoleonCat…
Gives more in-depth insights than the FB stats
Allows to manage both comments and users across the social accounts
Measures and analyzes your social progress – reach and engagement
Generates reports automatically
Tracks and monitors your competitors and industry benchmarks.
Citable Extension
Citable extension is a helpful tool to simplify the way you gather your research by collecting quotes, notes, and other data in a spreadsheet!
Our research specialist Artak highlights all the key benefits for you:
Collect and save information on autopilot,
Automatically save the page title, URL, and date,
Easily access your saved info with a click of a button,
Add tags to organize notes and accelerate analysis,
Forget about saving bookmarks,
Export your information to create a bibliography,
Print saved notes on sticky notes using Printable.
Feedier.com
Feedier is an organized and gamified feedback-gathering application for businesses to help better understand and strengthen customer relationships. Why games?? Cause our brains are inherently wired to games… and we love being rewarded through incentives.
Feedier lets you collect valuable feedback through an email, social media, or product app by providing an enjoyable unique gamified experience! They win, you win. The Feedier tribe pride itself on leveling the playing field and giving the customer what it deserves for its feedback.
In addition to being easy on the eyes, this new feedback collection method is entertaining, thanks to animations and rewards (vouchers, ebooks, Phil Collins tickets).
All the feedback is stored in one real-time dashboard that can monitor insights and KPIs. Submitting feedback needs to be fun and rewarding for the customer. Or else, why in the world would they do it?
Moosend.com
What do you call a magic cow? Moo-dini.
What do you call an easy-to-use email marketing platform for budget-minded businesses without the heavy price tag? Moo-send!
Moosend – ultimate marketing software – allows you to facilitate creating, managing, and monitoring email marketing campaigns and design and send eye-popping newsletters.
For the 5k contacts, the platform offers its services for free. Doubled up with the campaign reports and statistics in real-time.
With Moosend creating email campaigns are extremely straightforward with its drag-and-drop editor and 100+ ready-made templates.
Key features of the Moosend:
Includes a step-by-step Campaign Creation Wizard, which guides users through the process of creating email campaigns
Utilizes a visual workflow builder that includes subscriber welcome emails, abandoned cart reminders, and even lead scoring
Has a library of “recipes” of pre-defined automation to save you time during the setup process
Allows you to compare different email variations to maximize performance and delivery
Provides all of its functionality across all of its plans
Woobox.com
Woobox is one application to run numerous social media campaigns, sweepstakes, quizzes, lead gen forms, or any other interactive content at a reasonable cost.
The platform lets you track your entrants, stats, and traffic through your campaign dashboard.
Set up in two clicks: Upload your files and click the live button!
Screencastify
Sometimes you just need to put together a quick video. You want to show your teammate something. Highlight a process. Show them how you can do the job better.
But you don’t have time to open up DaVinci Resolve, the money to open up Premiere Pro, or the will to open up Windows Movie Maker.
Screencastify – Chrome’s most installed and trusted screen recorder – is the easiest and fastest screen capture editing tool we use here at TCF.
It allows you to record, edit and share the visual content you created within minutes.
With it, our SMM team can:
Customize the resolution and FPS of the video,
Annotate the screen using a pen tool,
Automatically save the videos to Google Drive.
The Lite version comes with a 10-minute recording limit per video and 50 videos per month.
Simple Gmail Notes
Perhaps you’re mostly satisfied with Gmail yet wish it had a few extra features — or even just an option to tweak certain parts of the layout. If so, the Simple Gmail Notes extension is for you.
Simply, using Simple Gmail Notes in Gmail would be like mixing peanut butter with chocolate! Simple Gmail Notes add amazing features to the everyday Gmail experience. It’s extremely useful, easy to use – works like a charm.
The private notes you attach to any email of your preference appear above the message in the Gmail interface — next to the subject line. The notes exist to help you keep track of information in emails, which is more than colored stars, folders, or labels offer. A few words in the notes give you enough clues about that email and help you find what you’re looking for faster and more efficiently.
Another important feature of this digital marketing tool is email summaries. This, again, can save lots of time if you want to find a specific abstract. To make the experience even more pleasant — experiment with different backgrounds and fonts to categorize emails.
The note will be automatically saved after editing and stored in your own Google Drive as a file.
Mail Tracker Extension
What happens after you hit ‘send’?
With the email tracking technology zooming in, the partnership department prefers Mailtracker. The tool shows when and where the email was opened, how many times, and the forwarded recipient.
But what makes the tool stand out among the rest is that at the bottom of the email, the tool shows that the sender is tracking them.
This way, we kill two birds at a time.
Firstly, the recipient sees we invaded their privacy, but not in a malicious way…
And secondly, thus we create more responsibility in answering back to our emails.
Calendly.com
Remember the time you wasted matching schedules with a person you wanted to meet??
Sending emails back and forth until you finally agreed on a day? If you periodically schedule a meeting with clients or partners – Calendly is the tool to find the available time slots and call them.
Choose your preferred and blackout dates, available times, meeting lengths, and several events per day, and share the link.
The time they chose will automatically be added to your calendar!
Improve your website conversion rates with Poptin
Improving your website conversion rates can be a big pain. You should consider many things – such as improving your site speed, having better UX, and so on.
But all of these things are hard to implement, expensive, and require a lot of your resources. On the other hand, using popups is one of the fastest ways to improve your conversion rate.
Popups are triggered by users’ behavior and delivered in the right context. Their only goal is to help you convert more people into customers and email subscribers. Popups are different “windows” triggered by users’ behavior and delivered to them in the right context. They aim to convert your website and visitors into email subscribers or customers.
You can convert twice as many people with an eye-catchy design, great copy, and fantastic offer. But, the biggest problem lies in “creating” those popups. Without some particular tools, it’s very hard (and expensive), to manually design and develop them.
Fortunately, tools like Poptin allow you to create beautiful popups in a fraction of the time and thus improve your conversions.
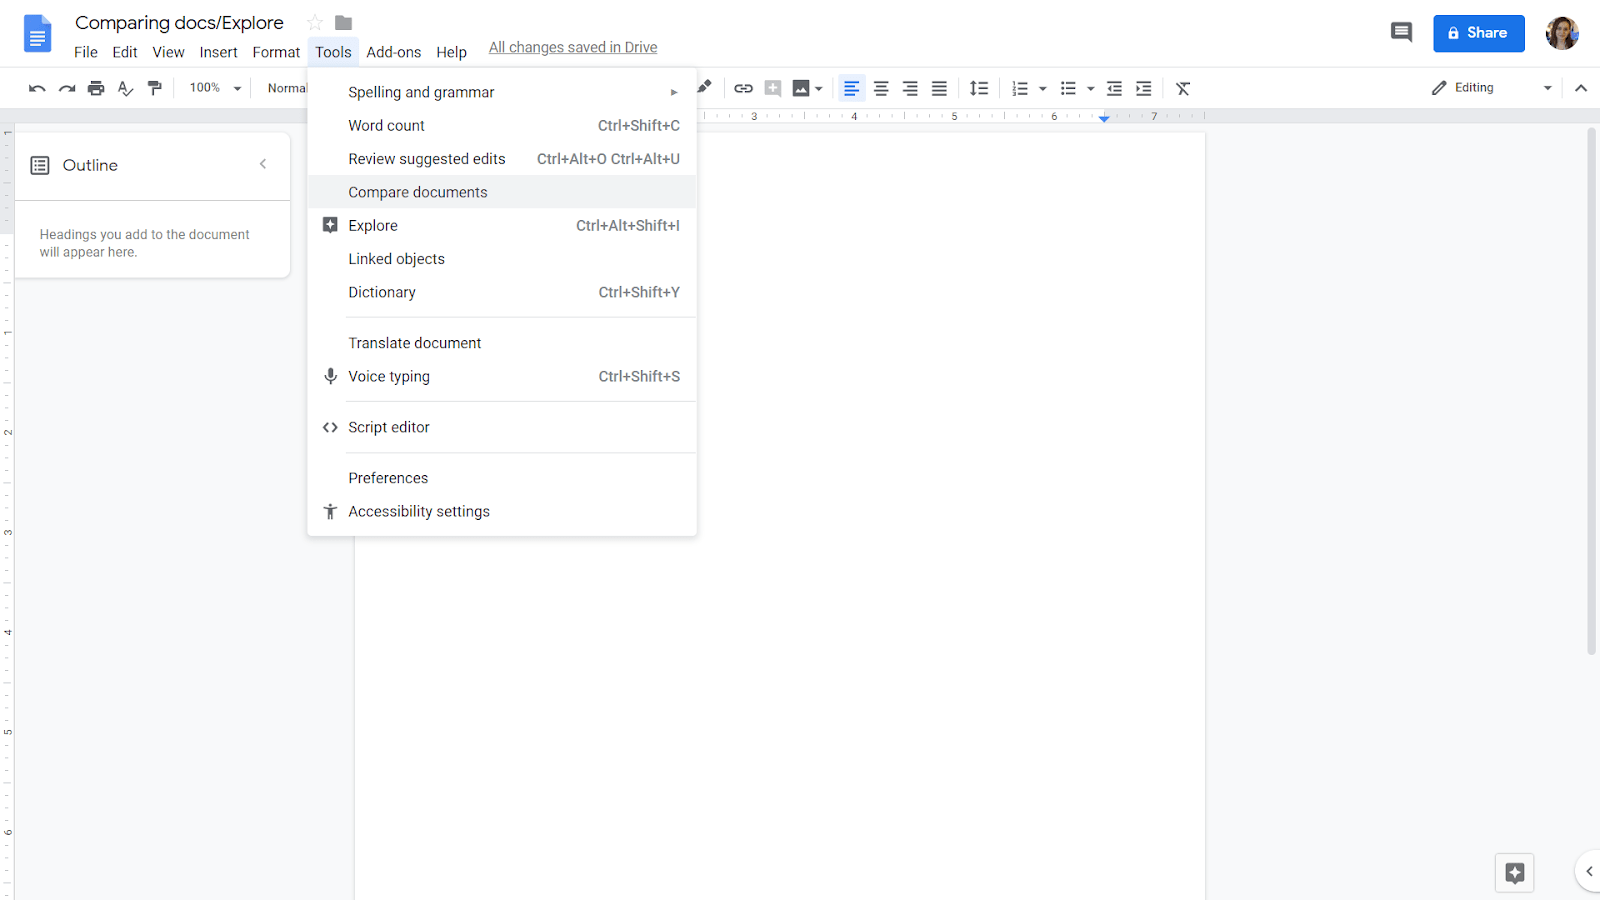
Compare Documents In Google Docs
Active users of Google Docs are aware that Google is constantly improving its functionality, adding new features to make your daily workflow more effective and simple. Surprisingly, many of these run years behind everyday MS Office features—yet we rejoice every time Google seems to reinvent the wheel!
This time Google added the Compare two Google Docs feature. Comparing 2 docs in Google has never been this quick and easy!
Comparing Google Docs is simple:
Open one of the Google Docs you want to compare
Click on “Tools” in the left upper corner, choose “Compare Documents” from the dropdown menu and then select the second doc
Once the comparing process is finalized, you’ll get a new file to see all the differences that the tool managed to detect.
That’s it! Using Google Docs to compare documents is that simple.
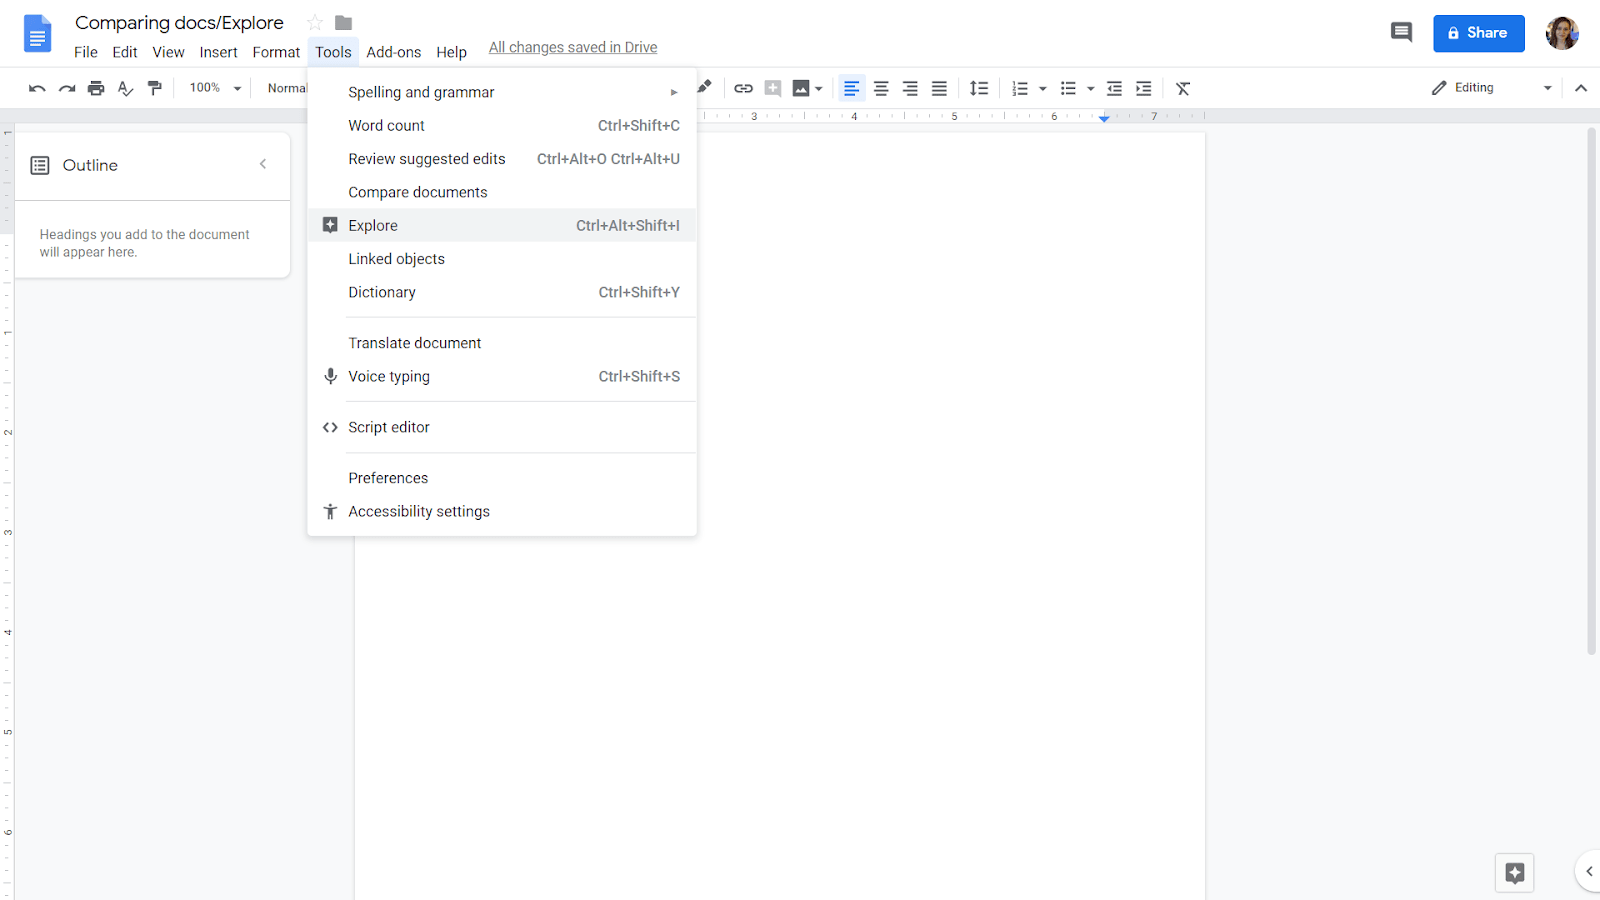
The next Google Doc function that might come quite handy is searching the internet from within the doc—without leaving the tab or browser.
Again, Google makes this easy:
Select “Explore” from the same menu, right-click the menu, or press Ctrl+Alt+Shift+I on Windows (Cmd+Alt+Shift+I on Mac)
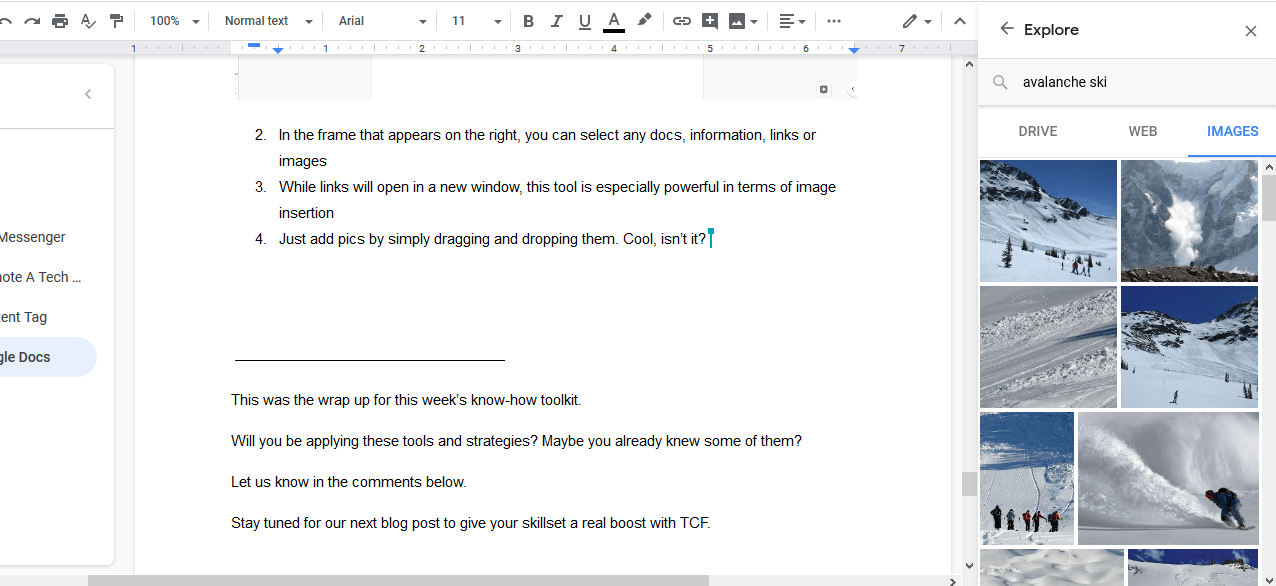
In the frame that appears on the right, you can select any docs, information, links, or images
While links will open in a new window, this tool is especially powerful in terms of image insertion
Just add pics by simply dragging and dropping them. Cool, isn’t it?
Automate Gary Vee’s $1.80 strategy To Boost Your Network
“$1.80 Instagram strategy translates to leaving your personal .02 cents on the top 9 trending Instagram posts for 10 different hashtags relevant to your brand or business daily.”
In other words, Garry Vee suggests we choose 9 trending posts with 10 different hashtags that are relevant to our niche and leave a comment to boost our visibility. He advises us to repeat the same steps every day to see tangible results.
Want to hear my ultimate tip to achieve top-notch productivity?
Whenever something smells like repetition, look for automation!
Which, in most cases, is synonymous with a careful scroll through Phantombuster’s magic Phantoms.
And this time, too, I wasn’t wrong!
To save yourself the tedious legwork of finding 9 trending posts in each hashtag category to interact with every single day, Phantombuster has just released simple automation to take the manual flair away from your networking routine.
Ready to get your hands on it?
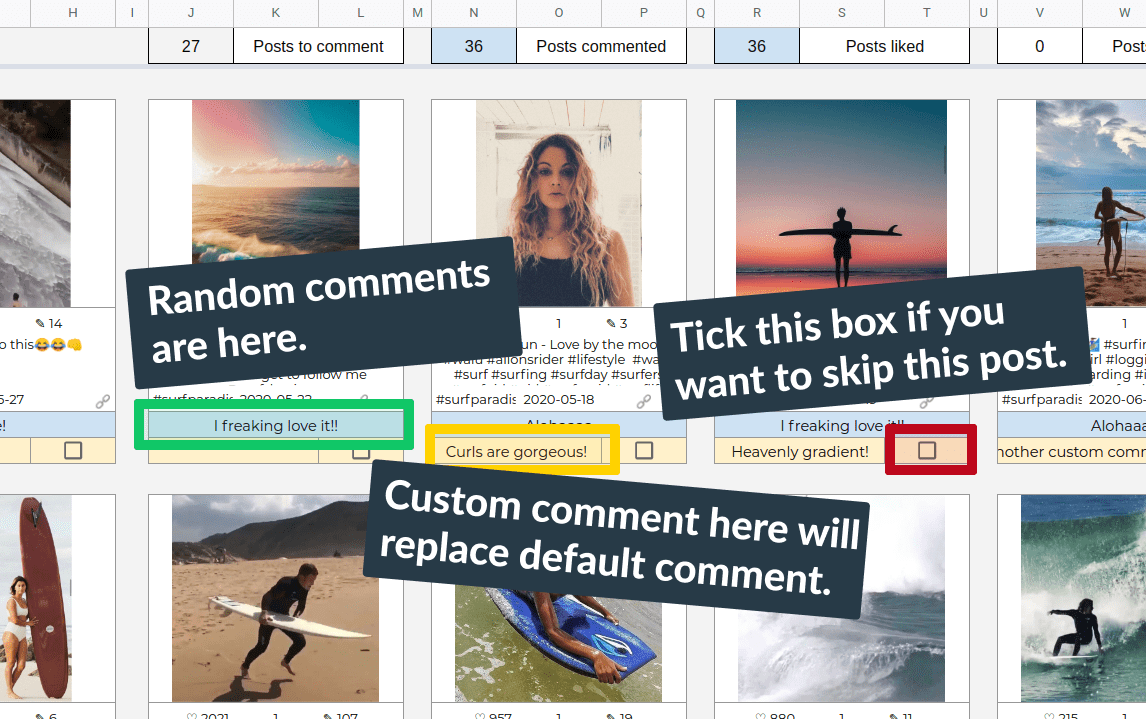
Step 1: First, choose 10 valuable hashtags that are most relevant to your niche and business
While the temptation may be big, my advice is to stick with rather smaller hashtags so you don’t lose relevance and get lost in the never-ending threads of comments.
Because remember—dropping a comment is not the final goal. Getting people to interact and remember you for it is!
Step 2: Extract the posts with the relevant hashtags
Once you’ve picked your 10 hashtags, it’s time to extract the 9 trending posts in each hashtag category.
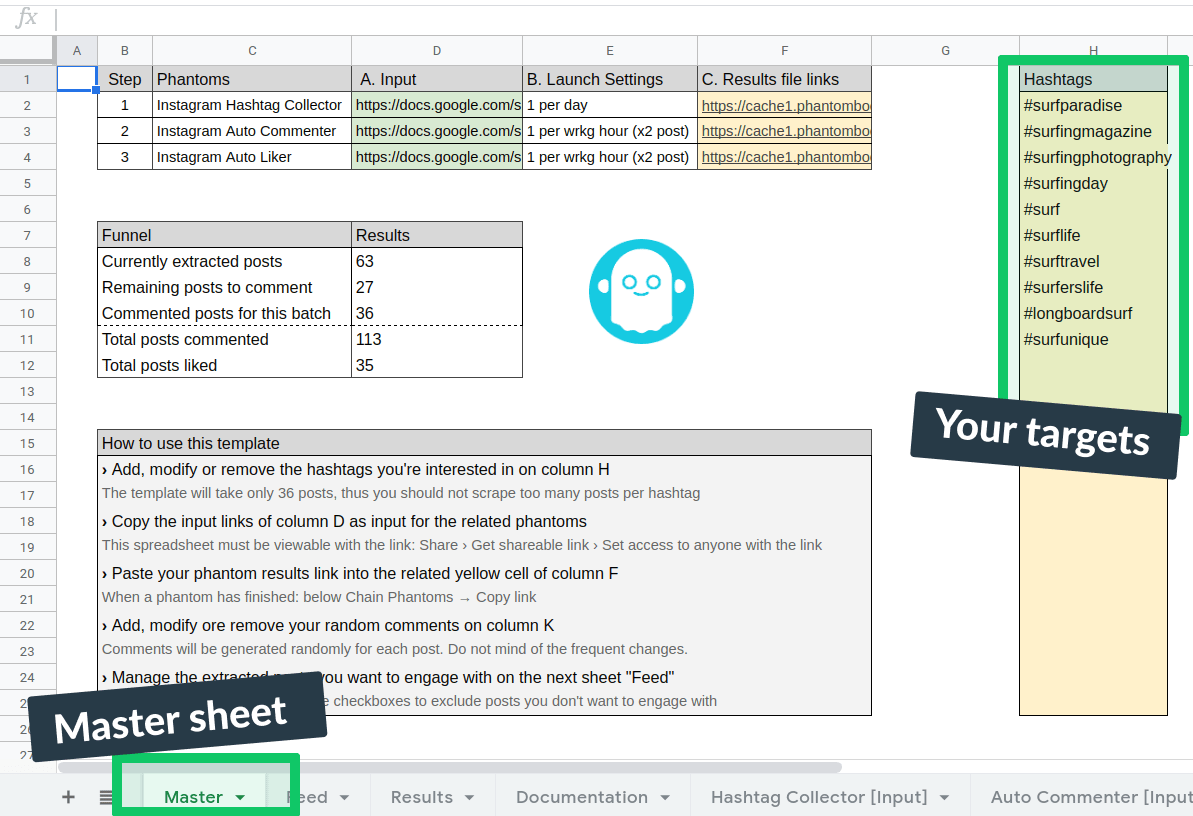
To do this, first copy this template. It will be your main dashboard. In the Master sheet, input the 10 hashtags you’ve chosen.
As an input, give the URL from cell D2 of your Master sheet from Step 2.
Scrape 9 posts per hashtag.
Scrape 10 hashtags (lines) per launch.
In the “Advanced settings,” pick “Repeatedly,” then “Once a day” to refresh the posts you comment on every day.
Also, in “Advanced settings,” under “Folder Management,” pick “Delete all previous files at launch” so that you process new comments every day and keep the spreadsheet light.
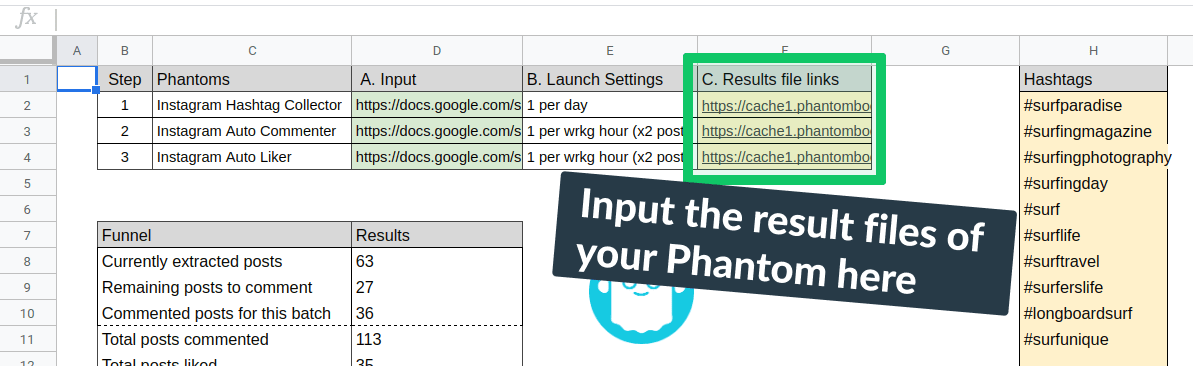
Launch the Phantom and paste the resulting URL into the F2 cell.
Now navigate to the “Feed” sheet, where you’ll find the top 9 posts with each of the 10 hashtags extracted and laid out for you.
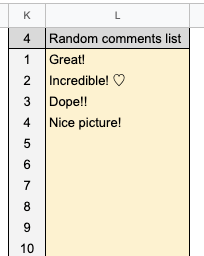
Step 4: Write the default comments
Now, navigate to the “Comments” section of the Master sheet and write in the comments that will randomly appear under posts.
Make them sound inspiring to convey your excitement and encouragement to the publishers for the great content they produce. Because at the end of the day, who doesn’t want to hear a word or two about how appreciated they are?
Now, return to the “Feed” sheet, where you’ll see a cell below every single post. This is where your randomly chosen comment will appear.
Step 5: Customize the comments you want to change
As with any other automation, the only drawback of this Phantom is that your comment will never be hyper-personalized to speak to just one particular post because… it’s just automation!
However, if you want to write a personal comment under the few most relevant posts, you can still do it!
In the green cell, you’ll see the randomly chosen comment from the list of comments you’ve input in Step 4. If you want to replace it with a personalized note, type your variant in the yellow cell instead.
While posting your comment, the Phantom will automatically pick that one.
If you don’t want your comment to appear on the post at all, just check the tiny box in the upper-right corner of the post.
You are all set to launch the Phantom and ignite your Instagram network!
Just make sure to do this slowly but consistently.
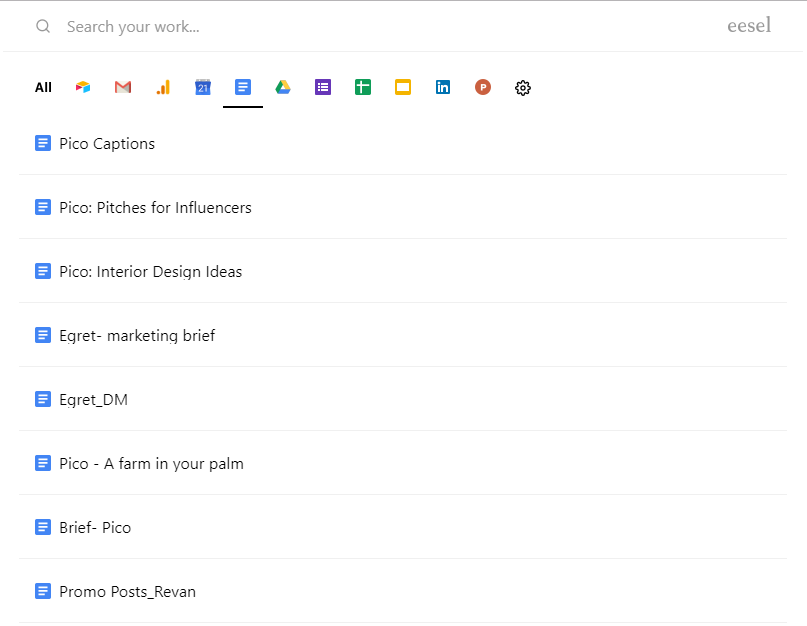
eesel to Find All Your Docs and Tools In One Place
I’ve switched between various productivity extensions, yet the customizability and simplicity of eesel are second to none. eesel automatically classifies your documents and the digital marketing tools you use to display in a neat overlay every time you open a new browser tab.
Previously, as I mostly accessed the Source/Medium tab from my Google Analytics Home page, I would go through several steps every time before I reached it. Now I can bypass those by simply tapping on the Google Analytics icon on eesel and, from the most frequently visited tabs, choose the Source/Medium to immediately land on my desired page. Convenient!
You can also personalize your eesel interface by adding any tools you use and removing ones you barely do. It also allows you to search both in the title and in the content of your documents, so you don’t have to navigate through folders again.
Moreover, it is free and simple to install with no registration or integration with your tools needed.
4 Growth Hacking Tactics To Revamp Your Marketing Campaign
Let’s start this week’s Know How with 4 eye-opening growth hacking tactics by the world-renowned growth hacker Julian Shapiro.
While running an advertising campaign, it’s common to target countries as a whole. But Julian Shapiro suggests you target just one location at a time—say San Francisco—instead of spreading all your advertising efforts over the entire US.
To amplify your visibility, you can expand your ad channels to include Pinterest, Google Display, and other relevant social platforms. The same narrow geotargeting will harness a cumulative effect.
He also suggests an analog of this strategy tailored to Influencer Marketing. Repetitive posts squeezed over a short time period are more likely to inspire immediate action.
Growth Tactic #2: Cross-Targeting Between Different Channels
Different social media platforms harbor varying converting potentials regarding different products. And this shouldn’t be correlated to audience relevance on the platform.
The ad of your B2B software will likely garner a lot more impressions and signups on LinkedIn than on Instagram or Facebook. However, most of your LinkedIn leads will never get halfway through your conversion funnel.
Shapiro suggests cross-targeting – spending money on other platforms to generate leads. And later capture them through retargeting ads on Facebook and Instagram. In combination, these will have a significantly higher converting potential.
Growth Tactic #3: Pay for Views, Not Subscribers
This means exactly what it reads as.
You may find many micro-influencers on YouTube whose videos get a substantial number of views—well beyond what their subscriber base should indicate. It’s probably because they talk about a hot, trending topic that resonates with the masses.
These are the influencers you want to partner up with! With their modest number of subscribers, they’re also likely to charge you much less than their “popular” competition.
Growth Tactic # 4: How Gmail Decides What to Send to Spam
Whether you run an email marketing campaign or influencer outreach, you first must ensure your prospects can see your email in their inbox—not disguised among the noisy promo of their spam folder.
Gmail has released a robust set of guidelines that explicitly lay out the steps you need to follow to ensure your emails don’t land in people’s spam folders.
Here are just some of the highlights articulated by Google:
Make sure your domain is authenticated
Turn on DKIM signing, and publish DMARC and SPF records
Send emails only to engaged users
Make sure users can confirm their subscription
Let users unsubscribe
Monitor senders who use your email service
Increase sending volume slowly
Monitor affiliate marketers
Format your messages for inbox delivery
Troubleshoot mail delivery problems
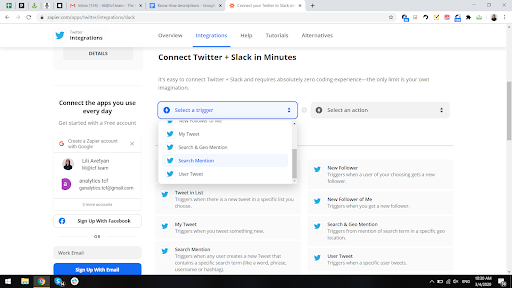
Get Your Twitter Notifications On Slack
What do you do when on top of all your tasks, you can’t afford to miss any news in your niche and can’t possibly use all the social media channels to stay updated? Or, in this case, what if you need to follow updates on Twitter, but you’d rather use a different platform?
Here is my little hack to declutter your workflow.
You can integrate the platform you rarely use – Twitter, in my case – with the app you love using every day – Slack.
And to join the two buddies, let Zapier act as the middleman.
Zapier lets you connect Twitter and Slack by choosing specific triggers and actions.
As I needed to get notified every single time someone tweets something that includes the word or hashtag “crowdfunding”, I selected the “Search Mention” trigger and the respective action to be sent a private Slack channel message every time someone mentions my search query.
Get Your Twitter Notifications On Slack
Easy.
New Audiences in Pinterest Group Boards
With 320 million active visitors every month, it’s high time you considered Pinterest your next marketing funnel.
Pinterest is famous for its boards, and there are two types of them—Personal and Group.
You can have your own personal boards to save your pins. But you may also have a group board where there will be more contributors besides yourself. And this is a huge advantage. More contributors mean more pins throughout the day.
And they both mean more activity on your board which is crucial for Pinterest.
Besides owning one, you can also ask to join others’ group boards, become a contributor, and access a huge target audience in your desired niche, be it technology, beauty, or pets.
People following group boards are usually united by their passions and shared interests. Most of them may be living in an area or be within the age bracket you’re interested in.
A piece of advice as you go about making your first promo post—make sure it looks organic. People are largely repelled by popping ads or direct promos on places like Pinterest, where they come for daily inspiration ideas or entertainment.
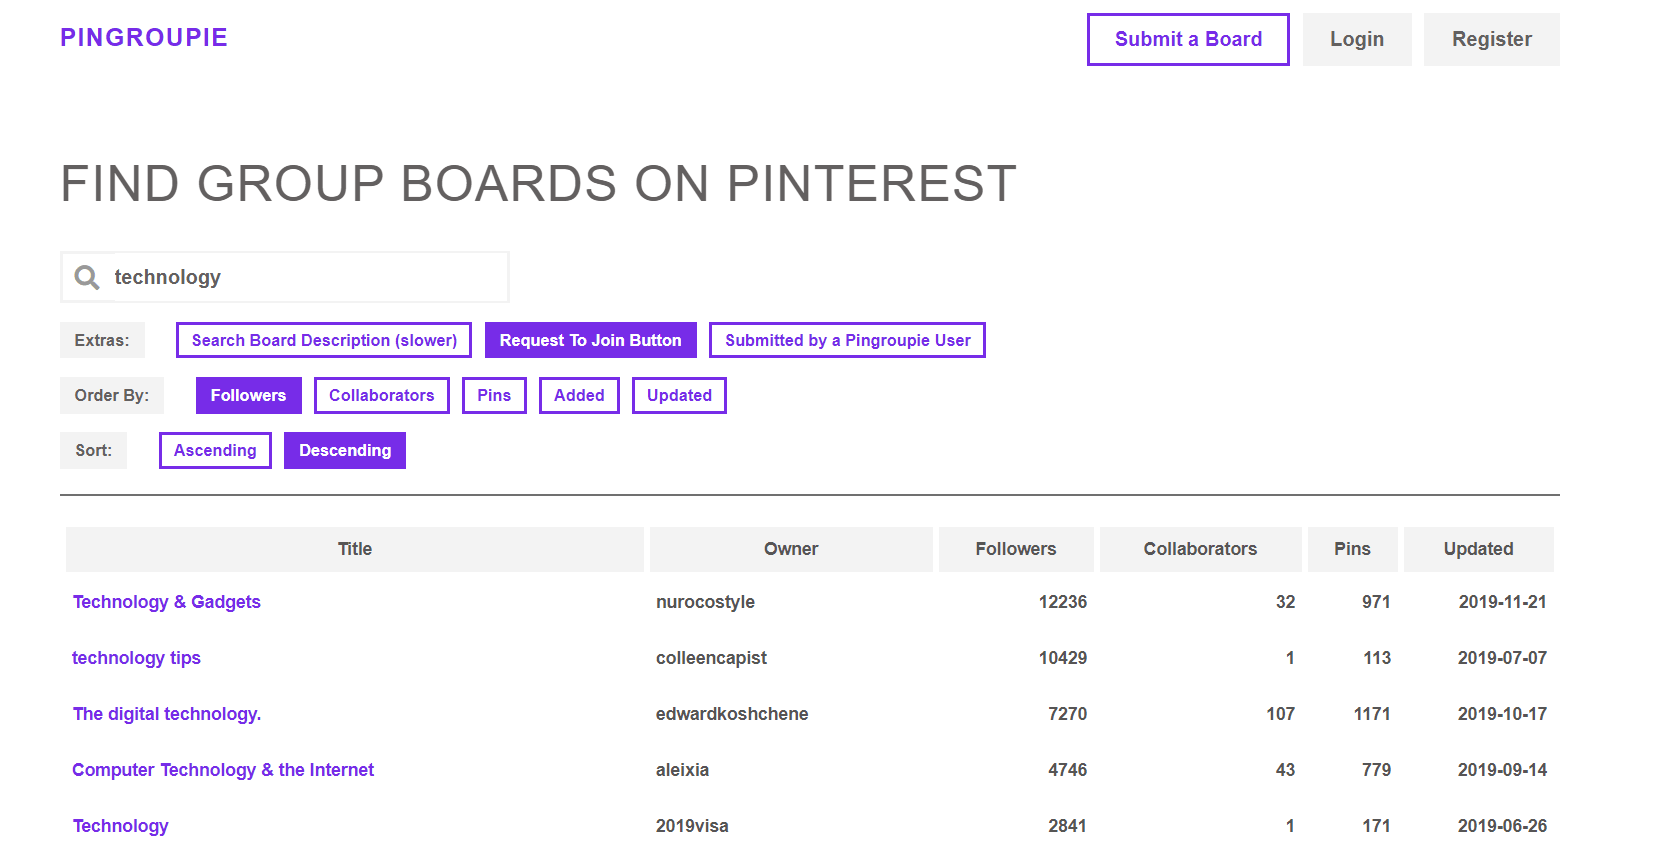
Pinterest GroupBoards Finder
Inspired by some of the benefits of group boards that Sona laid out? Looking for some good groups to join on Pinterest?
I was in the same position as you just a week ago, searching for boards in my desired niche with the “Request To Join” button. It took so much time that I started to look for some handy automation to streamline the process.
With PingGroupie, all left to do is pop your niche name into the search bar and set the order by the number of followers, collaborators, or other metrics. Within the span of seconds, the tool will roll out a Pinterest group board according to the preset filters. Easy!
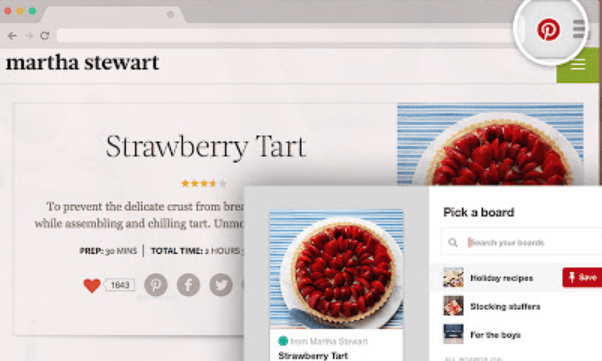
Save Faster with Pinterest’s Save Button
The Pinterest Save button lets you save any visual you find around the web on your Pinterest boards, so you can revisit them later.
Just click to save dinner recipes, style inspiration, home projects, and other ideas you want to give a try.
The Pinterest Save button also has built-in visual discovery technology. Hover over any image and click the visual search tool to instantly discover visually similar ideas on Pinterest.
Master Google Search Like A Pro
Google is generally pretty good at finding what you are looking for. But there are some lesser-known hacks – cleverly dubbed “operators” – that will make your Google search insanely effective by surfacing only the results most relevant to you.
Let’s look into some of the most popular ones!
A commonly-used tactic while searching for the exact word or order of phrases is wrapping them in quotation marks. Say “tech editor”—a classic PR search! This is a great way to exclude all the non-relevant results that may have otherwise sneaked into the SERP.
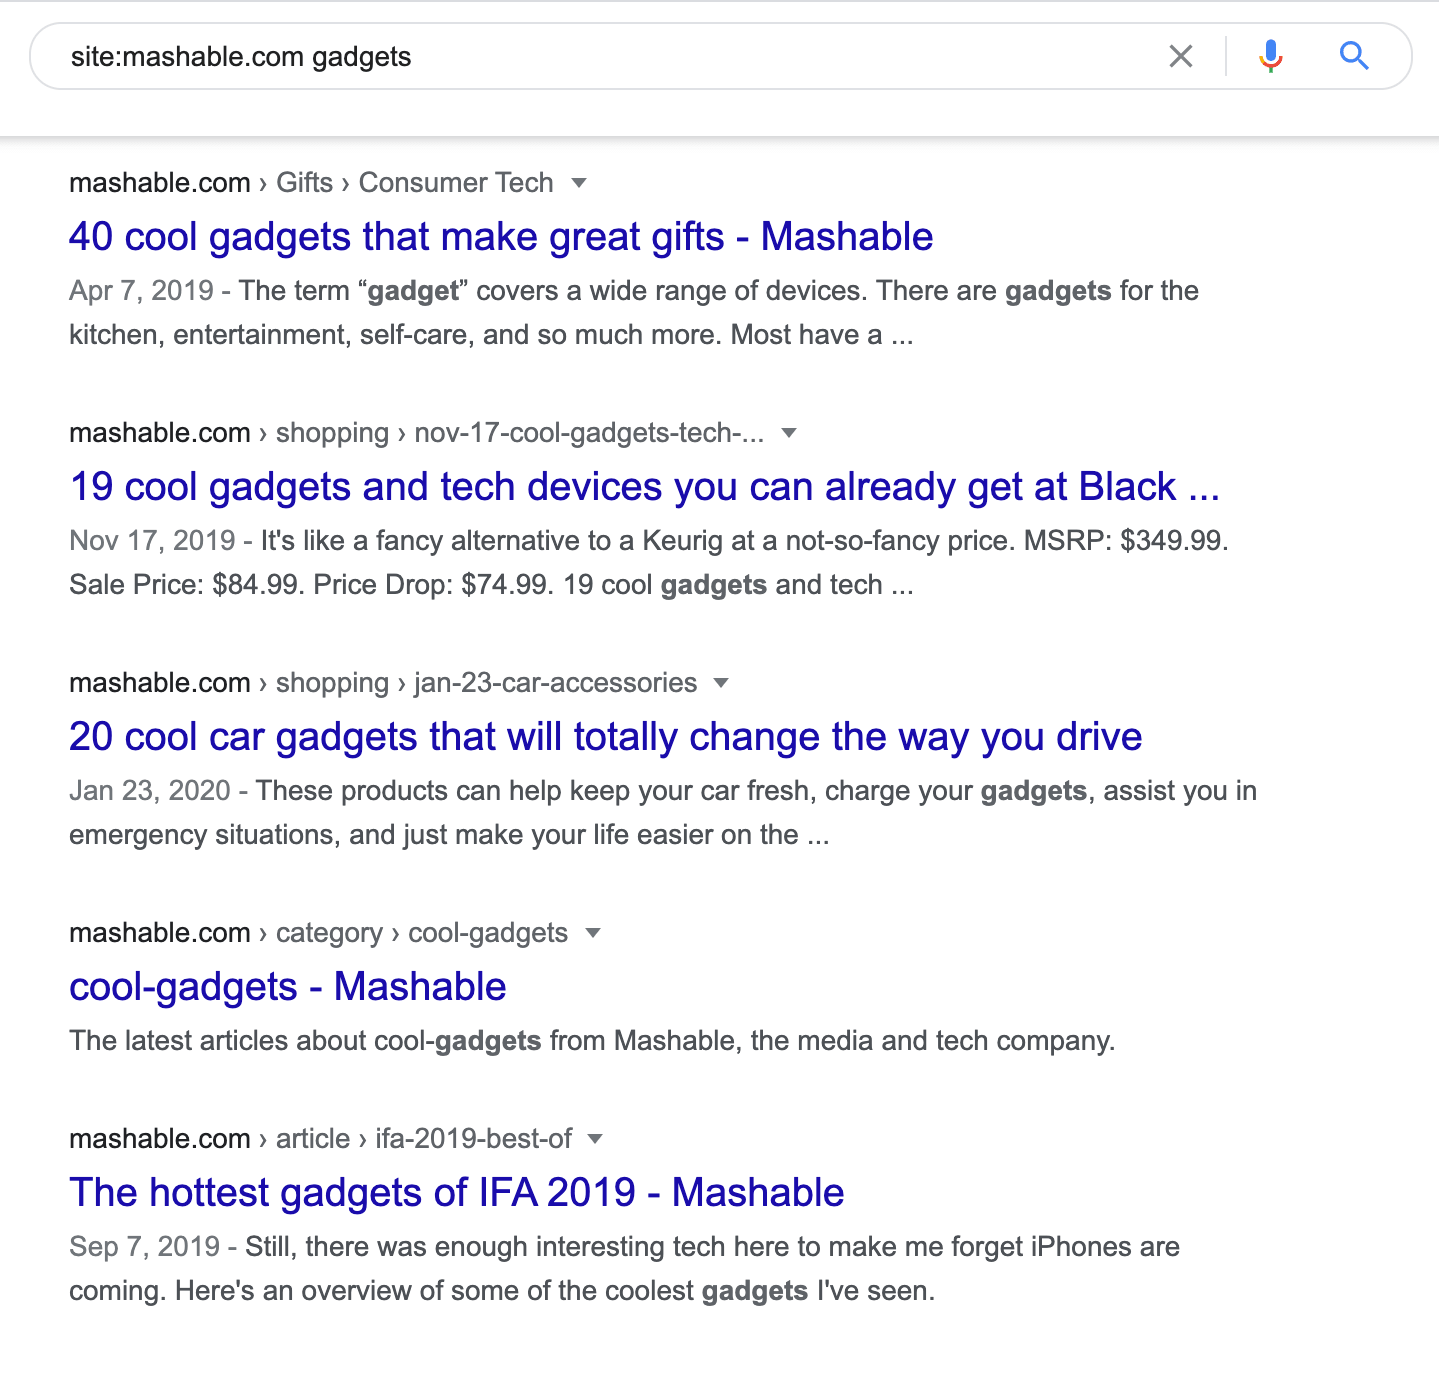
And suppose you want to find all the tech editors in a given media publication. In that case, you can use the ‘site: domain’ operator to trigger Google to search just within the boundaries of the given domain.
The combination of the ‘site: Mashable.com’ and ‘“tech editors”’ will return your list of tech editors from Mashable.com only.
You can easily swap the domain with any other media outlet to discover new journalist profiles within the same technology niche. Or… you can take a different spin and instead of searching by journalist profiles, search by the topic while still keeping it narrowed to the same domain-bound search.
Pop ‘site:mashable.com gadgets’ into the search bar, and Google will display all the articles about gadgets on Mashable.com. Scan them quickly to find their authors.
TCF Protip: Be sure to apply a timeline to filter out only the most recent articles. A journalist’s niche has been proven to be quite volatile at times. So there is always a chance that a tech editor from 5 years ago may now well be a market trend analyst, or who knows, a lifestyle guru!
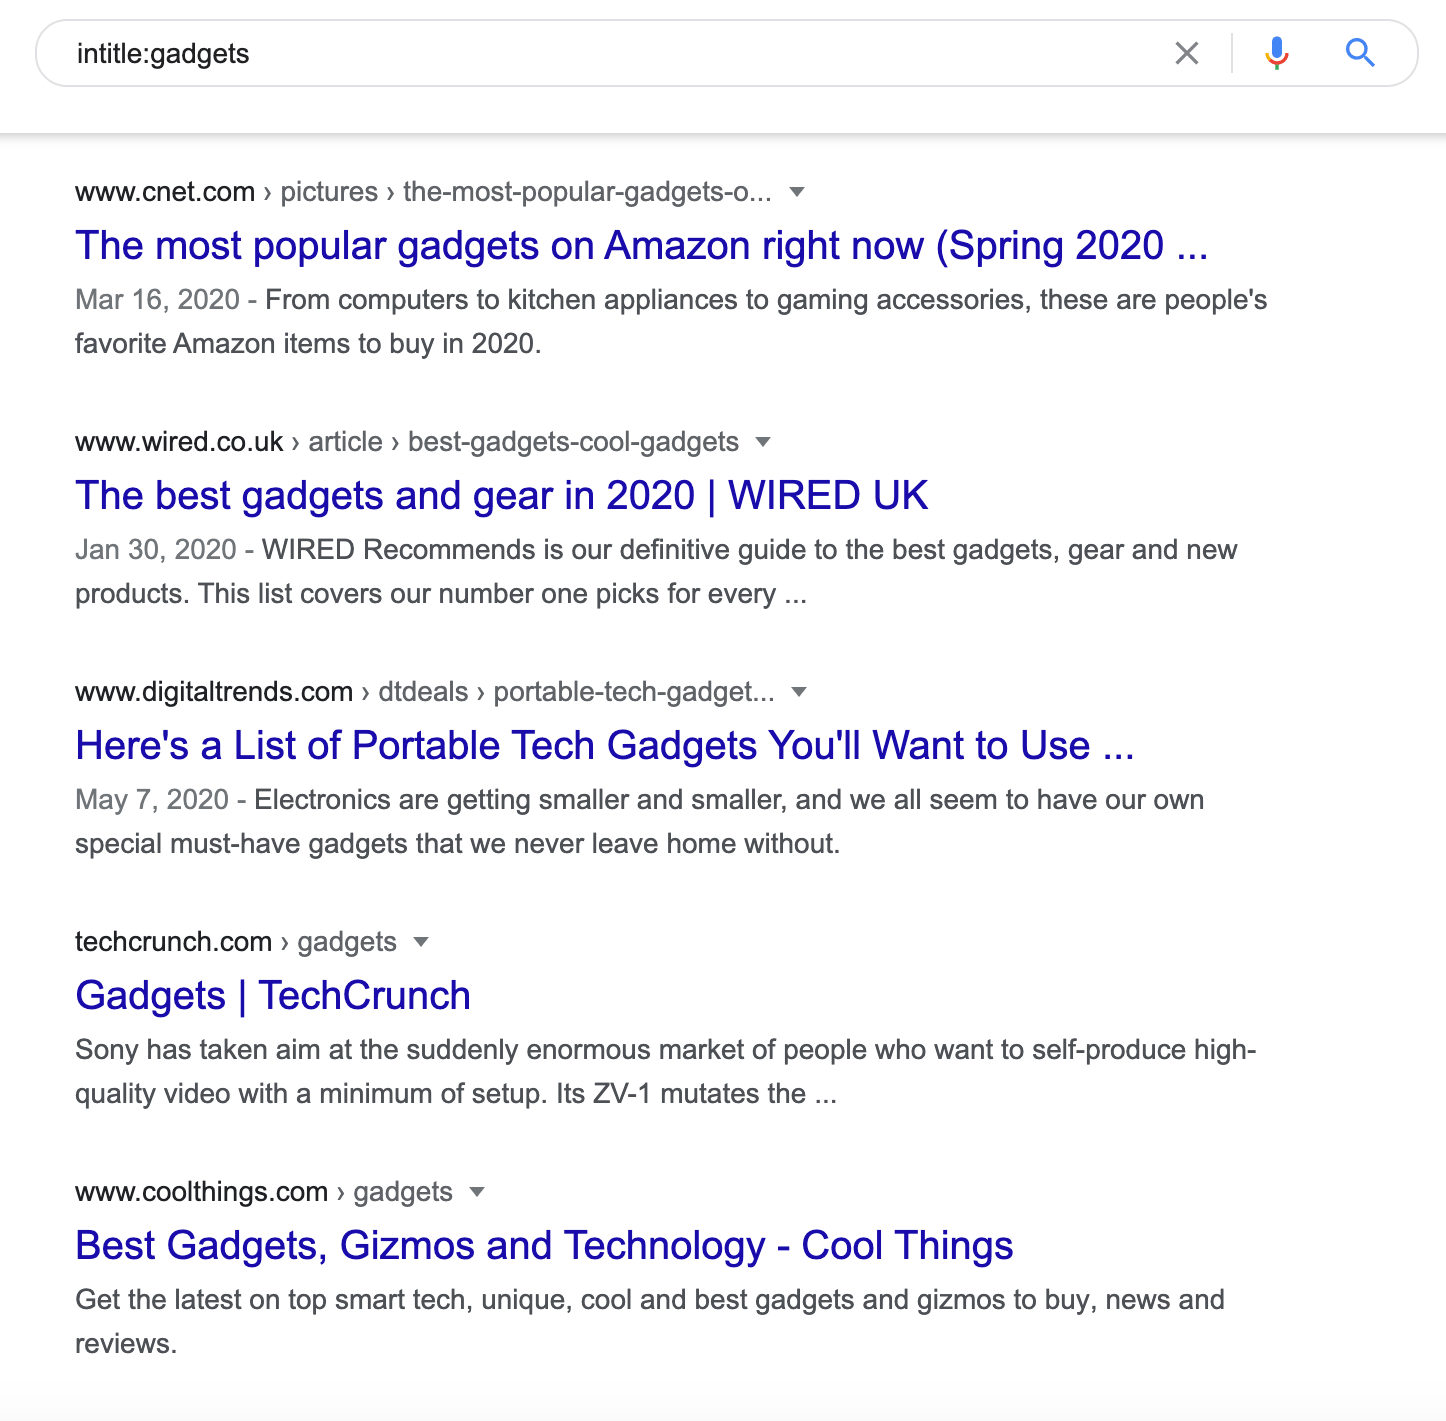
Sometimes you may need to find articles with an exact set of words in their title. And you won’t be the only one. Otherwise, Google would have hardly designated a separate search operator to expedite this particular search.
The combination of ‘intitle’ with your keyword in the search bar will roll out all articles with your keyword in the title. Because I didn’t define a single website to narrow down the search to in the following example, the returned results span hundreds of different domains!
Here is another cool operator combo: search for journalists based on their LinkedIn profile information. Type in ‘site:linkedin.com intitle:[publication name] + “[position]”’ and Google will show you a cluster of LinkedIn profiles with the respective publication name and position indicated on them.
With a different operator in action—‘related:domain’, Google will display all the sites similar to the domain.
In response to my query below, Google did a good job identifying TechCrunch, TNW, Wired, and tens of other top-notch media outlets that publish tech-oriented content just like Engadget.
And we’ve only scratched the surface today. There are a ton of more advanced search operators that, if fast-tuned in various combinations, can significantly narrow down your search and extract the most relevant results from the rabbit hole of info.
I’ll leave you with this comprehensive blog post from Ahrefs to get your toes deep into the multi-layered yet ironically labeled simple science called Google search!
Because mastering Google search is mastering half of your PR campaign!
This Week’s Testing! SparkToro
Let’s be real. Market research can be notoriously hard.
Traditional forms and interviews usually generate to few replies, setting aside the selection bias problem of self-reported data that is almost always inevitable. Still, in order to do great marketing, you need to understand your audience—where they spend time online, what they watch, and who they listen to or follow—to build a customer avatar that best resembles your potential buyers.
Over the course of the previous weeks, we tested 2 great audience intelligence platforms—Quantcast and Clearbit.
And this week, we are excited to get our hands on yet another top-notch audience intelligence software – SparkToro – to weigh their benefits and pitfalls against one another.
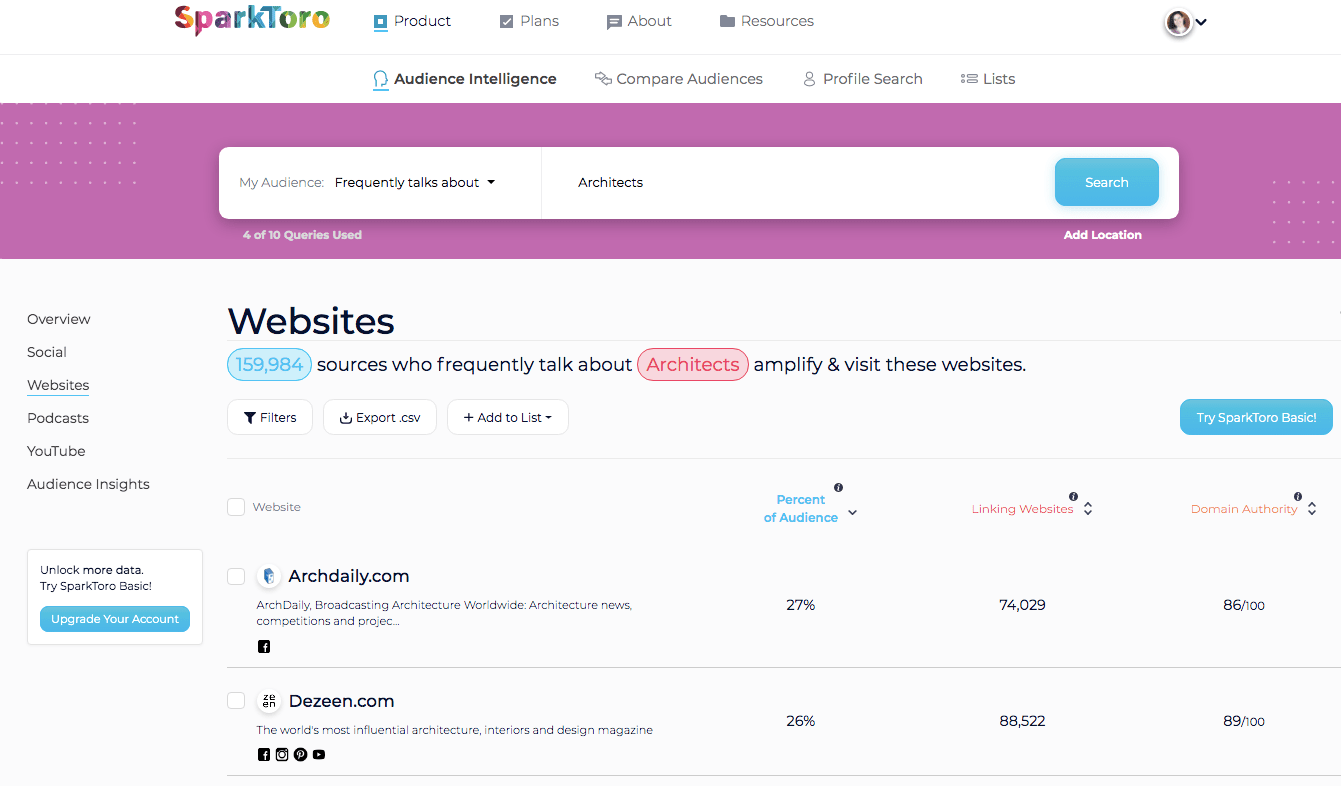
Co-founded by the Wizard of Moz Rand Fishkin, SparkToro, at its very core, is a massive database of distinct profiles and their behaviors, aggregated by crawling billions of websites and social accounts online.
You can type in your target audience in the search bar (say “architects”), and you’ll have the popular podcasts architects listen to, the websites they often visit, the keywords they use in their social bios. Even the hashtags they borrow for their posts – are all at your fingertips. You can even drill down your search to a specific geolocation.
Sounds lucrative, doesn’t it?
But will SparkToro outperform the other two? What will some of its drawbacks be? And what are its benefits?
Feedspot.com – Online Library at hand
There’s a common belief that people don’t read nowadays as much as let’s say… last century. However, apps, extensions, or sites pop up to offer a comprehensive platform to read all the top content.
This tool is intuitive and beautifully sorted according to the sites you choose to follow. It then gives relevant blog posts per site.
This is the ultimate goldmine for obtaining professional knowledge.
Ludus.one – Stellar Presentation software
You probably think, “Naah, another PP-like presentation tool”.
However, this is pretty much impressive software for creative professionals. As the maker – Vincent Battaglia, says in his article: “It’s like the 21st century PowerPoint”. Indeed, it looks stellar! By the way, Vincent was inspired by the Ludus planet of Ready Player One!
Versatile, cross-trained army of specialists
Know-how meetings also harvest workers who are resistant to change!
An equipped employee with a diverse set of skills and knowledge base:
1. Has increased productivity
2. Easily keeps up with new challenges
3. Becomes a highly competitive specialist in our and any industry
Your employees see value in your organization, and thus you decrease the chances of employee turnover.
Having a happy employee doesn’t eliminate the chance that some workers may leave your organization at one point or another. You should always keep an eye on employee engagement level: with some employee pulse survey tools, you can quickly identify room for improvement. So, here again – having a versatile employee is handy for productivity gaps. So you still have one big team to step into that role.
Let’s call this an effective development strategy!
“I’m a huge fan of our know-how meetings.
It’s kind of a challenge for me. Why?
Because I challenge myself to be better and be the best at whatever I’m doing.
This way, you can be the game-changer – you can be The Best 🙂 ”
Digify.com – Information security guardian
If you want an effective way to share confidential information with your company or partner, With Digify, you can protect, track, and, what’s best… watermark your documents.
Imagine Google Docs – but with a self-destruction function.
Imagine cloud file – but with special permission to print & download function.
For all security-obsessed people. Digify also allows tracking the access of a document with location and IP address details.
Zensurvey.com – Fighting employee turnover
Are you going to sit in your office and twiddle your thumbs while your team members leave?
For entering the corporate world, most companies conduct a pre-employment test that is very effective to know about the knowledge and skills of the candidate. Different companies take the help of the different types of tests that the candidates have to go through.
With Zensurvey – you create a questionnaire, and the tool sends it weekly to your employees for them to fill up.
It’s 100% anonymous and so 100% honest.
writeon.io
Who else doesn’t like it when you can’t copy text from a particular website?
What if I tell you that with this digital marketing tool, you can not only copy but also edit the text, save, and share it with colleagues.
Another online tool with the most awesome content of your choice.
Keep up with all the topics that matter to you. All in one place. Feedly compiles news feeds from various online sources for the user to customize & share.
windscribe.com
Are you having problems with your IP? Do you want to browse right from New York? Windscribers is here for you.
The best part of this is that it is not slowing down the connection.
Saaspages.xyz
With the 900+ collection of the best landing pages screenshots – Saas Pages is the holy grail for content writers and designers who are committed to creating copy that sizzles and sells.
SaaS world genius compilation with filtered blocks, best practices, and color palettes for each site build-in.
“We’re trying to make this the go-to guide when designing and building a landing page.” – quoting the founder Volkan Kaya.
It’s hard work that definitely deserves attention and appreciation. Hoping to see more content in the future.
SocialChamp.io
Social Champ, a social media management tool, allows you to curate, edit, design, schedule, and track content on your profiles. The tool supports Facebook, Instagram, LinkedIn, Pinterest, Twitter, and Google My Business.
With the vibrant and simple-to-use user interface, users can navigate the tool without any hassle. The cherry on top is their amazing pricing plans starting from as low as $10 per month!
Here are the significant benefits of using Social Champ to automate social media processes:
You get an all-in-one social media marketing calendar, which provides a grid view of all posts with options to add or reschedule content.
Auto RSS, bulk schedule, and repeat features enable you to automate social media postings by taking care of all steps.
You can track post analytics with platform-specific metrics for each social media channel and download customizable reports with presentation-ready graphs.
Fantastic customer service with quick replies.
You can recycle and repurpose old content by creating collections and utilizing them in upcoming campaigns!
Imgbot.ai
Ever seen a tool to resize, compress, crop, or watermark 100s of pics (up to 25 MB per file) in ONE place for FREE?
Here you go – Imgbot.ai uses powerful algorithms to process your pictures in batches and download them in a single ZIP file.
The tool is highly intuitive – you can easily drag and drop pictures or files to perform one of the aforementioned commands.
Tactic: Follow-up message as a first pitch
This was a pure mistake, which turned into a gold outreach tactic.
Instead of reaching out with your main offer, you just send the follow-up message first.
Typically, they get back to you saying sorry that they missed your first message — and asking to send the offer again.
In this way, you get the attention first, and only after that, tell your story.
Works like magic!
Deprocrastination.co
Deprocrastination.co is a time tracker and website tracker that takes only a minute to set up. If you’ve never used a time tracker or web tracker before, this one here didn’t require any sign-in, Alas! (unless you want to uncover the other benefits).
Choose the websites you want to block for a certain period of time to keep your active working hours going — away from social media.
Track how much time you spend on different platforms – minimize the use of the time-consuming ones and zowie, you are way productive!
This awesome tool was designed to simplify and ease the management overload of an individual and the team.
open-startups.xyz
Open-startups is a movement initiated by Buffer, where startup companies operate in the open and publicly share their statistics, metrics such as revenue, users, and traffic.
Companies turn into success stories and you and I can openly view and “be a part of that growth”.
HARO paid keywords
Help a reporter out – HARO is a great platform to quickly find sources and journalists for stories.
You receive three e-mails per day from your pre-set interests.
To get notified with the right and targeted keywords, HARO offers three different plans based on your intentions and budgets.
On the hunt for writers with ranker.com
Ranker.com goes far beyond the top 10 lists with deep rankings about everything – voted on by 1000s of people who have experience with what they’re ranking.
The results?
49m monthly unique visitors. Goldmine Content. Great insights.
The digital media blog covers everything from entertainment to food rankings.
So, if you are looking for opinionated experts or random bloggers to cover your niche project, you can use this webpage to search for relevant content creators and outreach them.
Toast – Safari & Chrome extension
If you are a research geek and open 125 tabs simultaneously, keeping track and focusing is hard.
Or…
Are you working on multiple projects with 2 or more different browser windows?
Geez… mess and the endless search for the needed tab.
THIS is for YOU.
Toast extension – is a session management tool, quite lightweight and simple to use, which allows saving all the tabs by organizing them into sessions.
By using Toast, you can:
Save and open all the tabs with one click
Name the sessions and view the full list
Bulk open or open a link URL
Add new tab/s from an open window
Update or duplicate the tabs
Make your workflow triple efficient
Save your computer memory RAM (my tiny Asus can breathe again, goodbye bookmarks)
Keep personal and work-life neat and organized
This is a godsend. My computer doesn’t have a lot of RAM, but I really like having a lot of tabs open. So now I am able to save them and still use the browser.
Salute, make a Toast of your tabs!
Wispform.com
Create beautiful and interactive forms and surveys in minutes using Wispform.com.
It has an intuitive and the simplest form of building creative forms, surveys, and quizzes there is.
A great alternative to Typeform, and with only &10/month, you can get all the advanced features.
Hone Your Creativity With Brad Hokanson’s Technique
We all have the desire to be more creative than we are now. But most of us are held back by the preconceived notions that creativity is an inherent quality — attributed to people of just a handful of professions — and can rarely be taught.
If you were to take anything away from my know-how, it should be that creativity — just like any other skill on the planet — can be learned through dedicated practice.
In fact, there is a technique adopted by Brad Hokanson. It’s simple. It’s fun. And it takes just 3-5 minutes a day.
But before diving into this technique, let’s understand what we classify as a creative idea. Creativity involves a new approach to everyday activities or repurposing items that surround us at every step.
Take straw as an example.
Its most common use case is for drinking sodas. But you can also use a straw for drinking mashed broccoli soup. You can even make colorful vases or twinkling white lights with straws!
And this is the basis of the practice called an originality development engine adapted by Brad Hokanson. Brad has taught creative and critical thinking for about 15 years, regularly holding lectures at the University of Minnesota.
You choose one item that comes to your mind, set the timer for 90 seconds, and start writing all the possible ways — even the most bizarre — an item can be used.
Moving past 3-4 applications at the start can be hard. But do push through the creative block as the most out-of-box ideas will likely arrive after the tenth when you have exhausted all the potential uses you’ve recollected across your experiences.
Once you finish the article, here is a little task to start immediately. Set the timer to 90 seconds and start pulling out a list of potential applications for the 3 items below.
Paper clip
Phone case
Pen
To get consistent practice every day, you can download the Originality Development Engine app for iOS.
And if you are an Android user, you are in good company!
Comment your list of applications in the comments below, and let’s practice together to get on track.
Syncari – Data automation platform
No-Code is a data automation platform that enables Revenue operations automation. It provides a unified data model that allows for the easy exchange of data between different applications and systems and the synchronization of data between multiple sources. This makes it easy to manage and analyze your data, ensuring you can make informed decisions about your business.
There’s no need for coding with Syncari data automation platform! Its intuitive user interface makes it easy to create, manage and execute automated tasks. Plus, its unified data model ensures that all your data is always in sync, making it easier to analyze and optimize your operations. So why wait?
Learn more about how Syncari can help you streamline your revenue operations.
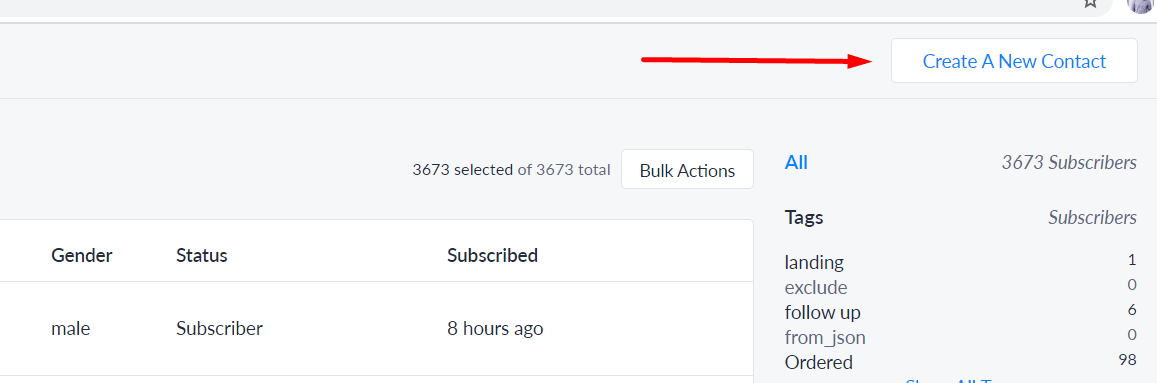
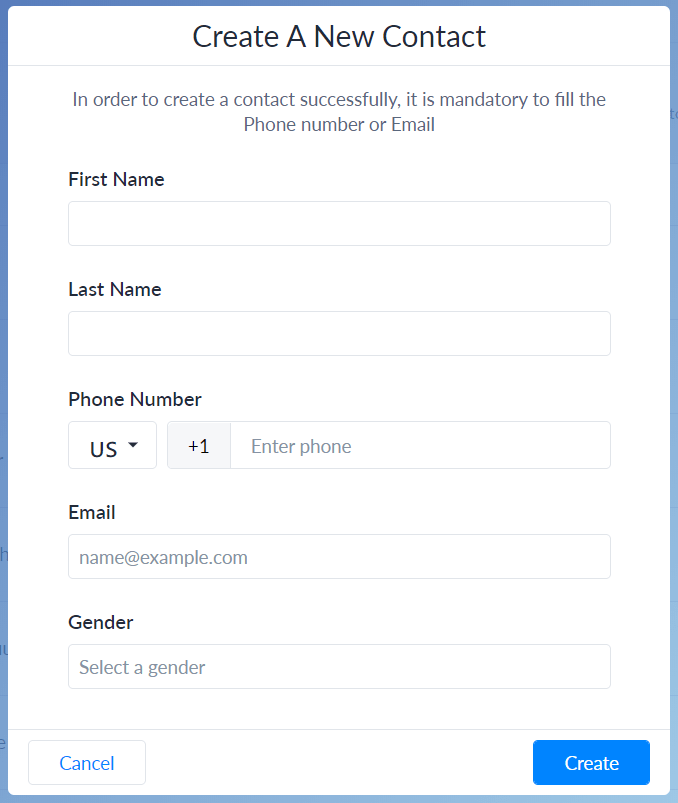
Manually Add Subscribers to Your ManyChat
ManyChat has recently rolled out a new capability that allows you to add subscribers manually to include them in your email or SMS marketing campaigns.
To access the feature, tap on “Create A New Contact” in the upper right corner of your ManyChat interface and fill in your lead’s phone number or email address along with their first and last names.
Needless to say, you first need to seek your prospects’ permission before you add them to your subscriber list. Otherwise, your spammy tactic may harm your brand reputation and damage trust among your leads.
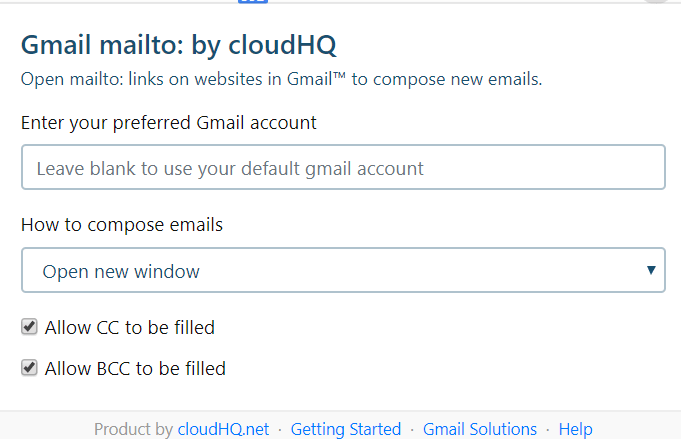
Mailto: Set Default Email to Gmail by CloudHQ
Do you recall the hundred times you clicked on “Contact me” or “Email” links on a website to be redirected to iCloud or Microsoft Outlook emails you hardly ever use?
It’s really annoying and takes up a lot of your valuable time. Turns out that this handy extension by Cloud HQ helps you bypass this inconvenience.
With Mailto, you can easily set your Gmail (or your GSuite account) as your default email client anytime you jump on a contact request online. You can also choose to open your email in a new tab or window.
While just a little hack, Mailto will definitely help you save a lot of time and energy you’d have otherwise wasted on copying emails every time.
(Although, if you’re feeling especially tech-savvy today, you can do the same in your Chrome or Firefox settings!)
Steps to Create a Powerful Content Marketing Process
Some marketers believe that if they stop churning out content every week, prospective customers will not find their business.
But it’s not true.
And why is that?
If you spend all of your time writing, you won’t have time for all of the other crucial content marketing process components.
However, finding enough time to spend on all of the other stages of the process can increase your chances of success.
Furthermore, there is a lot of competition in the content marketing world. It’s very easy for content you’ve worked hard to create to get lost in the sea of content published by other marketers.
This is why you need a process to help you plan every content marketing campaign from ideation to execution.
It starts with planning your campaign and researching your target audience and the channels you will use to distribute and promote.
Then, after planning, get creative. Write engaging content tailored to your audience. Content that will help you meet your business goals.
It doesn’t stop there, though:
You then have to publish, distribute, promote, and finally track the performance of each piece of content you create.
But wait, there’s more:
You also need to understand that this process is cyclical. Every stage of the content marketing process needs maintenance and refreshing to remain relevant and successful.
And although you should have it clearly defined, you should also make it flexible enough to adapt to changes depending on the data you collect from your analysis.
Now, are you ready to create your content marketing process?
Then check out this detailed infographic. It offers an in-depth look at the crucial stages of the process and what you need to do at each to succeed.
—————————
This wraps up this week’s Know How article!
Have you already installed the WhatRuns extension on your browser to stalk your competitors online? Have you tried it on our website? What are we running? Comment below if you can guess!
Or do you know what topics are spiking in popularity worldwide? There is DoorDash, Vegan Keto, AI-powered Chatbot, and so many more! Open Exploding Topics now and jump onto the latest topics in your niche to stay ahead of your competition.


Comments